Batch Operations: Add/Remove Routing Rules to Multiple Non-Group Reservations
Stay is enhanced to allow users to add/remove routing rules to multiple non-group reservations in the Batch Edit tab of the Batch Operations screen.
Feature Setting
The following new feature setting has been introduced to enable users to add/remove routing rules to multiple non-group reservations:
-
Name: Add or remove routing rules for multiple reservations
-
Value: Must be enabled
-
Comments: License is not required
Batch Operations - Batch Edit Tab
When the new feature setting is enabled, users can filter the reservations for which routing rules must be added/removed by selecting the date in the Arrival date picker in the Batch Edit tab of the Batch Operations screen. By default, the current property date is selected in this field. Users can select a date that is a maximum of 7 days ahead of the current property date (current property date +6 days).
The reservations are displayed based on the date selected by the users. The Routing Rule column displays the routing rules associated with the reservations, if any. When more than 2 routing rules are associated with the reservation, the first 2 rules are displayed in the Routing Rule column followed by the number of rules in brackets. When users hover over, the rules are displayed. This column is left blank when no routing rules are associated with the reservation.
Users can add/remove routing rules using the Add Routing Rule and Remove Routing Rule options available under More.
-
These options are applicable to reservations with open and closed folios. If a closed folio is selected as the destination for a rule, users with the Stay_OverrideClosedFolio permission can override and reopen the closed folio.
-
These options are enabled for selection, only after the reservations are selected.
-
These options are not applicable to group reservations.
-
When any group reservation is selected, the following message is displayed: Group reservations are not applicable for the Batch Routing Rule.
Adding a Routing Rule
Users can add a routing rule to the selected reservations by clicking the Add Routing Rule option under More. When clicked, the Add Routing Rule pop-up screen will appear displaying the selected non-group reservations. Users can select the required routing rule template to be applied from the Select Template drop-down list. Users can make changes to the selected template if required and save the changes.
The routing rule templates created for future dates will not be displayed in the drop-down list. The start date of the rule is determined by the arrival date of the reservations. When the destination account selected for the rule is closed, the user is notified that the destination account is in Closed status. Users can choose a different account and proceed to add the rule. If the selected destination folio is in Closed status, users can override and reopen the closed folio and proceed to add the rule.
When the selected rule is applicable only for partial stay dates of the reservations, the message, The selected routing rule will not be applicable for the entire stay, is displayed. When users click Yes, the rule will be applied to the selected reservations for the applicable dates.
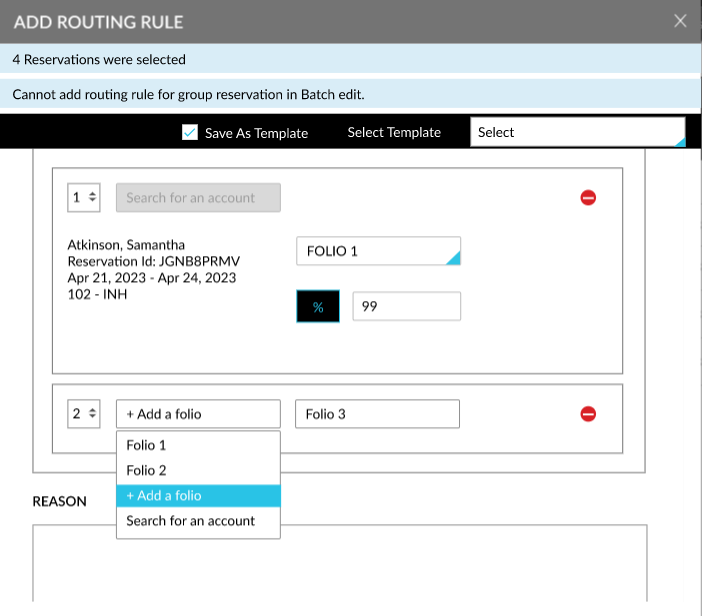
Users can also add a new routing rule for the selected reservations. The newly created routing rule can be saved as a template in the property (All Settings ➜ Templates ➜ Routing Rule Templates) if the Save as Template checkbox is selected. This checkbox is not enabled for selection when users select an existing routing rule template.
When users click Proceed, the new/selected routing rule is applied to the selected reservations. A progress bar appears that displays the status of the routing rule being added to the reservations. The progress bar is closed automatically when the routing rule is added to the reservations successfully and the users are navigated to the Confirmation pop-up screen that displays the following details:
-
Successful Reservations: The routing rule was successfully applied to <no of reservation> reservations.
-
Failed Reservations: If the routing rule was not applied to the selected reservations successfully, those reservations are displayed with the confirmation ID as a hyperlink on the Confirmation screen. The reason for the failure is captured in the Reason column.
-
Impacted Reservations: The selected reservations that contain charges that fall under the selected routing rule template are displayed with the confirmation ID as a hyperlink.
When users close the progress window when the routing rule is being added to the reservation, the message, Creating bulk routing rule is in progress. Click here for the status, is displayed as a banner at the top of the screen. When users click the Click here hyperlink, the progress bar is displayed.
When the routing rule is added to the reservations successfully, the message, The routing rule was successfully applied to <no. of reservation> reservations. Click here for the status, is displayed at the top of the screen. When users click the Click here hyperlink, the Confirmation pop-up screen is displayed.
After the routing rule is added to the reservations successfully, the rule that was added recently will be displayed next to the existing rule in the reservation. If the rule was not added successfully due to network/system errors, a record for the failure is created in the Batch Operations Logs screen and users can select the reservations again and add a new routing rule.
Removing the Routing Rule
Users can remove the routing rules associated with the selected non-group reservations using the Remove Routing Rule option. When this option is selected, the Remove Routing Rule pop-up screen appears that displays the following message: All routing rules will be deleted from x reservations. Existing charges will remain on the folio. Do you want to continue removing all routing rules? When users select Yes, the routing rules associated with the selected reservations are removed.
A progress bar will appear that displays the status of the routing rules being removed from the reservations. The progress bar is closed automatically when the routing rules are removed from the reservations successfully and the users are navigated to the Confirmation pop-up screen that displays the following details:
-
Successful Reservations: The routing rule was successfully removed from <no of reservation> reservations.
-
Failed Reservations: If a comp routing rule was associated with the selected reservation, the routing rule is not removed, and the remaining reservations are processed. The reservations for which the routing rule was not removed successfully are displayed with the confirmation ID as a hyperlink on the Confirmation screen. The reason for the failure is captured in the Reason column.
When users close the progress window when the routing rule is being removed from the reservation, the message, Removing bulk routing rule is in progress. Click here for the status, is displayed as a banner at the top of the screen. When users click the Click here hyperlink, the progress bar is displayed.
When the routing rules are removed from the reservations successfully, the message, The routing rule was successfully removed from <no. of reservation> reservations. Click here for the status, is displayed at the top of the screen. When users click the Click here hyperlink, the Confirmation pop-up screen is displayed.
If a rule was not removed successfully due to network/system errors, a record for the failure is created in the Batch Operations Logs screen and users can select the reservations again and remove the routing rules associated with them.
To support this enhancement, the following changes have been made:
-
A new column, Routing Rule, has been added to the Batch Edit tab on the Batch Operations screen that displays the routing rules associated with the reservations.
-
Two new options, Add Routing Rule, and, Remove Routing Rule, have been added to the Batch Edit tab on the Batch Operations screen under More. These options allow users to add/remove routing rules associated with the selected non-group reservations.
-
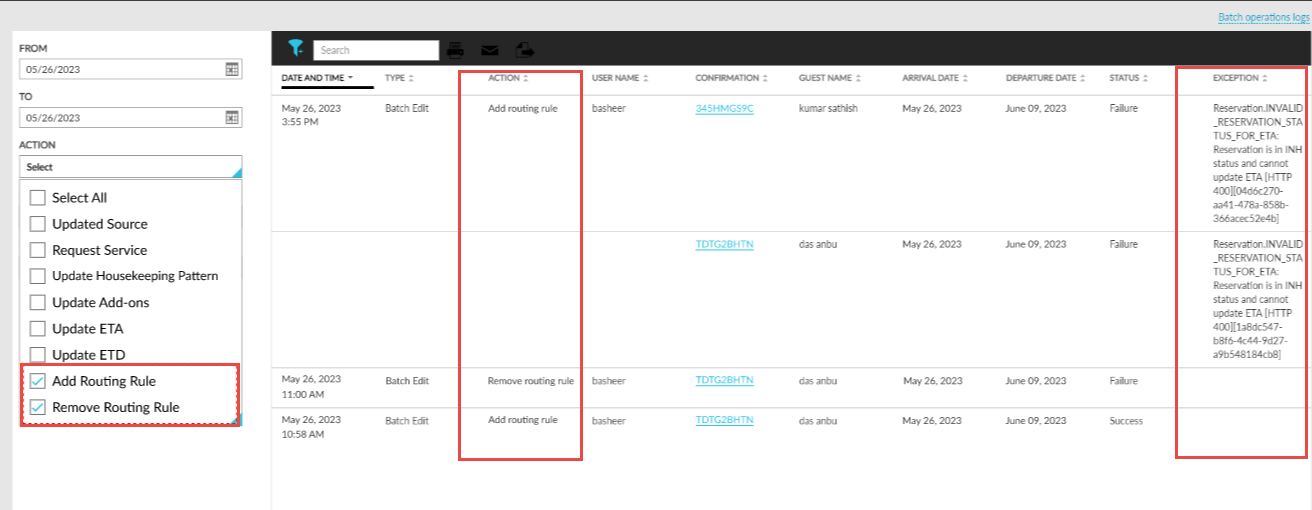
Two new actions, Add Routing Rule, and, Remove Routing Rule, have been added to the Actions drop-down list on the Batch Operations Logs screen to filter reservations for which the routing rules were added/removed.
-
The following new columns have been added to the Batch Operations Logs screen:
-
Action: This column displays the type of action performed by the users, that is, whether the routing rule was added or deleted from the reservations.
-
Exception: The reason for the failure to add/remove routing rules is displayed in this column.
-