Release 24.2
Classify Properties Based on Segments in Platform
Stay is enhanced to allow users to classify properties based on segments created for a tenant in Agilysys Platform.
For example, users can segment the properties based on their location, that is, all properties within the same location can be grouped together in a segment.
This classification of properties helps users to search for properties belonging to a segment and easily update their property configurations. Users can configure the segments and their types when creating properties in Agilysys Platform.
Permissions
The following permissions must be assigned to allow users to view and edit the property segmentation setup:
-
Platform_ReadPropertySegmentation: Only users with this permission can view the Property Segmentation - Setup section in the Properties tab under a tenant. This section will be greyed out to users without permission. This permission is assigned to the following roles by default:
-
System Administrator
-
Stay Hotel Manager
-
Department Manager
-
Profile Management
-
Guest Service Agent
-
Stay Front Desk
-
Stay Hotel Supervisor
-
GSA Supervisor
-
Stay Housekeeping Supervisor
-
HK Supervisor
-
Stay Accounting
-
Accounts Receivable Manager
-
Stay Night Audit
-
Stay Reporting
-
-
Platform_WritePropertySegmentation: Only users with this permission can create, modify, and delete the property segmentation setup. For users without this permission, the following options will be disabled in the Property Segmentation - Setup section:
-
Checkboxes in the Segment column
-
Select All checkbox
-
Segment name hyperlink
-
Show Inactive checkbox
-
Create button
-
Delete button
-
This permission is assigned to the System Administrator role by default.
Configure Segments
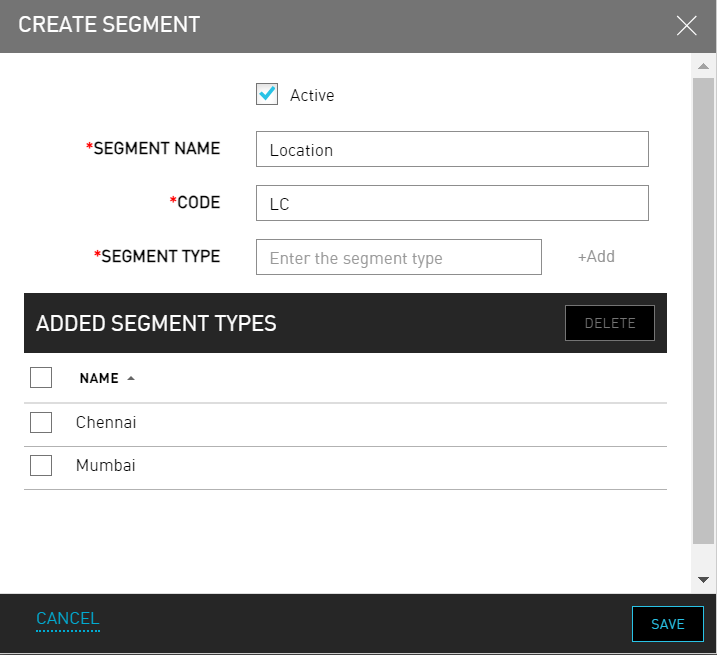
Users can configure segments in the Property Segmentation - Setup section in the Properties tab under a tenant. When users click Create, the Create Segment pop-up screen appears that displays the following fields:
|
Field |
Description |
|---|---|
|
Active |
Select the checkbox to activate the segment. This checkbox will be selected by default. |
|
Segment Name |
The name of the segment. This is a mandatory field that supports alphanumeric and special characters. A maximum of 150 characters can be entered. |
|
Code |
The code for the segment. This is a mandatory field that supports alphanumeric and special characters. A maximum of 15 characters can be entered. |
|
Segment Type |
This is a mandatory field that allows users to create multiple segment types for a segment. This field supports alphanumeric and special characters. A maximum of 50 characters can be entered. Users must enter the segment type and click +Add. When clicked, the segment type will be added to the Added Segment Types section. For example, for a segment, Location, multiple segment types such as Chennai, Mumbai, Pune can be created. |
|
Added Segment Types |
Displays the segment types added by the users in the Name column. This column can be sorted. Users can delete a segment type by selecting the checkbox for the segment type and clicking Delete. |
Users can save the segments and types by clicking Save.
Property Segmentation - Setup Section
Once the segments are created, they are displayed in the Property Segmentation - Setup section. Users can view the inactive segments by selecting the Show Inactive checkbox. This section displays the following columns:
|
Column |
Description |
|---|---|
|
Segments |
The name of segment is displayed as a hyperlink. When clicked, users are navigated to the Edit Segment pop-up screen. |
|
Code |
The code of the segment. |
|
Segment Type |
The segment types created for the segment. They are displayed as a list separated by a comma. |
All the columns can be sorted alphabetically and numerically in ascending and descending order.

Users can delete a segment by selecting the checkbox for the segment and clicking Delete. When clicked, the Confirmation pop-up screen appears that displays the following message: The modifications will be applied to all relevant properties. Do you still want to proceed? When users click Yes, the selected segments will be deleted.
Modify Segments
When users click on the segment name displayed in the Segments column, they are navigated to the Edit Segment pop-up screen where users can modify the values of the preferred fields. Users can also delete a segment type by selecting the checkbox for the segment type and clicking Delete. A segment can be made inactive by deselecting the Active checkbox. When users delete a segment type or make a segment inactive and click Save, the Confirmation pop-up screen appears that displays the following message: The modifications will be applied to all relevant properties. Do you still want to proceed? When users click Yes, the modifications will be saved successfully.
Create or Modify Properties
When users create a new property or modify an existing property, the configured segment and the segment types can be selected for the property in the Create/Edit Property pop-up screens. Users can select one or more segments from the Segments drop-down list. Once the segment is selected, the segment types available for the segment are displayed in the Property Segments section.
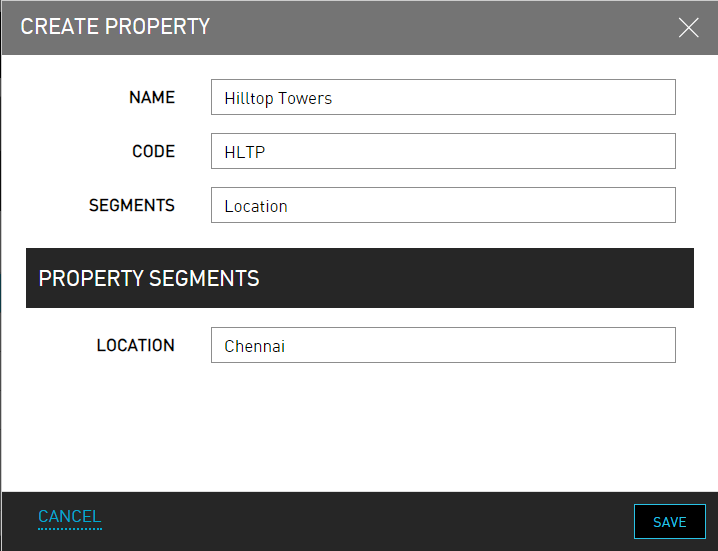
Users must select the preferred segment types and click Save. The selected segments and their types will be applied to the property. The Segment column in the Rguest Platform - Properties section in the Properties tab displays the segments selected for the property. When multiple segments are applied for a property, they are displayed as a list separated by a comma.

The segments and segment types added to a property in Agilysys Platform will be displayed below the Property Code field in the Property tab of the Property Setup screen (All Settings ➜ General ➜ Property, Buildings & Outlets) in Stay.
System Changes
To support this enhancement, the following changes have been made to the Properties tab for a tenant in Agilysys Platform:
-
A new column, Segment, has been added to the Rguest Platform - Properties section in the Properties tab.
-
A new section, Property Segmentation - Setup, has been added to the Properties tab.