Rate Plans
The Rate Plans option, also known as tariffs, enables users to create pricing tiers for different rooms in the property. For instance, the user may want to provide a different rate plan for a corporate employee whose company is already in contract with them. As users prepare to set up rate plans, the easiest way to start is to consider to whom the rooms are sold at the property so that they can offer a variety of rate plans to attract guests who have different needs and price sensitivities.
For example, here are some common rate plans used in the hospitality industry:
|
Field |
Description |
|---|---|
|
Rack Rate |
It is the standard retail rate (or published tariff) for a particular room category or type. Rack rates are printed on a property’s tariff sheet and are submitted to local government authorities for hotel licensing and tax compliance. These rates do not include any sort of discount. |
|
Best Available Rate (BAR) |
The lowest discounted rate available for the guest for that day. |
|
AAA Rate |
The negotiated AAA travel discount rate for a room. |
|
AARP Rate |
The negotiated AARP senior discount rate for a room. |
|
Government Rate |
The negotiated government discount rate for a room. |
|
Corporate or Commercial Rate |
The rates are offered to companies that provide frequent business for the property. This rate may vary according to the volume of business guaranteed by the companies. |
|
Group Rate |
The rates are offered to groups, meetings, and conventions using the hotel for their functions. |
|
Family Rate |
A rate reserved for families with children. Usually, these rates include extra bed charges and may also include some free add-on activities for children. |
BAR and Rack are the default rate plans in Stay. As part of a basic property setup, users can quickly get the property up and running with just these default plans. The user can add new rate plans to meet the needs.
Add New Rate Plans
This option allows users to create additional rate plans for the property. Perform the following steps to create a new rate plan:
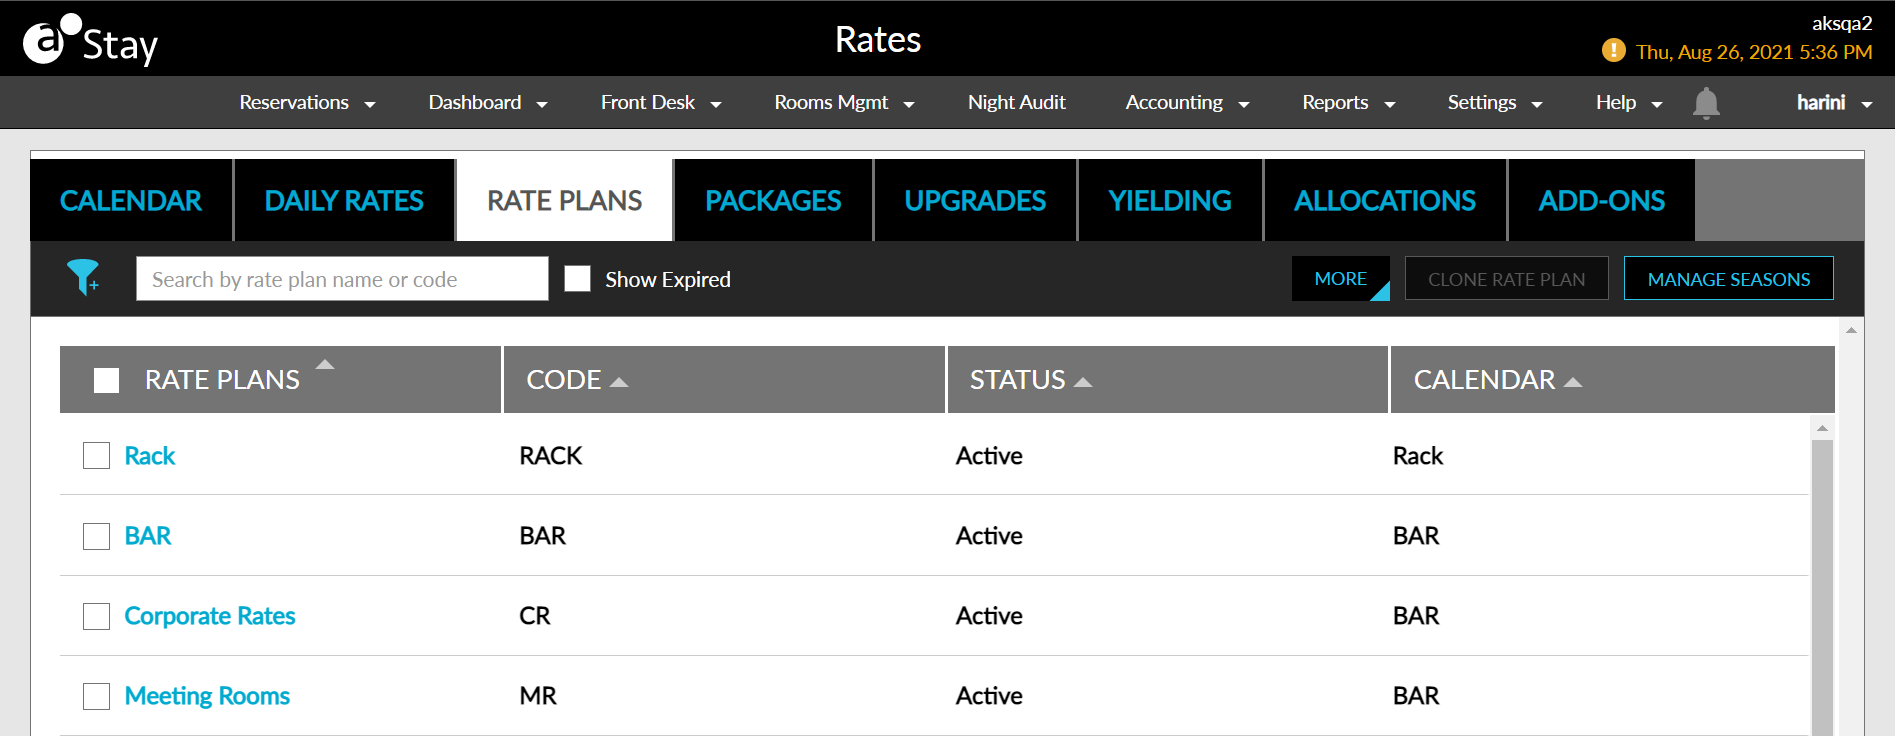
Navigate to Settings ➜ Rates.
Click Rate Plans.
Navigate to More ➜ New Rate Plan. The Add a New Rate Plan pop-up window appears.
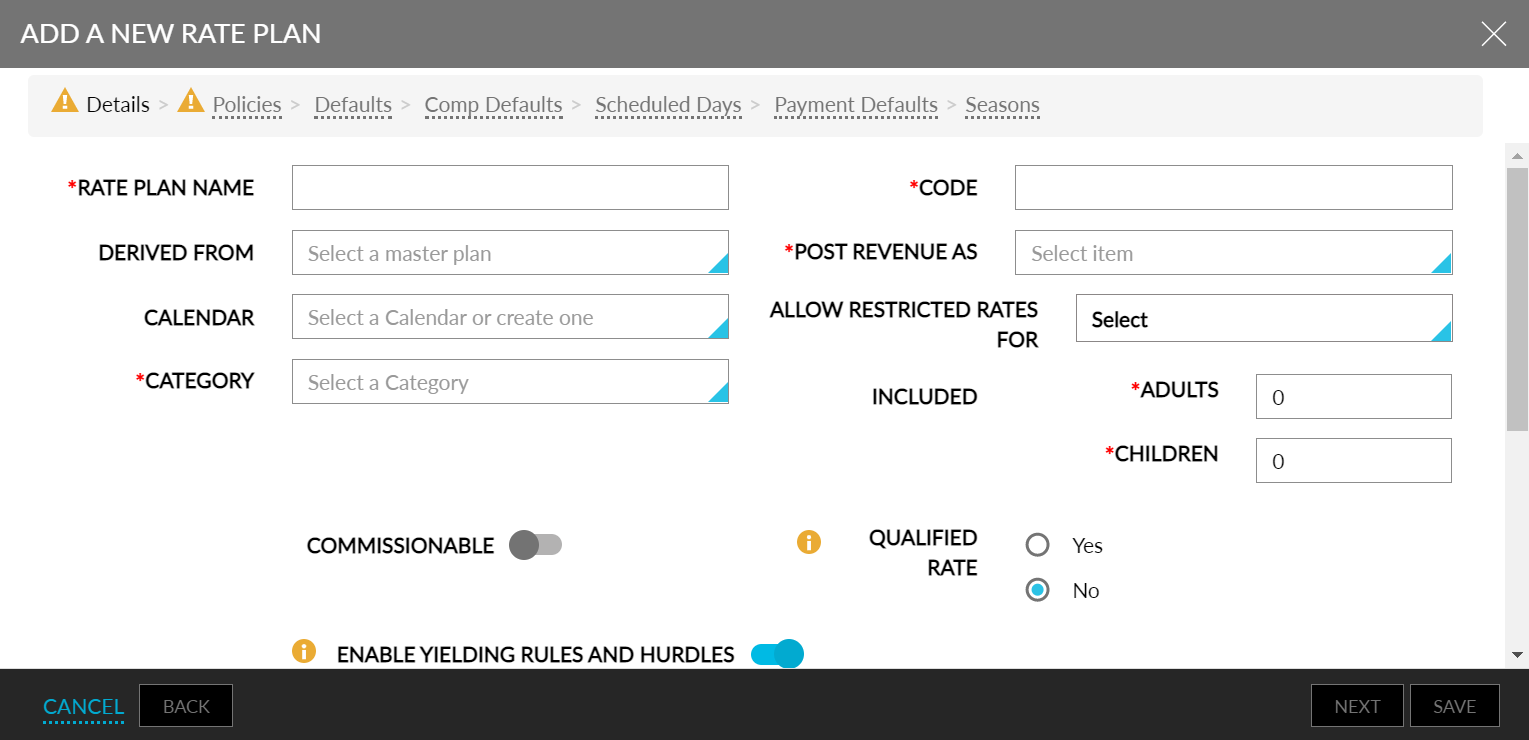
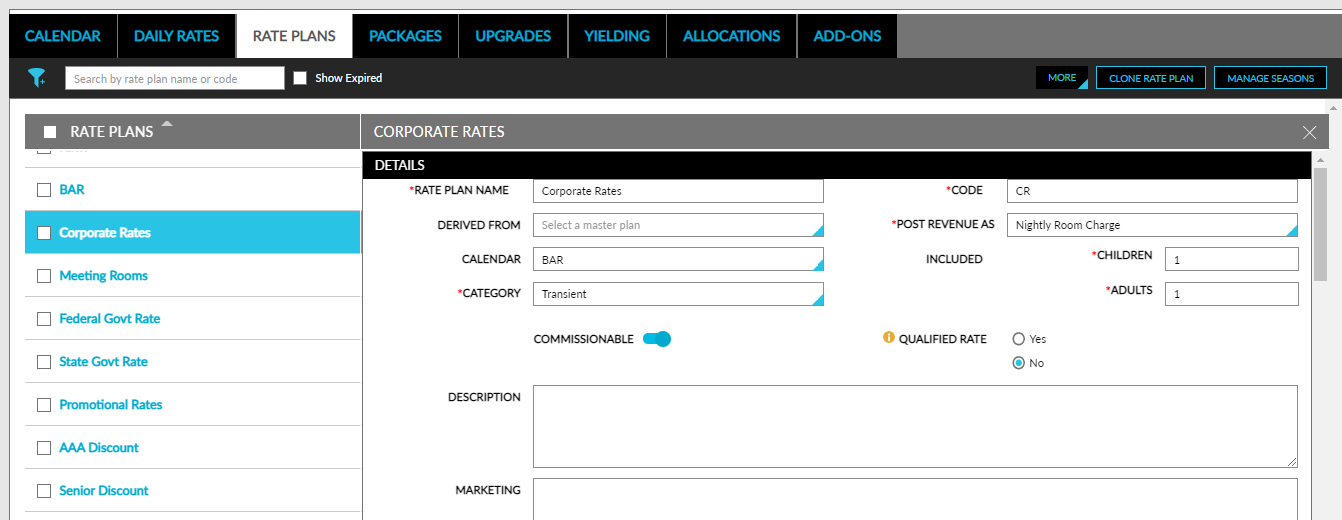
Refer to the following table and fill in the fields to add a new rate plan in the Details tab:
|
Field |
Description |
|---|---|
|
Rate Plan Name |
The name of the rate plan. |
|
Code |
A unique code to identify the rate plan. |
|
Derived From |
The master plan from which the rate plan is derived. |
|
Owner’s Rate Plan |
Enable this checkbox to make it as rate plan for owners’ reservations. This flag will be displayed when, only if Owners feature setting is enabled. |
|
Post Revenue As |
The charge type for the post-revenue. |
|
Calendar |
The calendar for the rate type. Select a calendar or select None to auto-create a calendar for the rate plan. It implies that each rate code gets its calendar by default. |
|
Category |
The guest category for which this new rate plan should apply. |
|
Require IATA Number |
Enable this flag to enforce the addition of an IATA number for the reservations created using rate plans and packages. |
|
Included |
|
|
Adults |
The number of adults that must be part of the reservation for this rate plan to apply. |
|
Child |
The number of children that must be part of the reservation for this rate plan to apply. |
|
Commissionable |
Enable the toggle if the rate plan is commissionable. |
|
Qualified Rate |
Displays this rate plan only if the user searches with this rate plan’s code. This has no impact on booking channels. |
|
Enable Yielding Rules and Hurdles |
Enable the toggle to apply yielding rules and hurdles. |
|
Description |
Enter a description. |
|
Marketing |
The marketing description for a rate plan. |
The list options are those items that are set up on the Guest Accounting page. Ensure to choose an item that is marked as Room Revenue.
Categories help the users to organize the rate plans. On the Rate Management page, users can filter by these categories.
Click Next. The Policies tab appears.
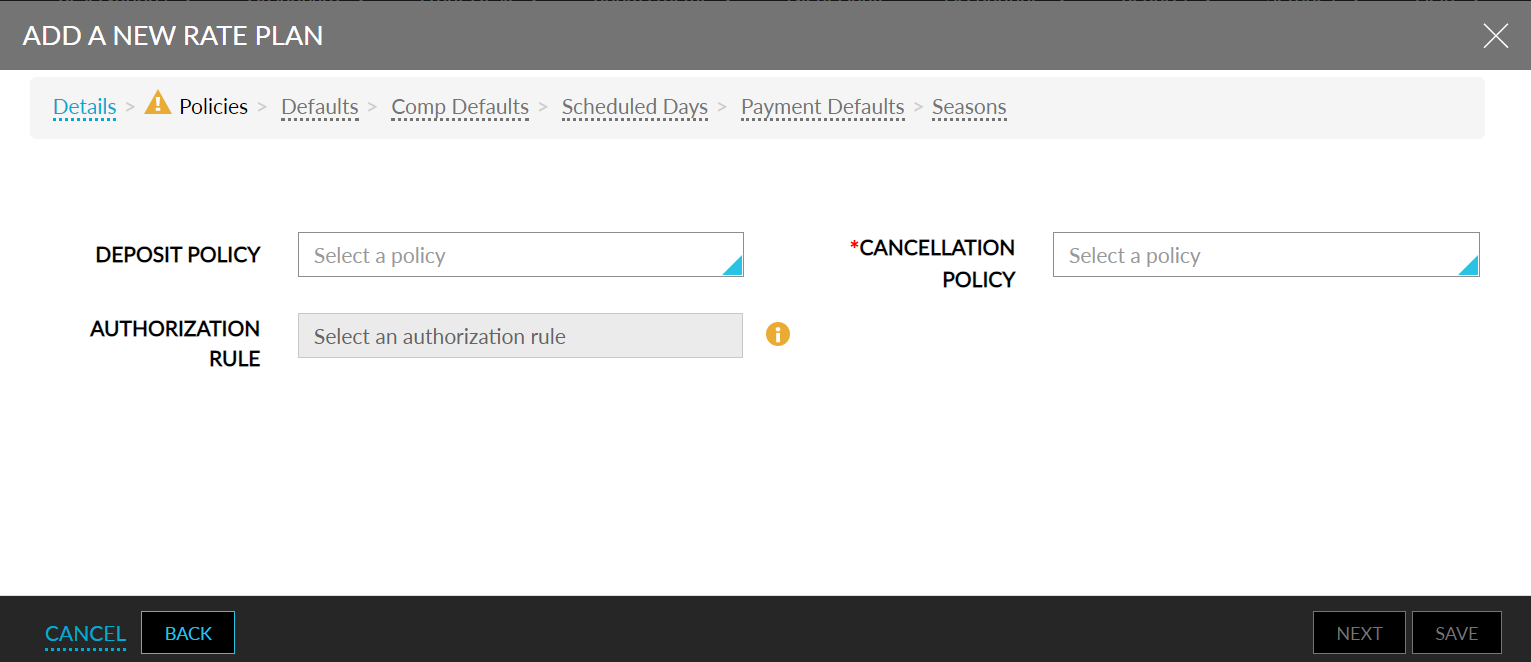
Choose a Deposit Policy option.
Choose a Cancellation Policy option, such as 24-hour cancellation policy.
Click Next. The Defaults tab appears.
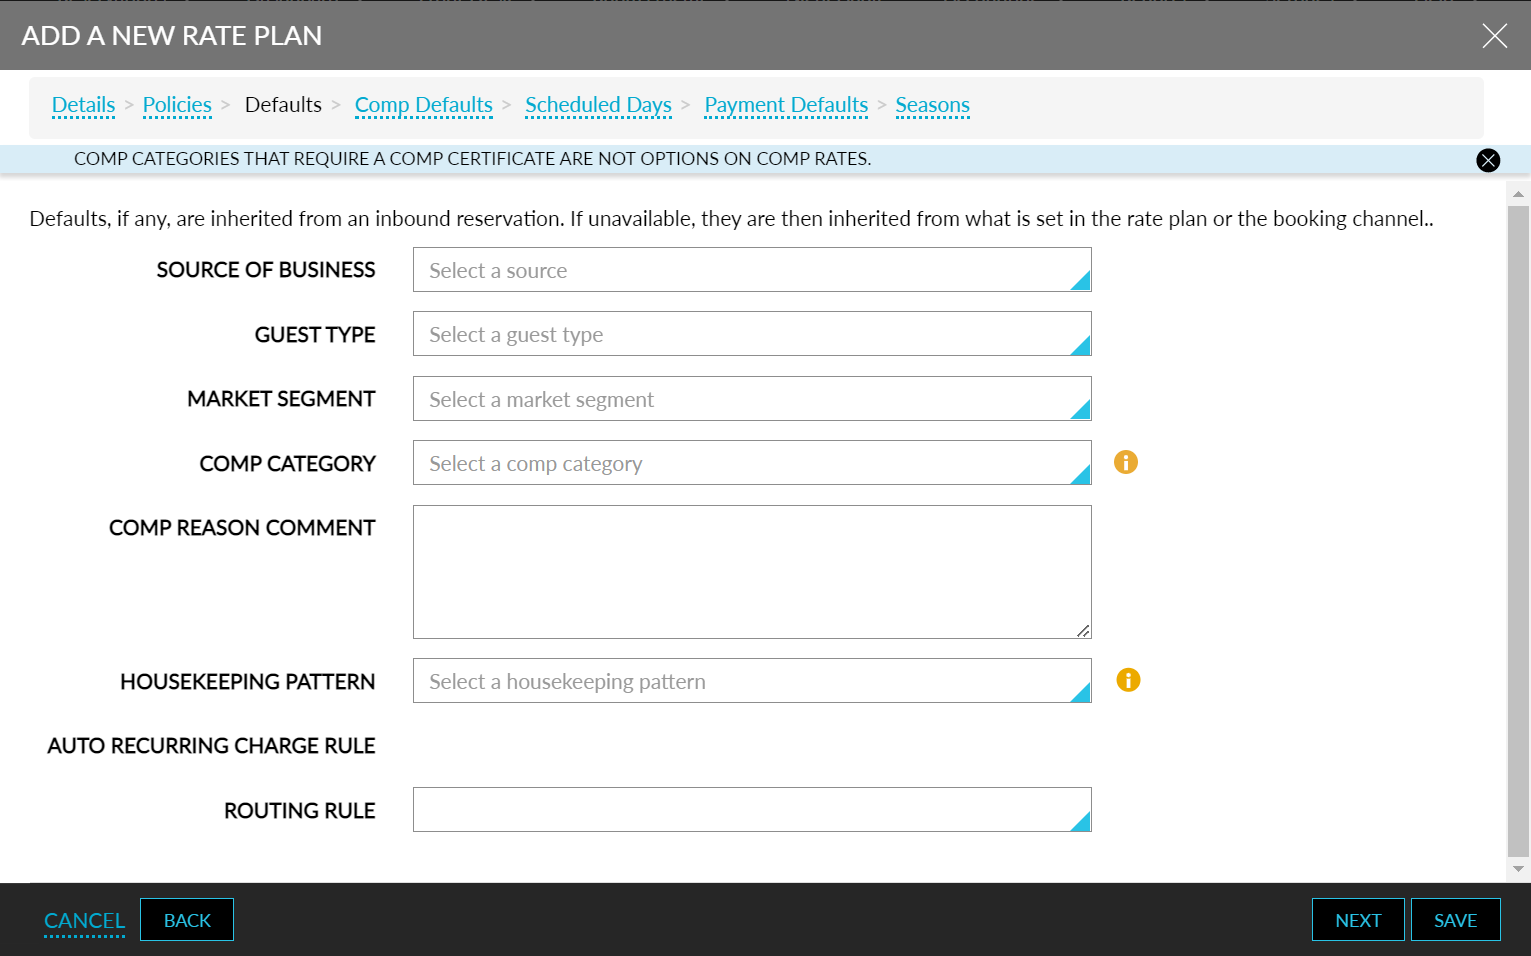
Refer to the following table and fill in the fields in the Defaults tab:
|
Field |
Description |
|---|---|
|
Source Of Business |
Select the source of business from the drop-down list. |
|
Guest Type |
Select the type of guest from the drop-down list. |
|
Market Segment |
Select the market segment from the drop-down list. |
|
Comp Category |
Select the comp category from the drop-down list. |
|
Comp Reason Comment |
Enter the comp reason in the box. |
|
Housekeeping Pattern |
Select a housekeeping pattern from the drop-down list. |
|
Routing Rule |
Select an applicable routing rule from the drop-down list. |
Click Next. The Comp Defaults tab appears.
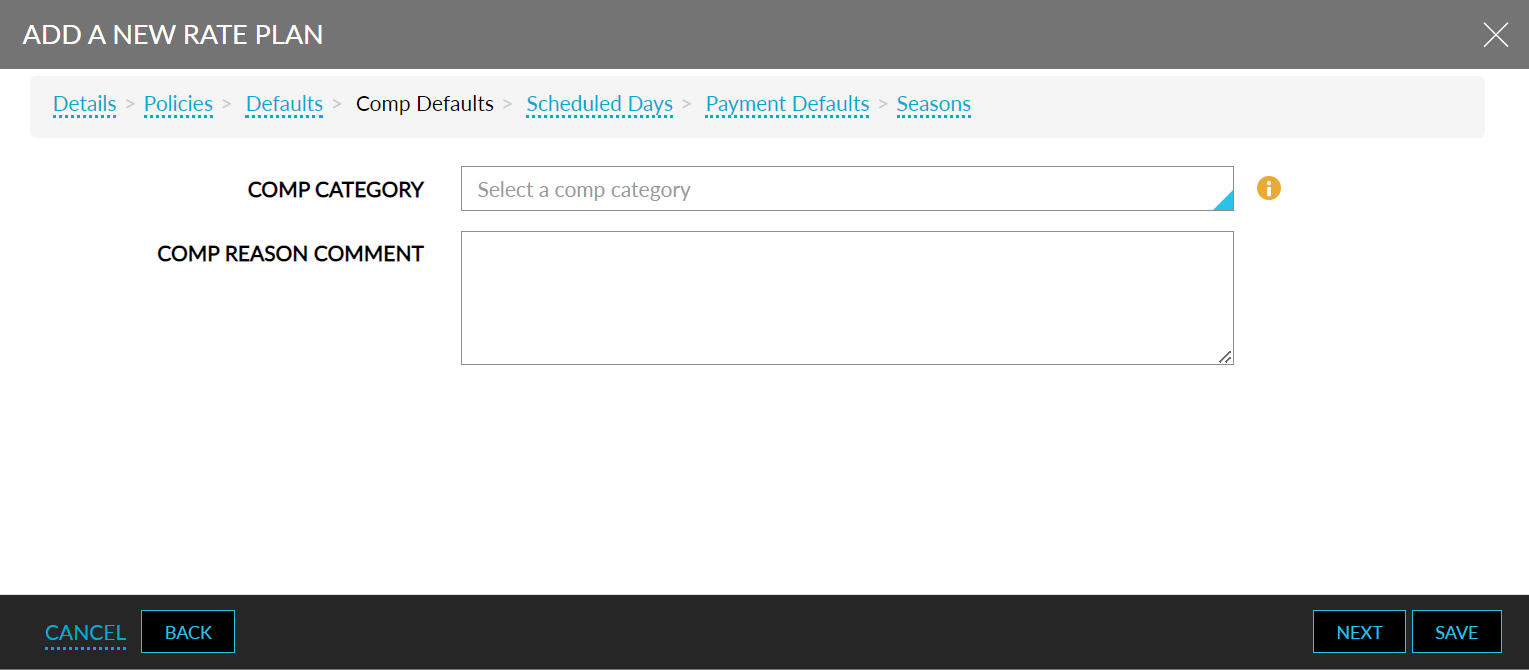
Refer to the following table and fill in the fields in the Comp Defaults tab.
|
Field |
Description |
|---|---|
|
Comp Category |
Select a comp category from the drop-down. |
|
Comp Reason Comment |
Enter a comp reason comment. |
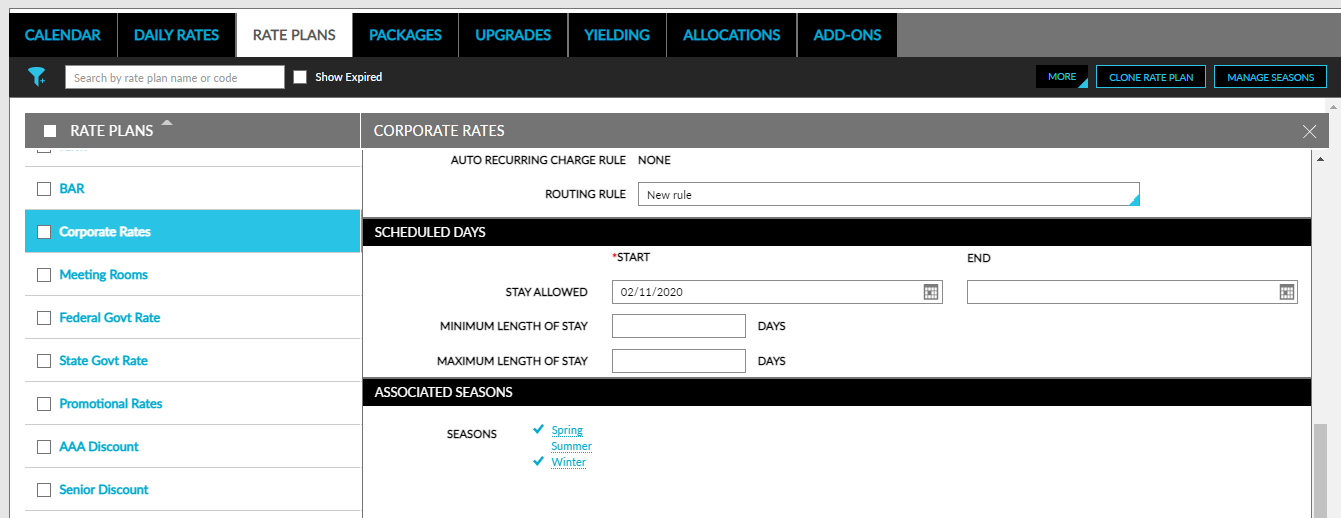
Click Next. The Scheduled Days tab appears.
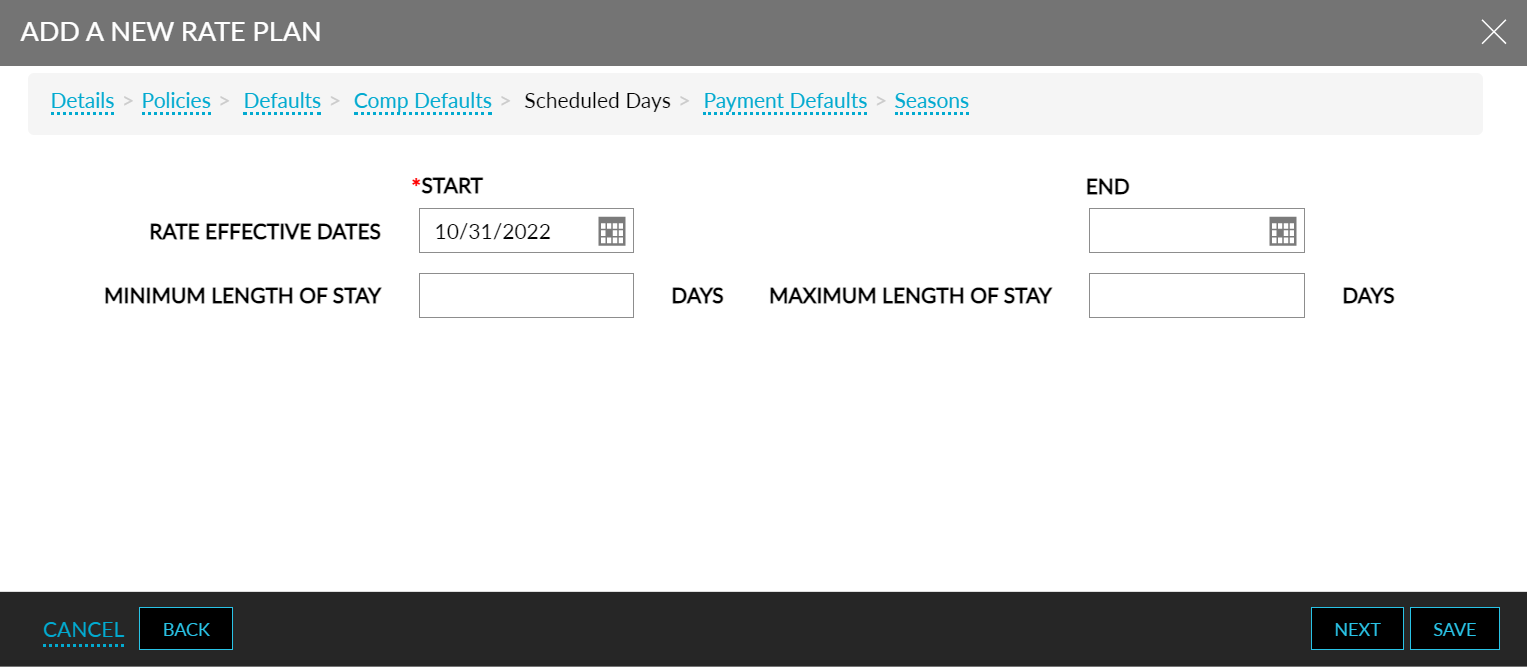
Refer to the following table and fill in the fields in the Scheduled Days tab:
|
Field |
Description |
|---|---|
|
Rate Effective Dates |
|
|
Start |
The start date. |
|
End |
The end date. |
|
Minimum Length Of Stay |
The minimum number of days of reservation. |
|
Maximum Length Of Stay |
The maximum number of days of reservation. |
Click Next. The Payments Defaults tab is displayed.
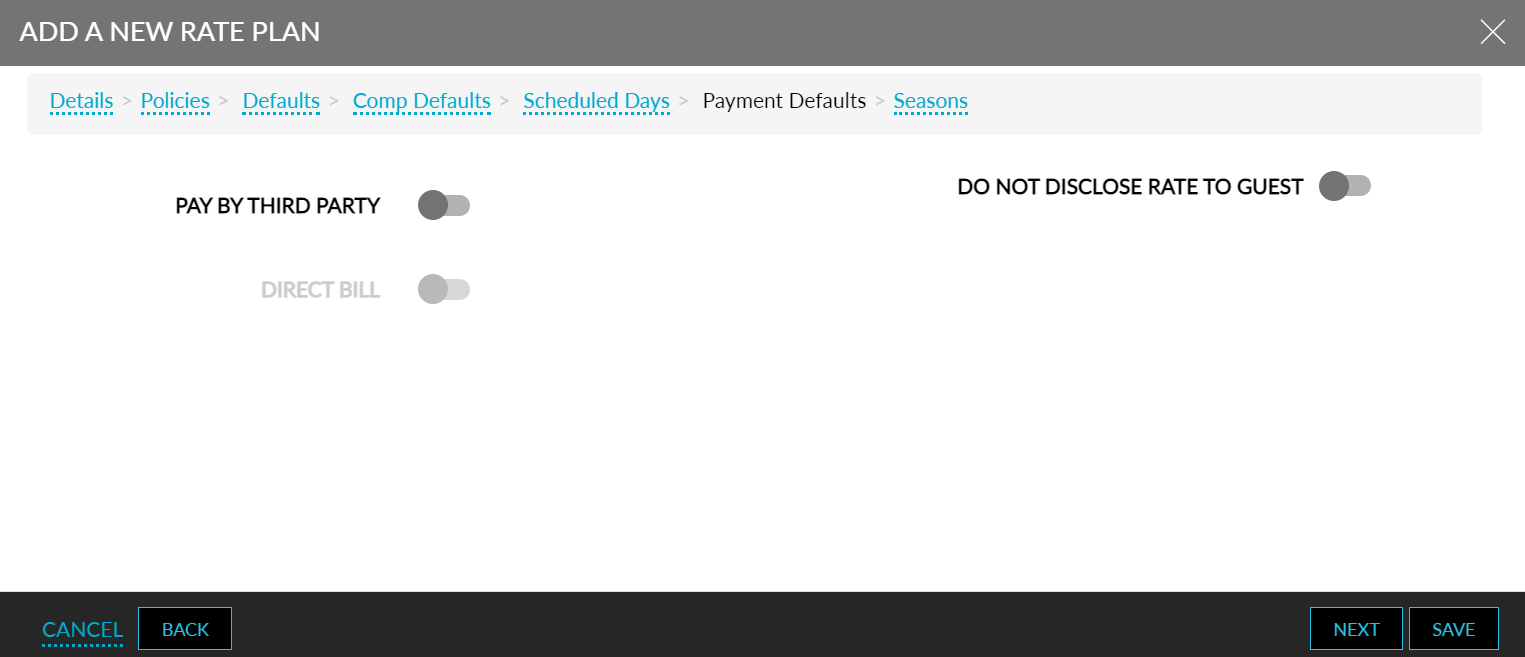
Refer to the following table and fill in the fields in the Scheduled Days tab:
|
Field |
Description |
|---|---|
|
Pay By Third Party |
Enable to allow payments by third party |
|
Third Party Folio Name |
Enter the third-party folio name |
|
Direct Bill |
Enable to associate an A/R account |
|
Destination Account |
The AR account associated to the direct bill |
|
Include Deposit |
Enable to include deposits |
|
Do Not Disclose Rates |
Enable if the rates are not to be disclosed to the guest. |
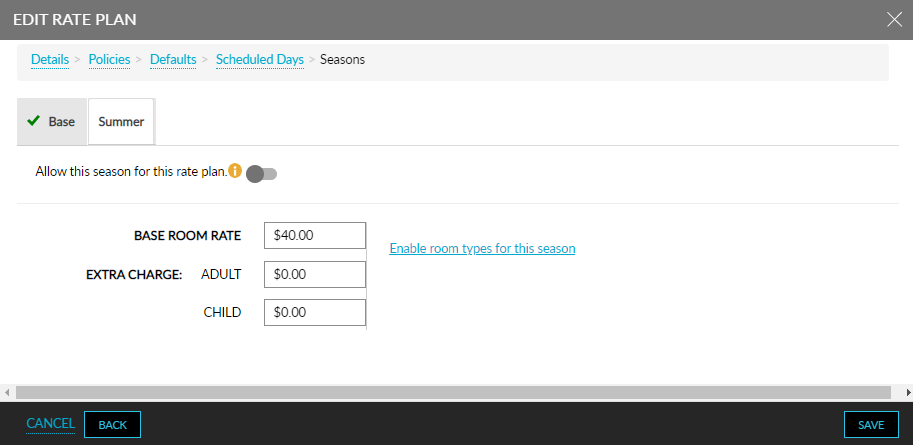
Click Next. The Seasons tab appears.
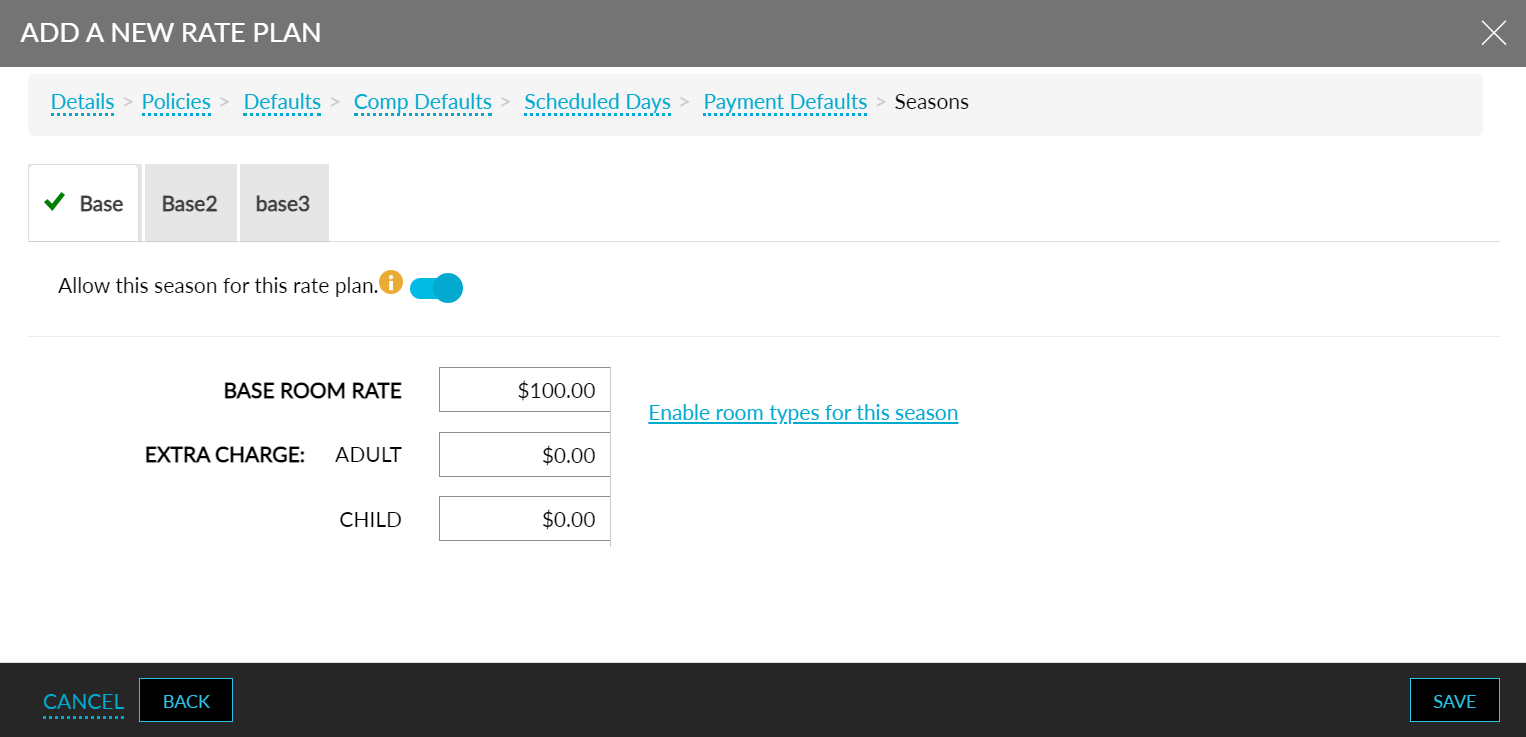
Select the season for the rate plan.
Turn on the Allow this season for this rate plan toggle to apply the strategy to the rate plan.
Refer to the following table and fill in the fields in the Seasons tab:
|
Field |
Description |
|---|---|
|
Base Room Rate |
The base room rate for the rate plan. |
|
Extra Charge |
|
|
Adult |
The additional amount for adults in the rate plan. |
|
Children |
The additional amount for children in the rate plan. |
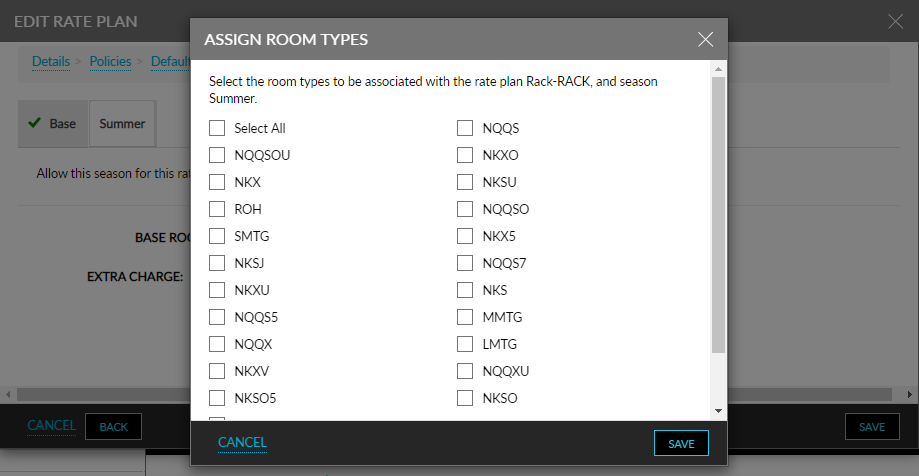
Click on Enable room types for this season. The Assign Room Types dialog box appears.
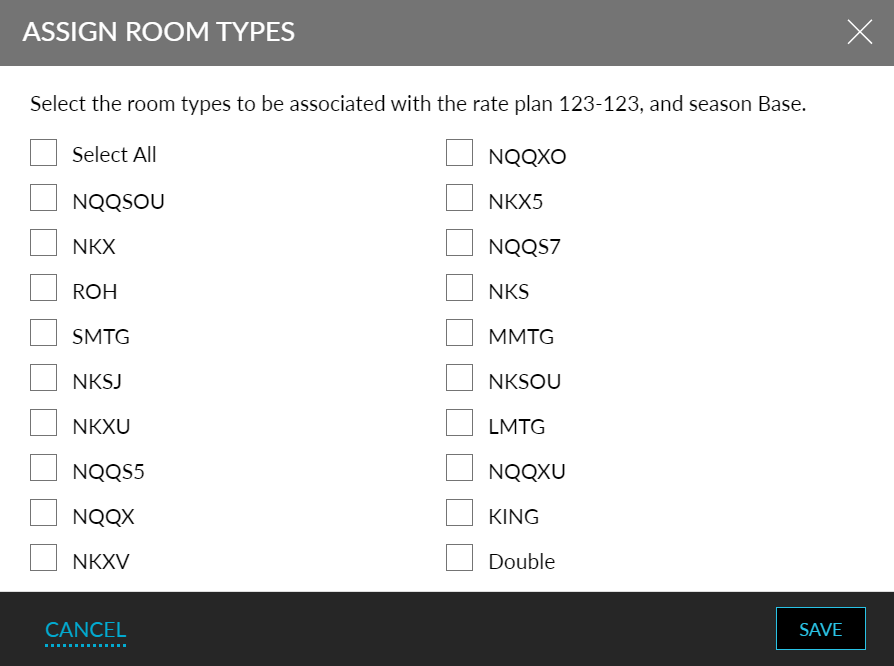
Select the room types or Select All.
Click Save. The Manage Room types overlay appears with modifiers.
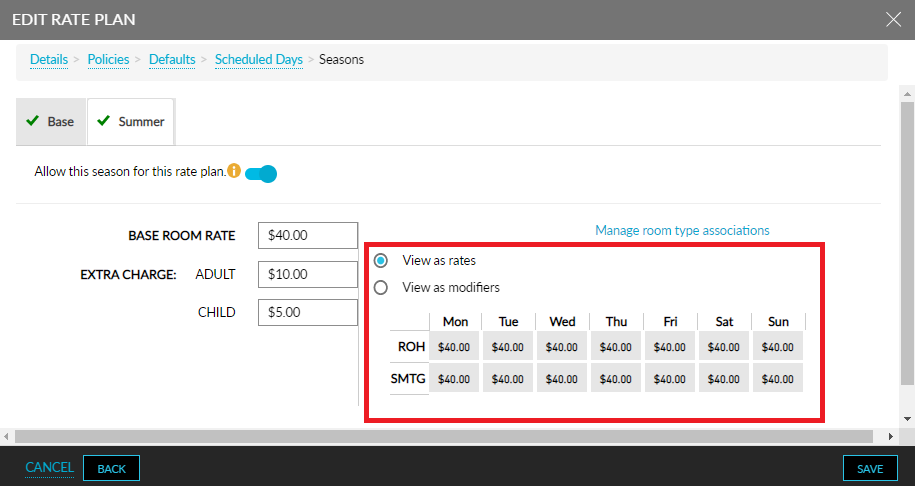
Select a room type by day to enter any room modifiers.
Click Apply.
Select View As Rates to see the modifiers applied.
Click the days and edit the rates.
Enter the base rate for the rate plan in the Base Room Rate field.
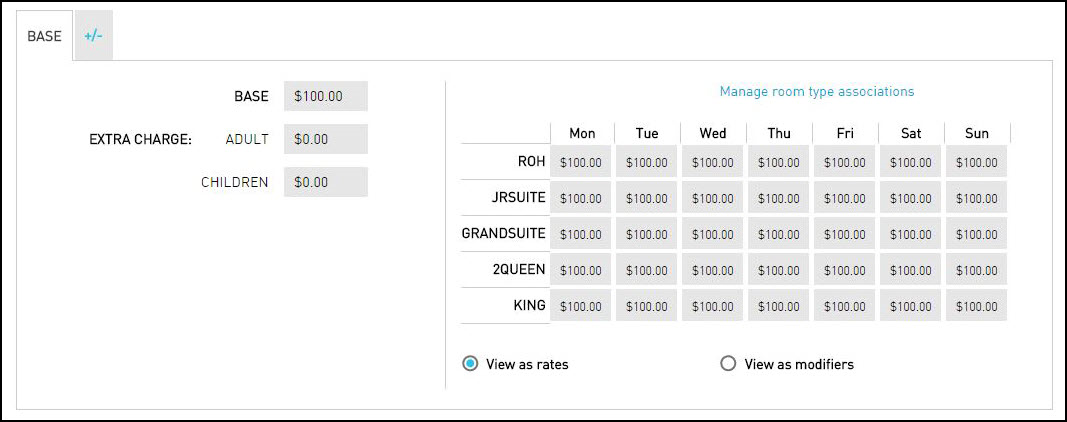
Add any required extra charges for adults and children.
Click Save. The new rate plan is created.
Configure Tax Exemptions for Rate Plans and Packages
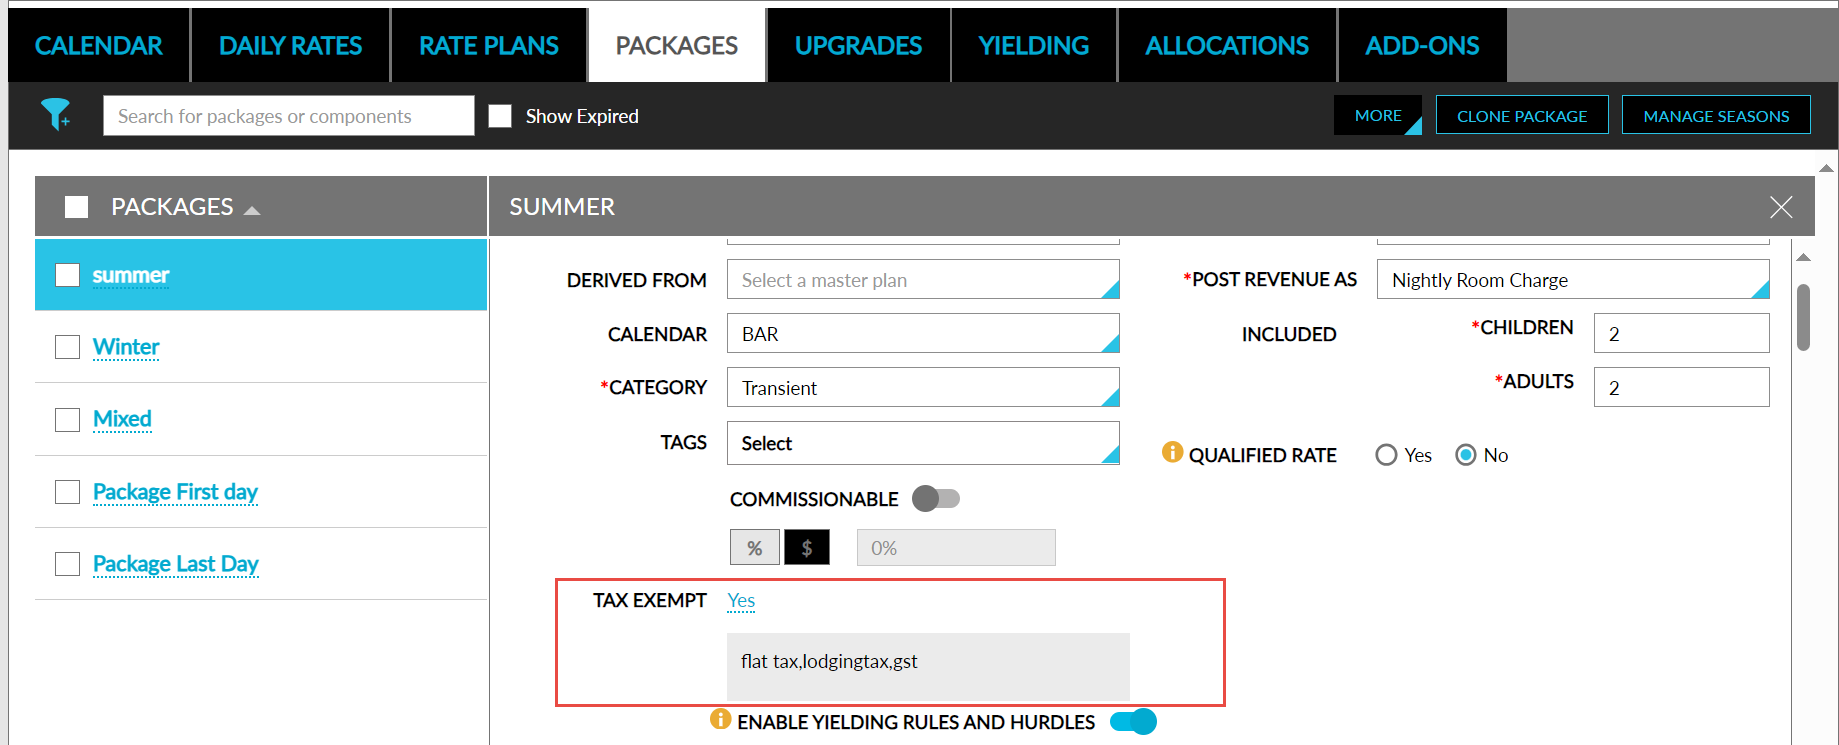
When the Guest Profile Tax Exempt feature setting is enabled, the Tax Exempt field will displayed in the Details section of the selected rate plans and packages. By default, this field displays the value No as a hyperlink.
Perform the following steps to configure the tax exemption options for rate plans and packages:
Navigate to the Details section of the selected rate plans and packages.
Navigate to the Tax Exempt field and click the hyperlink, No, displayed next to this field. The Tax Exempt Settings pop-up screen appears.
Refer to the following table and fill in the fields:
|
Field |
Description |
|---|---|
|
Tax ID |
Enter the tax ID. This field supports alphanumeric characters. Users must configure an ID in this field for the Tax Exemption field to be displayed. |
|
Tax Exemption |
|
|
Require Eligible Guest Profile |
This is a non-mandatory flag that supports the following functionalities:
|
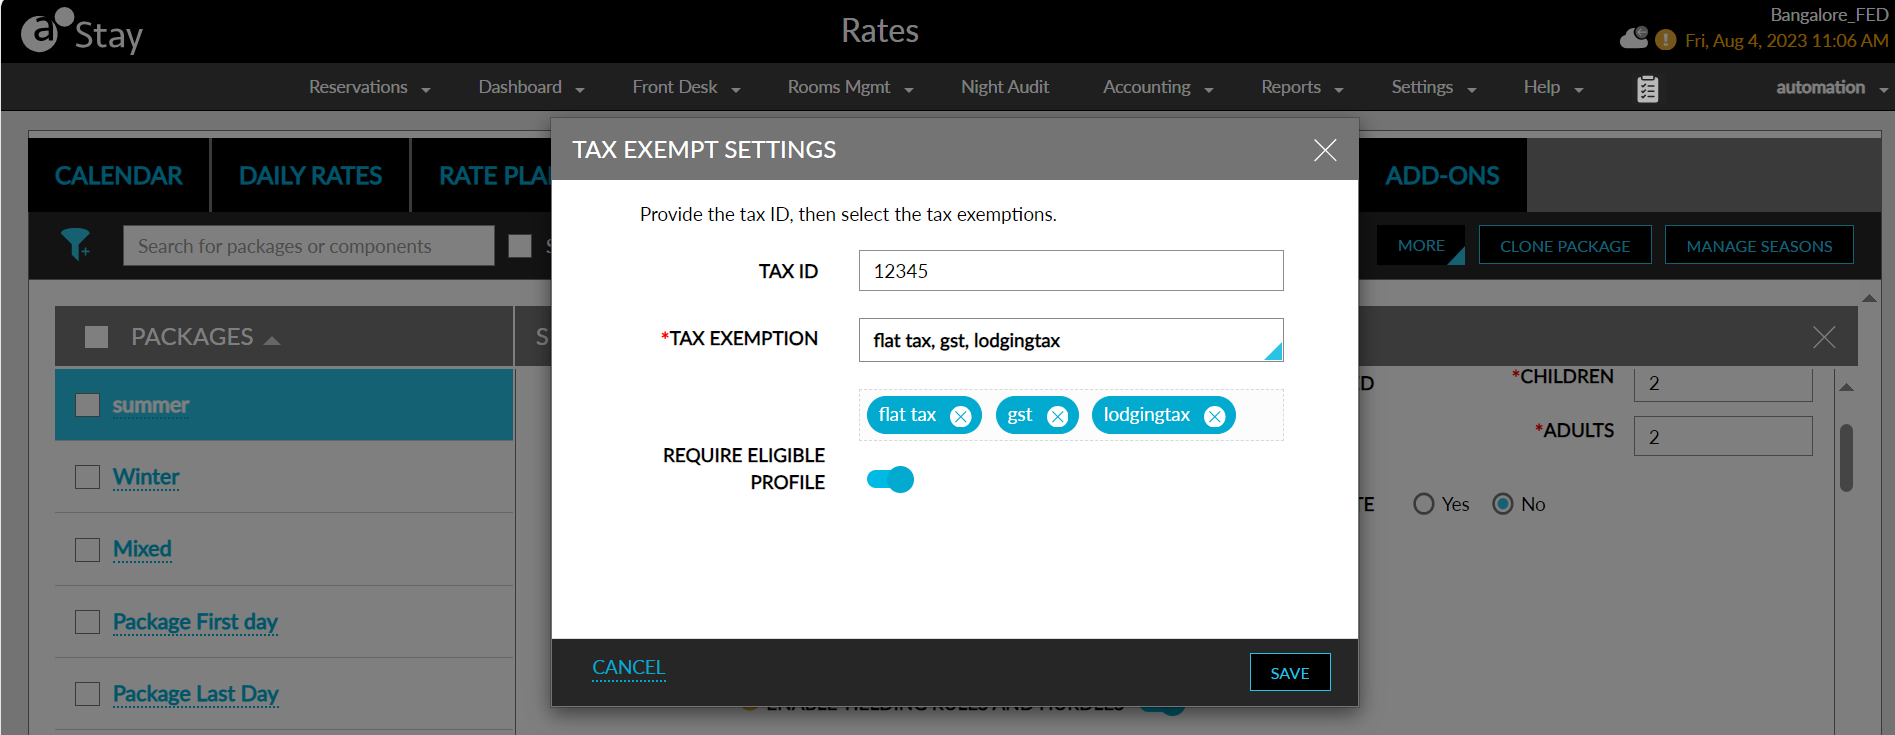
Click Save. The value of the Tax Exempt field is modified to Yes and the selected tax classes are displayed in a box below the field. The tax classes displayed inside the box are greyed out and cannot be edited.
Users can also configure the tax exemption options for rate plans and packages in the following screens:
-
Bulk Edit Package
-
Bulk Edit Rate Plan
-
Rate plan ➜ Clone Rate Plan
-
Package ➜ Clone Package
Enforce Guest ID Validation for Rate Plans and Packages
Stay allows properties to enforce guest ID validation for selected rate plans and packages. With this enhancement, the property can configure the list of IDs required from the guests to avail specific rates or packages at the time of check-in. Once the IDs are verified by users, the guests are checked-in to the reservations.
For example, a specially negotiated rates for AARP members (American Association of Retired Persons) is configured at the property along with the list of proofs to be submitted by the guests for ID validation during check in. When a guest checks in with a reservation with AARP rate plan, the user is prompted to validate the membership ID of the guest. Only when the IDs are verified, the guests are allowed to check into their reservations.
Feature Setting
-
Name: Rate Plan/Package ID Validation
-
Value: Must be enabled
-
Comments: Licenses is not required
Configuring ID Validation for a Rate Plan
When a new rate plan is configured for the property, users can set ID validation as mandatory by enabling the Validate ID toggle in the Policy tab of the Add a New Rate Plan screen (Settings ➜ Rates ➜ Rate Plan ➜ More ➜ New Rate Plan). When users enable the Validate ID toggle, guest ID validation is made mandatory during check-in. Users can now enter the instructions to be displayed in the reservation during check-in. A maximum of 600 words can be entered in the textbox.
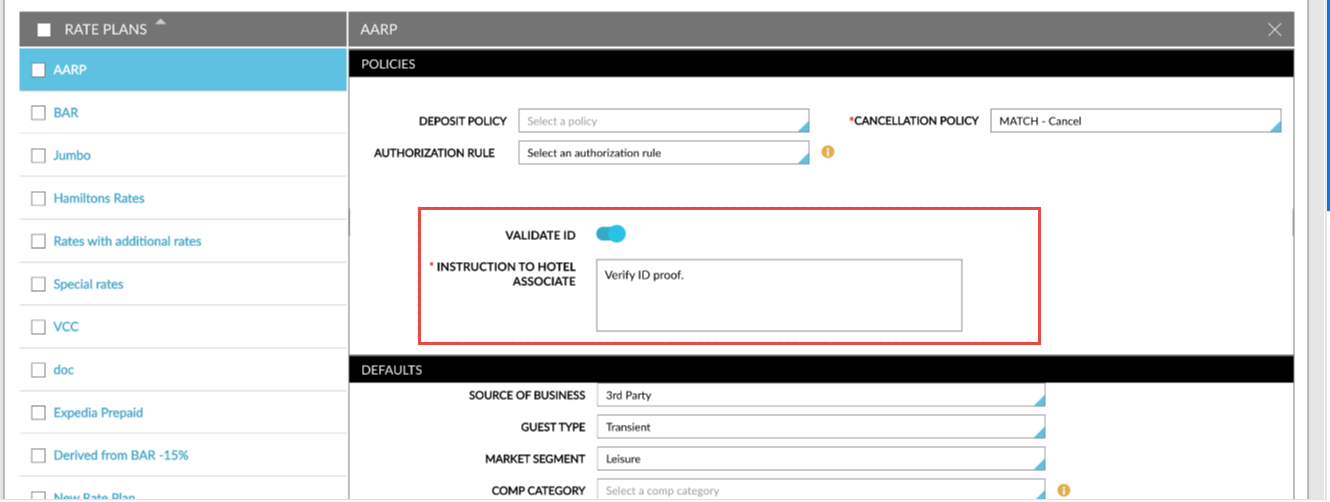
Users can configure ID validation for an existing rate plan available at the property by enabling the Validate ID toggle under the Policy section of the rate plan (Settings ➜ Rates ➜ Rate Plan). When a rate plan or package is modified and marked for ID validation, reservations that are previously created will be also be enforced with ID validation during the check-in.
When the Validate ID flag is enabled, the Instruction to Hotel Associate field is added to the Policies section in the Rate Plan screen. Users can enter the instructions to be displayed in the reservation during check-in.
Edit Rate Plan
BAR and Rack are the default rate plans. To edit them or any of the other rate plans, kindly perform the following steps:
Navigate to Settings ➜ Rates.
Click Rate Plans.
Click on the rate plan on the left panel to expand the details.
Choose a charge type from the Post Revenue As from the drop-down list, such as Nightly Room Charge.
The list options are those items that the user sets up on the Guest Accounting page. Ensure to choose an item that is marked as Room Revenue.
Choose today or future date as the start date.
Choose a Cancellation Policy to enforce, according to how the property chooses to handle canceled reservations. For example, a 24-hour Cancellation Policy.
Cancellation policies must exist before creating the rate plan.
Users can select the routing rules to be associated with the rate plans and define the priority in which the routing rules should be executed in the reservations. Users can associate any number of routing rules to a rate plan. This feature can be used only when the Enhanced Routing Rule feature setting is enabled.
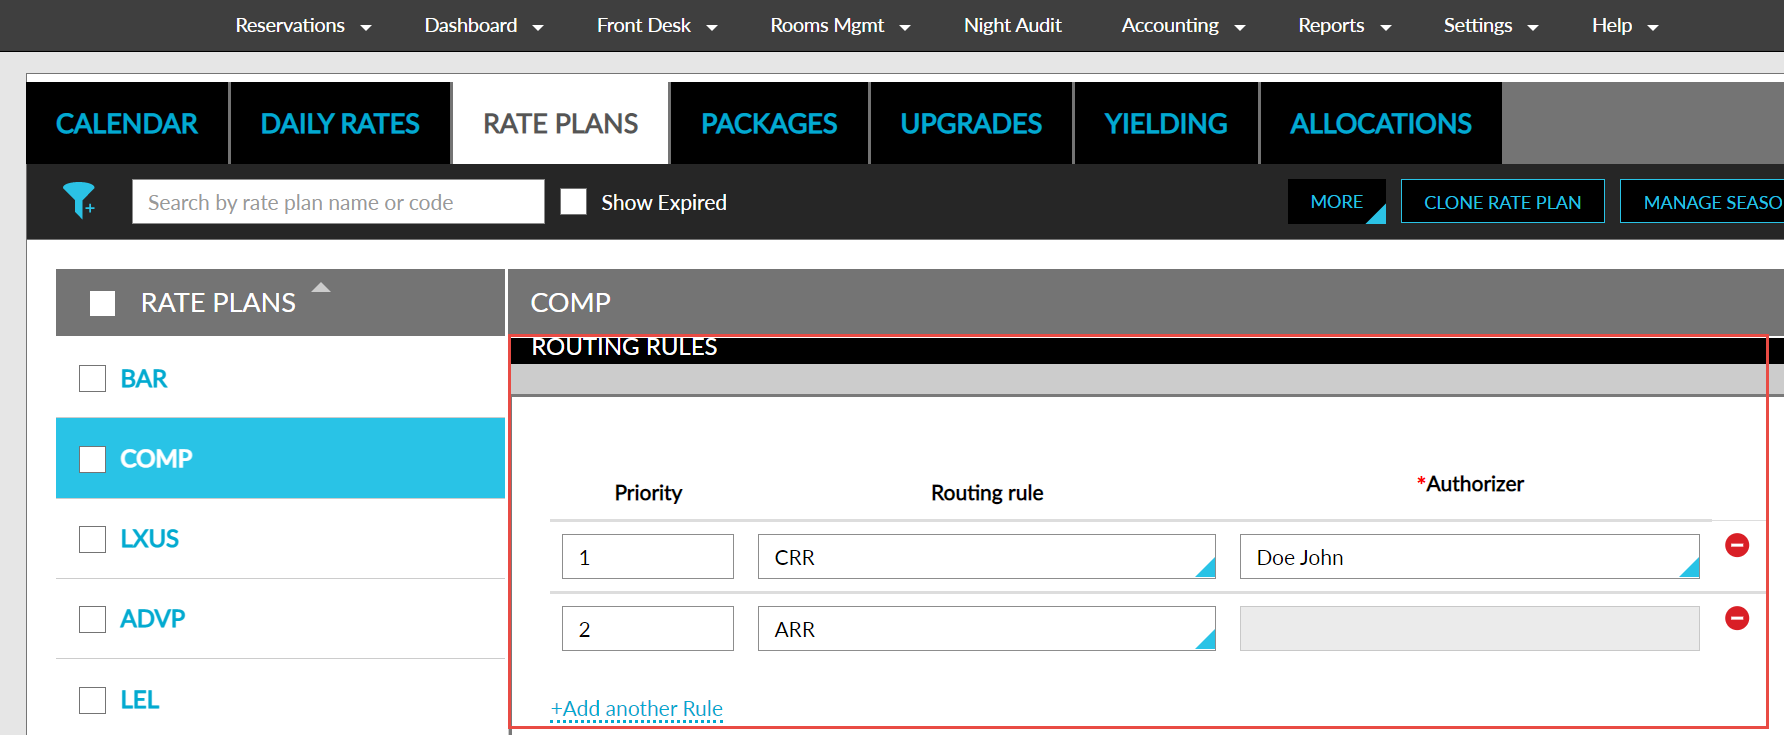
The routing rules will be executed in the ascending order of the priority assigned in the rate plan, that is, when two routing rules are associated to a rate plan, the routing rule with priority 2 will be executed after the routing rule with priority 1. If the posted charge does not satisfy the rule with the highest priority, the rule with the second highest priority will be executed next.
Only active routing rules can be associated with the rate plans. The routing rules will stop functioning when the validity ends.
-
Priority - users can define the priority of execution for the routing rule
-
Routing Rule - drop-down list from which users can select a routing rule
-
Authorizer - drop-down list from which users can select an authorizer for the routing rule
When a comp routing rule is selected, the authorizer that was selected when creating the rule will be automatically displayed in the Authorizer field. Users can change the selected authorizer if multiple authorizers exist for the routing rule. When a routing rule without an authorizer is selected, the Authorizer field will be greyed out. Users can click on the Add another Rule option to add the next rule.
Choose the payment method from the Payments Default section.
Click a season under the Associated Seasons section.
Enable the season from the Edit Rate Plan pop-up screen.
Click Enable room types for this season to add room types.
Select the room types from the Assign Room Types pop-up screen.
Click any day in the room type row to edit the rates.
Enter a modifier value or rate.
To copy the modified rate or modifier value, select any of the following rules to copy:
-
Copy to all days - This applies the rate to all the days for the room type.
-
Copy to all weekdays - This applies the rate to all the weekdays for the room type.
-
Copy to all weekends - This applies the rate to all the weekends for the room type.
-
Copy to all room types - This applies the rate to all the room types for the particular day.
-
Copy to all room types and all days - This applies the rate to all room types across all days.
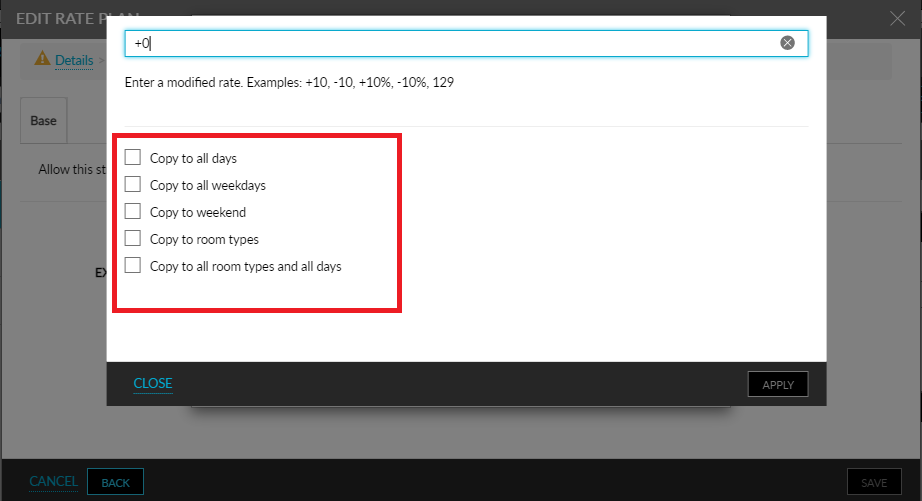
Click Apply to apply the modified rate or rate modifier.
Set Rate Plans for OTA
When accepting payments from third-party OTA, rate plans can be associated with the OTA by enabling the Pay by Third-Party option in the rate plan. Properties can also enable the Direct Bill option to associate an A/R account. Else, can provide a name for the third-party folio. To enable, follow the below set of instructions.
Navigate to Settings ➜ Rates ➜ Rate Plans.
Enable the Pay by Third-Party option.
Enable the Direct Bill option if an AR account has to be associated.
Search and select the AR account in the Destination Account field.
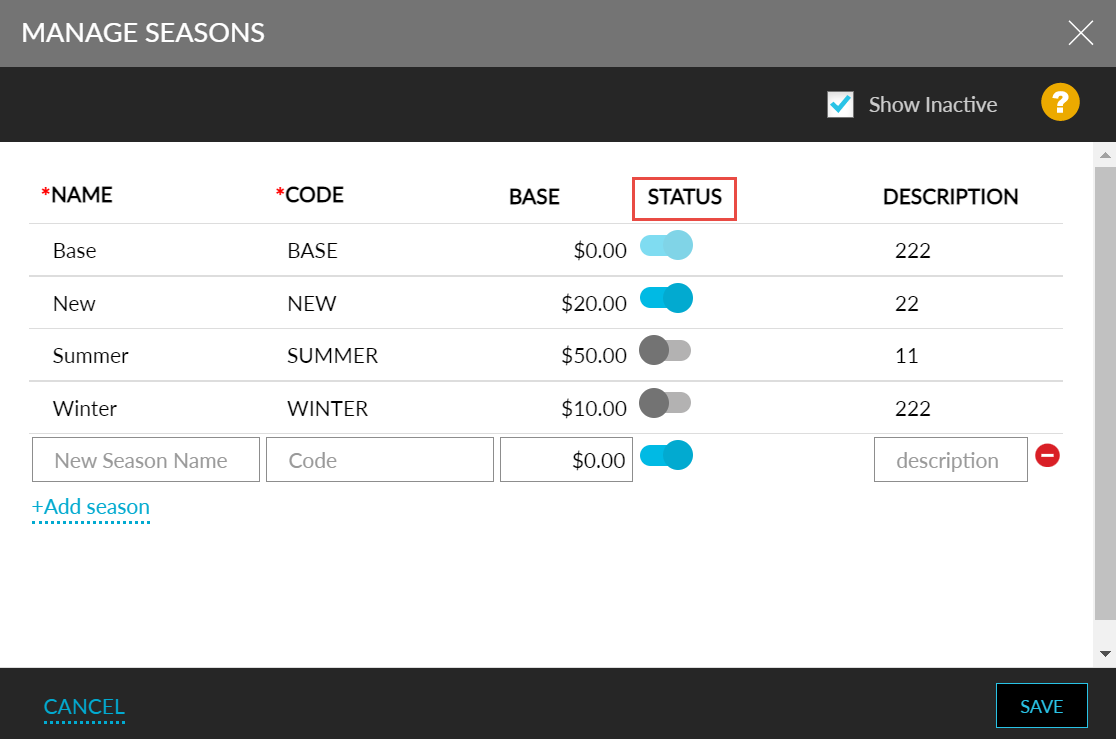
Flag to Manage Season Status
Users now have the flexibility to activate or deactivate seasons.
Click the Manage Seasons button in the Rate Plans screen.
Turn the flag off to deactivate the preferred season. By default, this toggle is turned on for all seasons.
Click Save.
If a season is currently used for a rate plan or calendar, a lighter shade of the toggle is displayed, which cannot be turned on or off. Enabling the Show Inactive checkbox displays both active and inactive seasons.
Base Rate for Weekends
Users now have the flexibility to set different rates for weekends and weekdays.
Click the Manage Seasons button in the Rate Plans screen.
Add exclusive weekend base rates to seasons in the Manage Seasons pop-up.
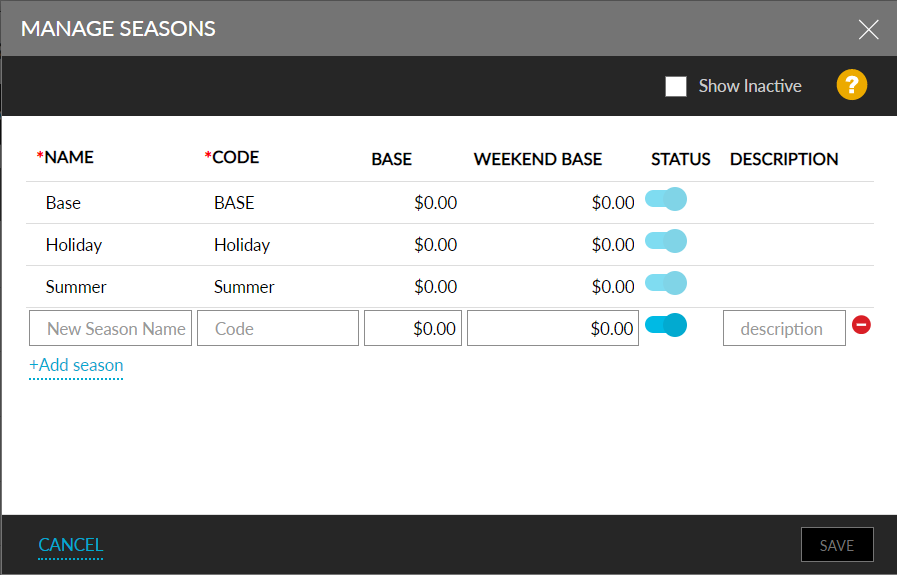
Click the Save button to save the season.
Enable or disable weekend base rates in the associated seasons for a rate plan using the Weekend Base Rate toggle in the Edit Rate Plan pop-up screen.
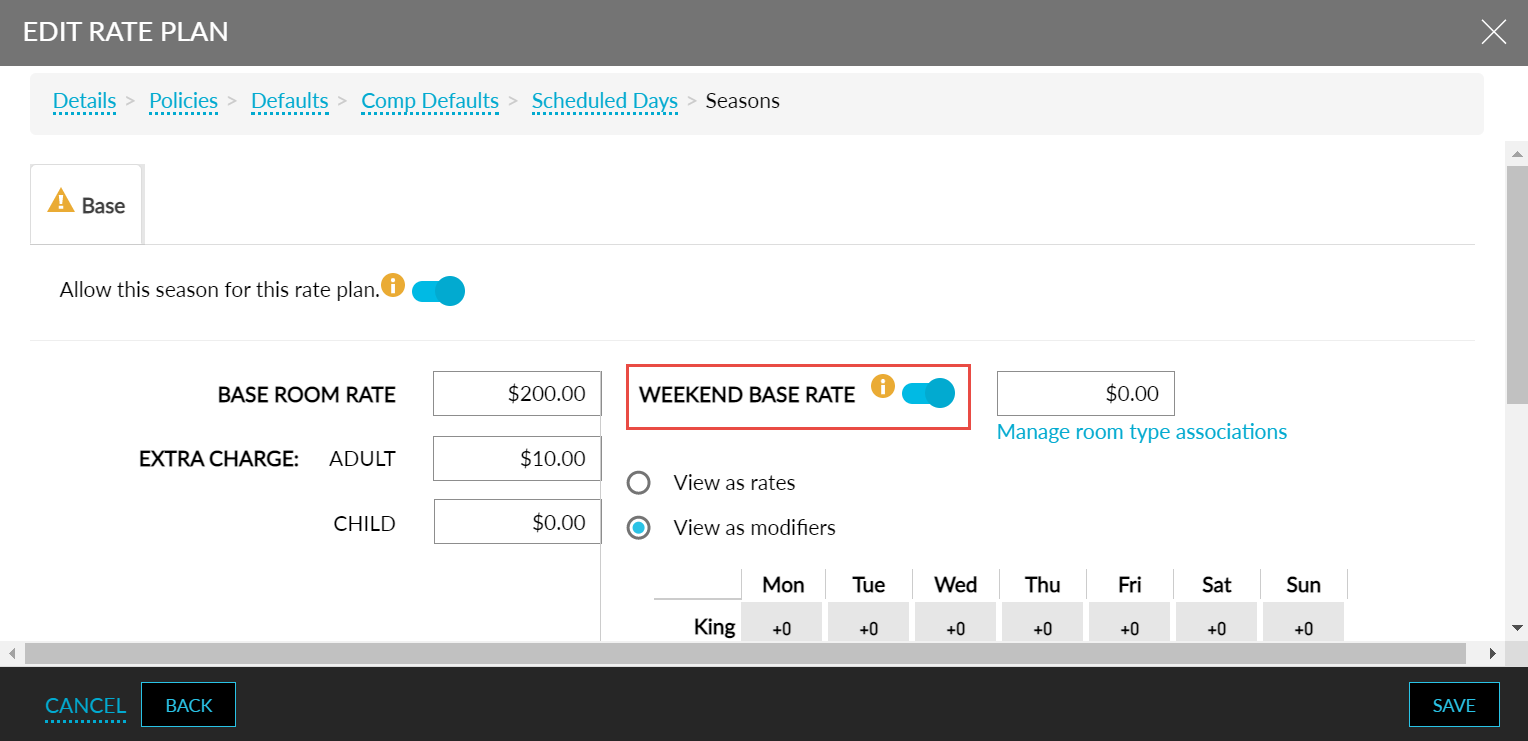
The feature setting named Base rate for weekend should be enabled to set weekend base rates. When it is disabled, the option to add weekend base rates in seasons will not be available, and any previously configured weekend base rates will no longer be displayed.
Setting the Display Order for Rate Plans & Rooms
The display order for rate plans and rooms can be set in the Rates screen.
Navigate to Settings ➜ Rates.
Click Rate Plans.
Click More ➜ Prioritize Rate Plans. The Rate Stack pop-up screen appears.
Set the display order by dragging and dropping the rate plans in the preferred order.
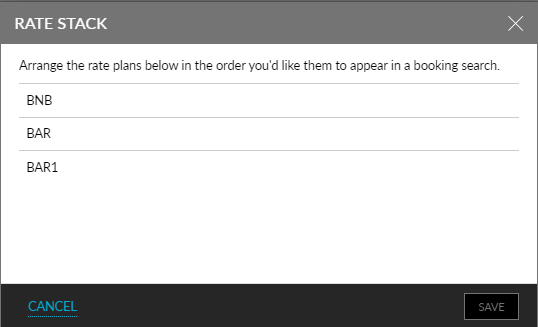
Click Save to confirm the order.
Similarly, the following steps can be followed for setting the room selling order.
Click More ➜ Prioritize Room Sell Order. The Prioritize Room Sell Order pop-up screen appears.
Set the display order by dragging and dropping the rate plans in the preferred order.
Click Save to confirm the order.