Configure Function Rooms
When users click the Configure hyperlink in the Function Rooms section, they will be navigated to the Configure Function Room screen. Users can create function rooms based on the styles configured and apply the inventory blocks and cancellation policies for the rooms. When users click Add, the Configure Function Room pop-up screen appears that consists of various sections. The first is the Basic Details section which is a mandatory section that displays the following fields:
|
Field |
Description |
|---|---|
|
Name |
This is mandatory field that allows users to configure a unique name for the room. This field accepts a maximum of 50 characters. |
|
Description |
This is an optional field that allows users to enter a description for the function room. This field accepts a maximum of 100 characters. |
|
Maximum Occupancy |
This is a mandatory field that allows users to configure the maximum count of occupants for a function room. |
|
Dimension |
This is an optional field that allows users to define the dimensions of a function room based on the following metrics:
|
|
Length |
This is an optional field that allows users to define the length of a function room. The value entered in this field will be suffixed with the dimension selected in the Dimension field. |
|
Width |
This is an optional field that allows users to define the width of a function room. The value entered in this field will be suffixed with the dimension selected in the Dimension field. |
|
Height |
This is an optional field that allows users to define the height of a function room. The value entered in this field will be suffixed with the dimension selected in the Dimension field. |
|
Square Meter/Feet |
This is an optional field that allows users to define the area of a function room. When the dimension is selected as Meter, the label will be displayed as Square Meter and if the dimension is selected as Feet, the label will be displayed as Square Feet. |
|
Phone Extension |
This is an optional field that allows users to configure the phone extension of a function room. |
|
Rate Per Day |
This is a mandatory field that allows users to configure the charge per day for a function room. This field accepts a maximum of 16 characters. |
|
Rate Per Hour |
This is a mandatory field that allows users to configure the charge per hour for a function room. This field accepts a maximum of 16 characters. |
|
Post Revenue As |
This is a mandatory single-select drop-down list that allows users to select the transaction item for posting the revenue for the function room. The transaction item selected cannot be deactivated in Guest Accounting (Settings ➜ Guest Accounting ➜ Items ➜ Transaction Items). |
|
Buffer Time |
This is an optional field that allows users to define the time interval between two successive function room bookings. |
|
Service Charge |
This is a mandatory field that allows users to define the service charge percentage for a function room. Users can configure a value up to 100%. This field also accepts decimal values rounded off to 2 digits after the decimal point. |
|
Post Revenue As (Service Charge) |
This is a mandatory single-select drop-down list that allows users to select the transaction item for posting the service charge for a function room. |

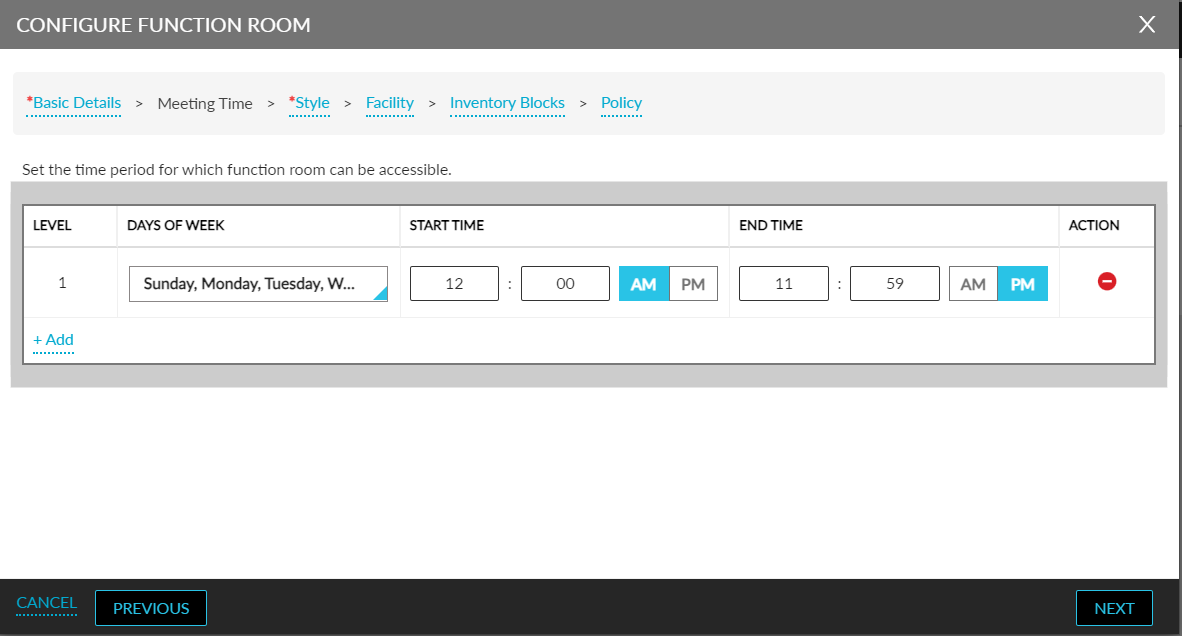
When users click Next, they will be navigated to the Meeting Time section. This is an optional section that allows users to define the days and time when the function rooms will be accessible. This section displays the following fields.
|
Field |
Description |
|---|---|
|
Level |
The level is auto generated by the system. |
|
Days of Week |
This is a multi-select drop-down list that allows users to select the days when the function rooms can be accessed. |
|
Start Time |
This field allows users to select the start time when the function room can be accessed. By default, the start time is displayed as 12:00 AM. |
|
End Time |
This field allows users to select the end time up to which when the function room can be accessed. By default, the start time is displayed as 11:59 PM. |
|
Action |
Users can delete a level by clicking on the delete icon displayed in this column. |
To add a new level, users must click the +Add hyperlink.
When users click Next, they will be navigated to the Style section. This is a mandatory section that displays the following fields:
|
Field |
Description |
|---|---|
|
Style Name |
This is a single-select drop-down list that allows users to select a function style for the room. All the function styles configured in the Style tab of the Function Room Setup screen will be displayed in this drop-down list. |
|
Maximum Occupancy |
This is an input field that allows users to configure the maximum number of occupants for a function room. The count entered is validated against the style selected. When the entered value is greater than the count configured for the style, the following message will be displayed: Function room can accommodate up to <count> occupants. |
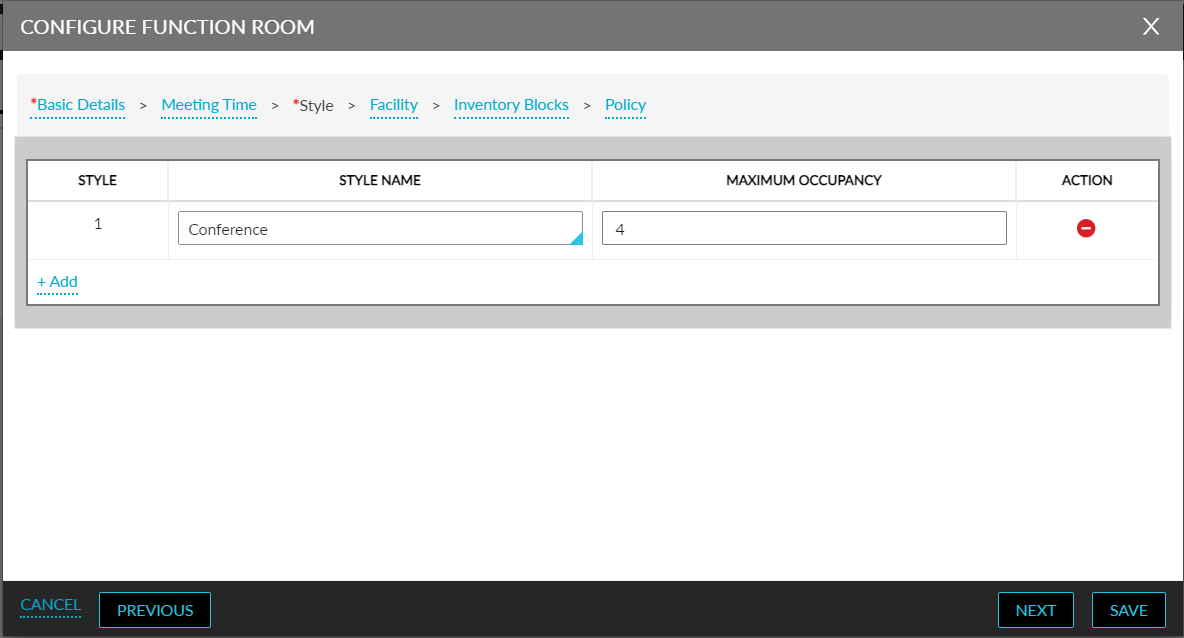
Multiple styles can be associated with a function room. Users must click the +Add hyperlink to associate another function style with the room. Users can delete the style using the delete icon displayed for the style in the Action column.
Once values are configured in the Basic Details and Style sections, the save button will be enabled for selection. Users can optionally configure values in the Facility, Inventory Blocks, and Policy sections.
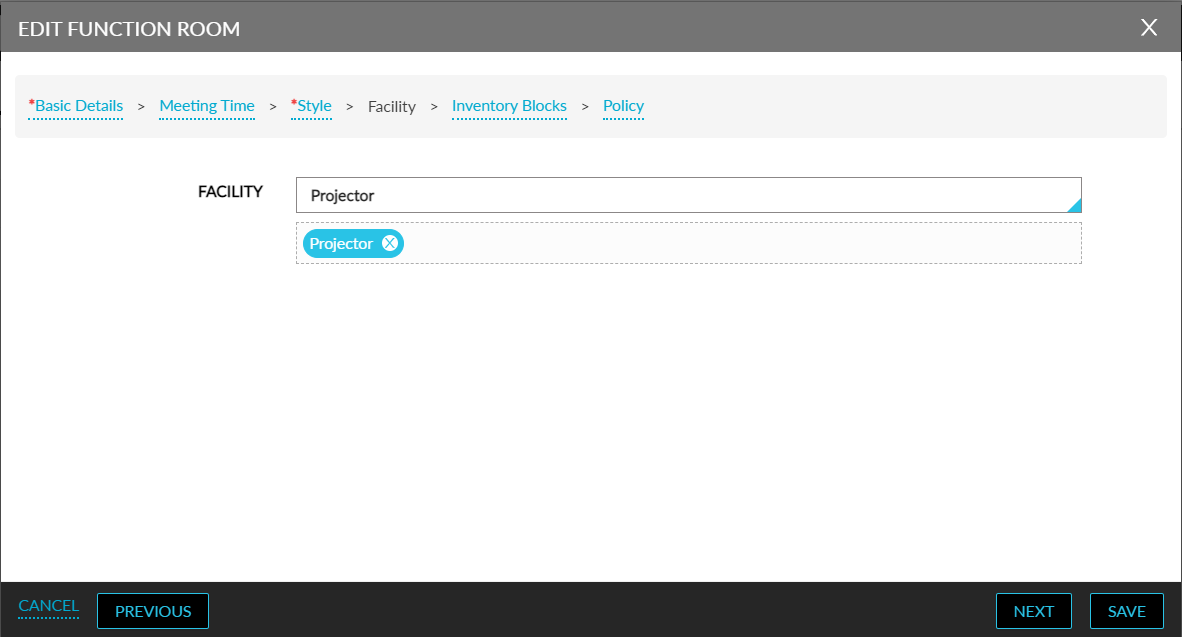
When users click Next in the Style section, they will be navigated to the Facility section. This section displays the Facility drop-down list. This is a multi-select drop-down list that displays all the facilities configured in the Facility tab of the Function Room Setup screen. Users can select the preferred facilities for a function room. The facilities selected for a function room cannot be deactivated.
When users click Next, they will be navigated to the Inventory Blocks section. This section allows users to apply the inventory blocks configured in the Inventory Blocks tab of the Function Room Policy screen. When an inventory block is applied to a function room, the room will not be available to the guests for booking. This section displays the following fields:
|
Field |
Description |
|---|---|
|
+Add |
Click this hyperlink to apply an inventory block for a function room. |
|
Inventory Block Code |
This is a single-select drop-down list that displays the inventory blocks configured. Users can select the preferred inventory block for the function room. |
|
Start Date |
The start date configured for the inventory block selected will be displayed. |
|
End Date |
The end date configured for the inventory block selected will be displayed. |
|
Days of Week |
The days of week applicable for the inventory block selected will be displayed. |
|
Start Time |
The start time configured for the inventory block selected will be displayed. |
|
End Time |
The end time configured for the inventory block selected will be displayed. |
|
Action |
Delete an inventory block using the delete icon displayed for a block. |
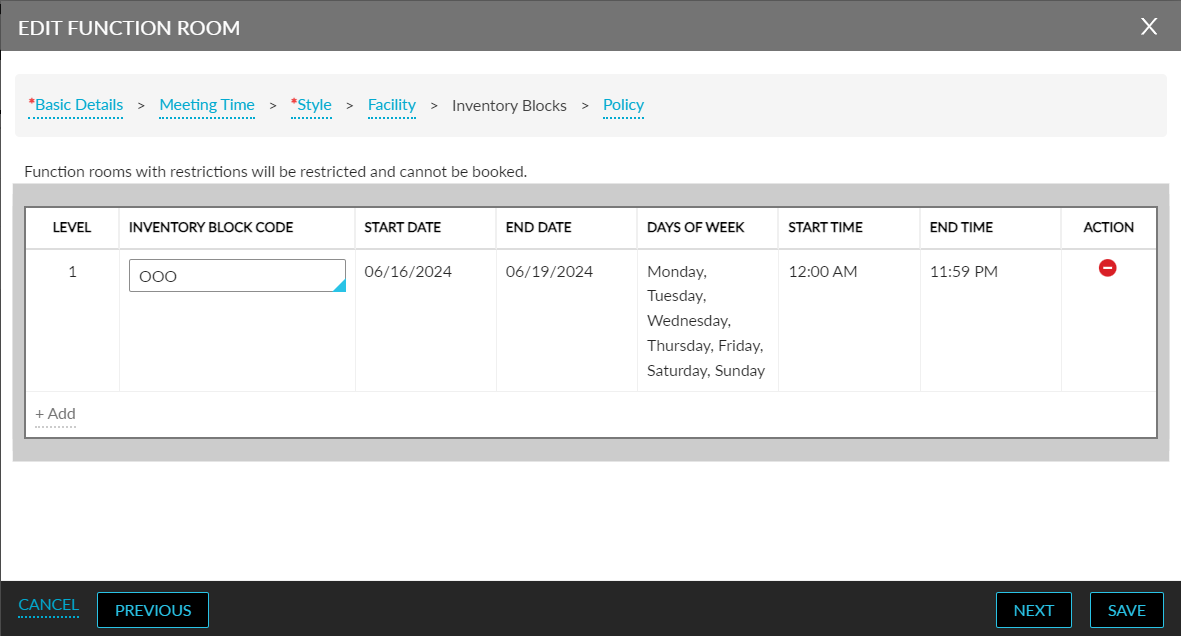
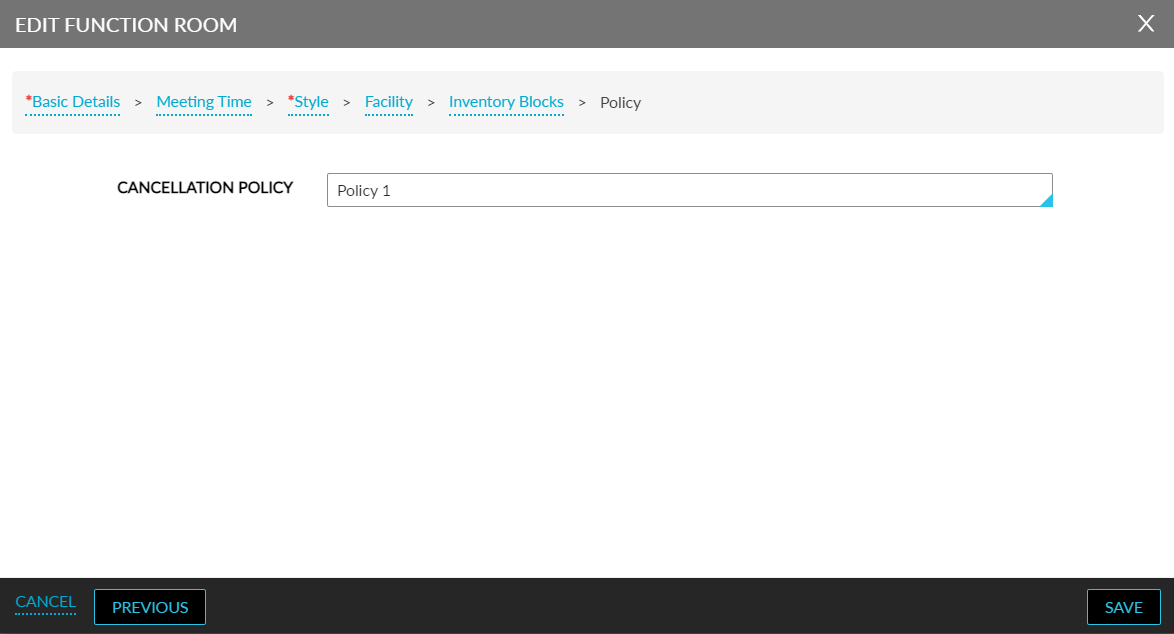
Users cannot deactivate the inventory block applied for a function room. When users click Next, they will be navigated to the Policy section. This section displays the Cancellation Policy drop-down list that displays all the policies configured in the Cancellation Policy tab of the Function Room Policy screen. Users can select the preferred policy to be applied for the function room.
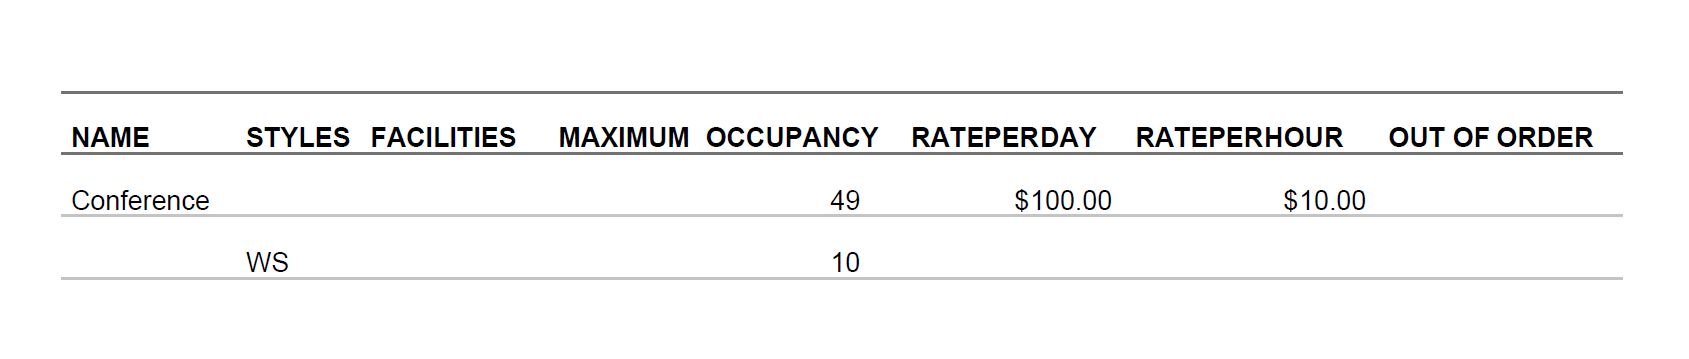
When users click Save, the function rooms configured will be displayed in the Configure Function Room screen. The details of the function rooms will be displayed in the following columns:
-
Name
-
Styles
-
Facilities
-
Maximum Occupancy
-
Rate Per Day
-
Rate Per Hour
An accordion is provided for the function room name displayed in the Name column. When expanded, the styles and maximum occupancy configured for the function room will be displayed in the Styles and Maximum Occupancy columns.

To modify the details of a function room, users must click the function room name displayed as a hyperlink in the Name column. When clicked, the Edit Function Room pop-up screen appears that allows users to modify the details configured for the room.
Users can download the function rooms configured at the property as a PDF file by clicking on the download button.