Sharing a Reservation
Sometimes two or more guests having individual reservations wish to occupy the same room and maintain separate billing and folios. The guests’ stay dates may coincide exactly and sometimes only part of their stay overlap. Such a reservation is called a "share."
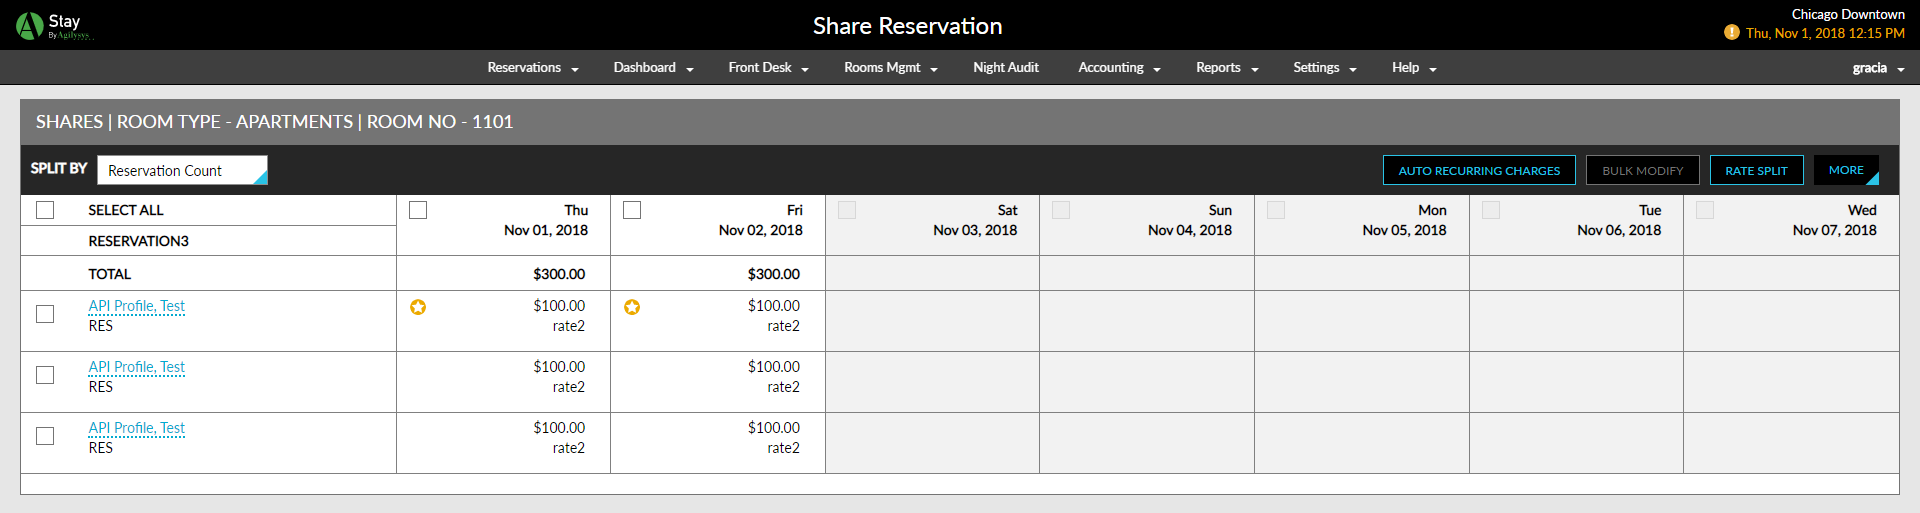
Select the Reservation and click the Shares icon to open the Share Reservation screen. The Shares feature lets users manage availability, rates, billing, guest tracking, and other aspects of property management that are directly and indirectly affected by shares. Specifically, the Shares feature provides the following functionality:
Combine reservations to create a share: Users can join two or more existing reservations or newly created reservations in a single room, provided there is some overlap of stay dates. The combine share action may involve moving one or more already checked in guests to the shared room.
Break Share: A share can be broken into individual reservations regardless of whether the guests are checked in or reserved. Where the share consists of more than two sharers, users have the option to break any number of the sharers into individual reservations. The sharer(s) who are being broken from the share can be assigned to separate rooms. Breaking a share affects availability.
Rate Split: The room rate for shares can be handled in several ways. Based on the Reservation Count or the Guest Count for each day of the stay, the rate can be evenly split among sharers; the rate can be billed entirely to one of the sharers; or each sharer can pay the full rate. The system also accommodates fixed rates and discounts (based on a flat amount and/or a percentage) established individually for each guest's reservation.
Primary Sharer: When guests are sharing, automatic and manual posting transactions for the sharing guests can be maintained on separate Billing screens. Separate folios can be generated for the sharers. Optionally, a share can be set up where charges for all sharers are automatically routed to one of the sharers who is designated as the "primary" sharer.
Automatic Check-in of Shares: When a reservation having sharers is checking in, any other sharers whose arrival date is today's date will be automatically checked in without prompts, including a prompt for keys.
(This behavior is activated only when creating a share through the Share Confirmation screen.)

Creating a Share
Allows users to add more reservations to a reservation as part of a share by searching for reservations. A search can be performed by the reservation confirmation number, the guest's profile name, or the guest's reservation name alias. Search will display only the reservations that are in the 'RESV' OR 'INH' status and have at least one night overlapping among the reservations.
From the Reservations page, select the reservation users wish to link.
Once the selected reservation opens, click on the Share Reservation icon. The Share Reservation screen opens.
Click More.
Click Add Existing Reservation. The Add Existing Reservations screen opens.
Search for reservation confirmation number or a guest's profile name in the search bar. All relevant reservations that are in the RESV or INH status are displayed.
Select the reservation and click the +Add link.
Click Add. Users can view the Primary Reservation and the Shared Reservation. If users want to change the Primary Reservation users can select the Mark as Primary Reservation option.
All the reservations added to the share will get assigned to the room type of the primary reservation.
Click Add. The shared reservation is created successfully.
Splitting Rates for a Share
Open the shared reservation.
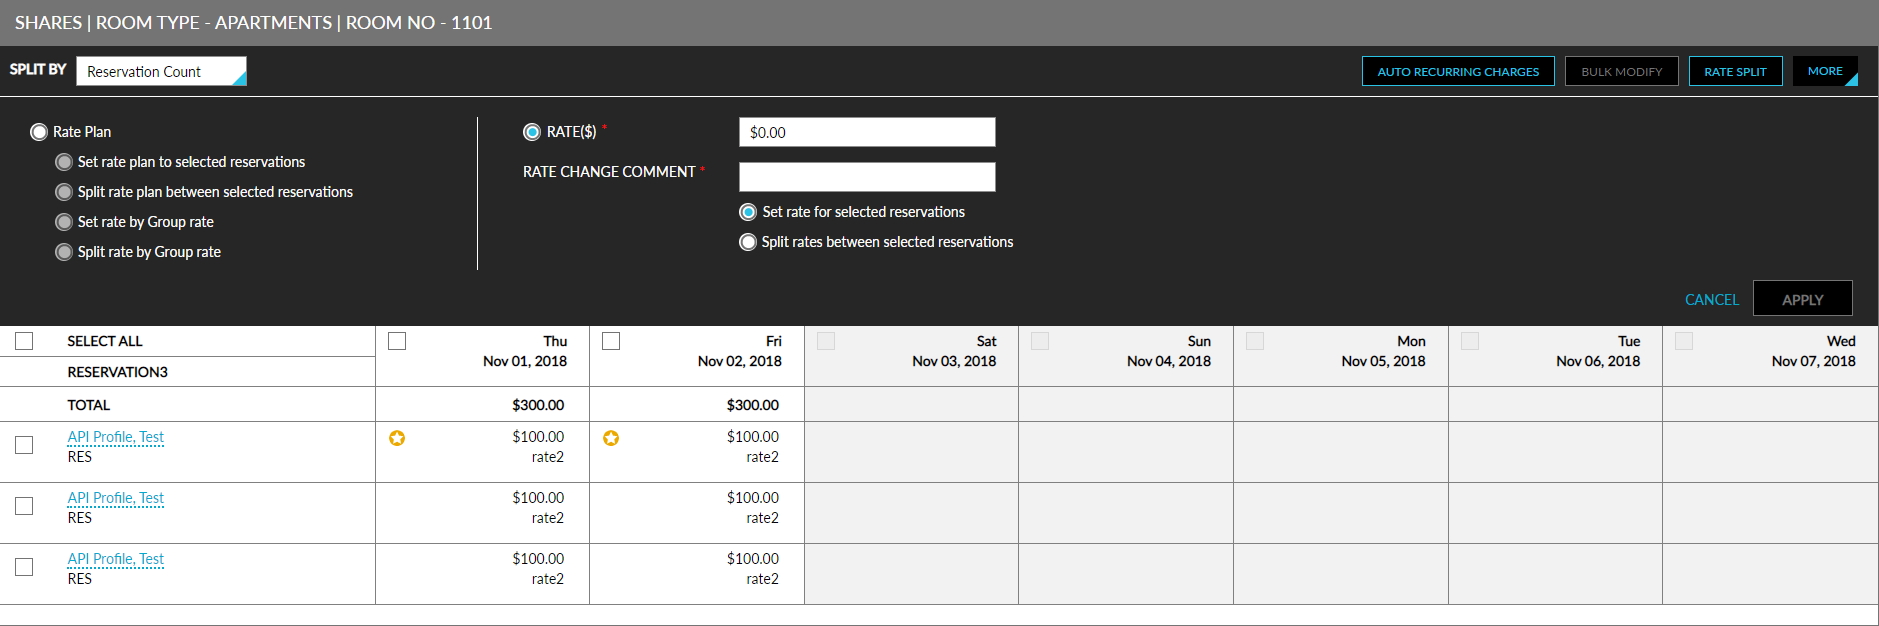
Click Rate Split. The options to split rates among reservations appears. Rates can either be split by Rate Plan or by Rates (flat amount or percentage). To split by rate plan, the following options are available:
|
Field |
Description |
|---|---|
|
Set rate plan to selected reservations |
If the GSA wants to set a specific rate plan for selected reservations, they can select this option. A list of all the relevant rate plans are displayed. Select the rate plan for the specific day and click Apply. |
|
Split rate plan between selected reservations |
If specific reservations in the share want the rates to be equally split, this option can be selected. Select the reservations which want the rates to be split and then select the rate plan from the list displayed. click Apply. |
|
Set rate by Group rate |
If the GSA wants to set a specific rate plan for the entire group, they can select this option. A list of all the relevant rate plans are displayed. Select the rate plan for the specific day and click Apply. |
|
Split rate by Group rate |
If specific reservations in the group want the rates to be equally split, this option can be selected. Select the reservations which want the rates to be split and then select the rate plan from the list displayed. click Apply. |
To split by Rates, the following options are available:
-
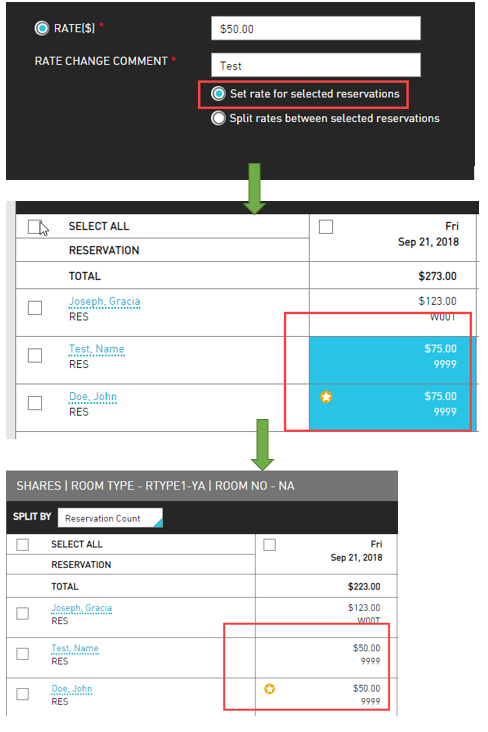
Set rate for selected reservations: Use this option to set a flat rate for a selected reservation. For example, if users wish to set $50 for 2 specific reservations in a share, enter the amount, enter a rate change comment. Select the reservations for which this flat rate must be applied and click Apply. See screens below for reference.
-
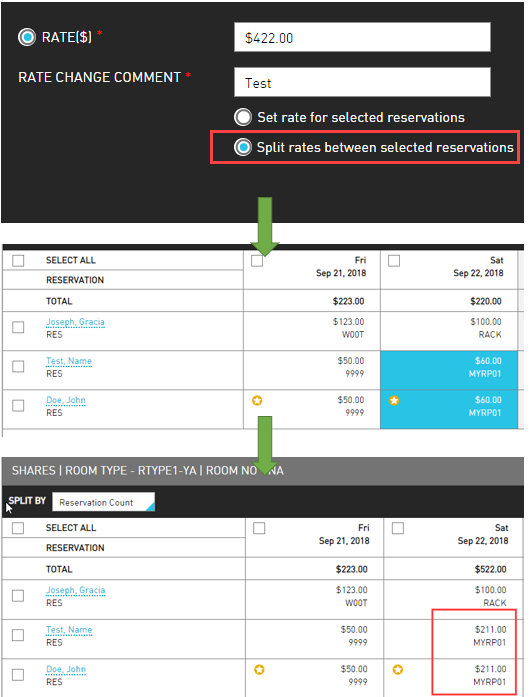
Split rates between selected reservations: Use this option to split an amount for selected reservations. For example, if users wish to set $422 for 2 specific reservations in a share, enter the amount, enter a rate change comment. Select the reservations for which this rate must be applied and click Apply. The amount gets equally split among the 2 selected reservations. See screens below for reference.
Breaking a Share
When users break a share, users separate one or more guests from the share arrangement. Only the reservations that are in RESV or Inhouse status can be broken from a share.
For a share that is being broken and is in the RESV status, the GSA can go to the reservation and then modify stay after breaking the share.
-
If room was assigned, the user will have the option to assign another room, or leave unassigned until check-in.
-
For a share that is being broken and is in the INH status, the GSA must select a new room to assign to the reservation.
To break a share:
Open the shared reservation.
Select the reservation that wishes to break away from the share.
Click More.
Click Break from Share.
From the Breaking Share confirmation screen, users must select if users wish to re-allocate the revenue between the remaining guests in a share or just continue without allocating the revenue to other reservations in the share. Select any one of the other reservations in the share to be a primary reservation. This may occur if the existing reservation that wants to break from the share was the primary reservation in the share.
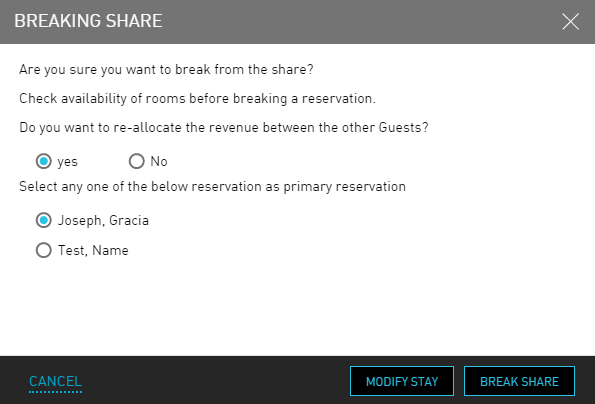
Select Modify Stay or Break Share.
-
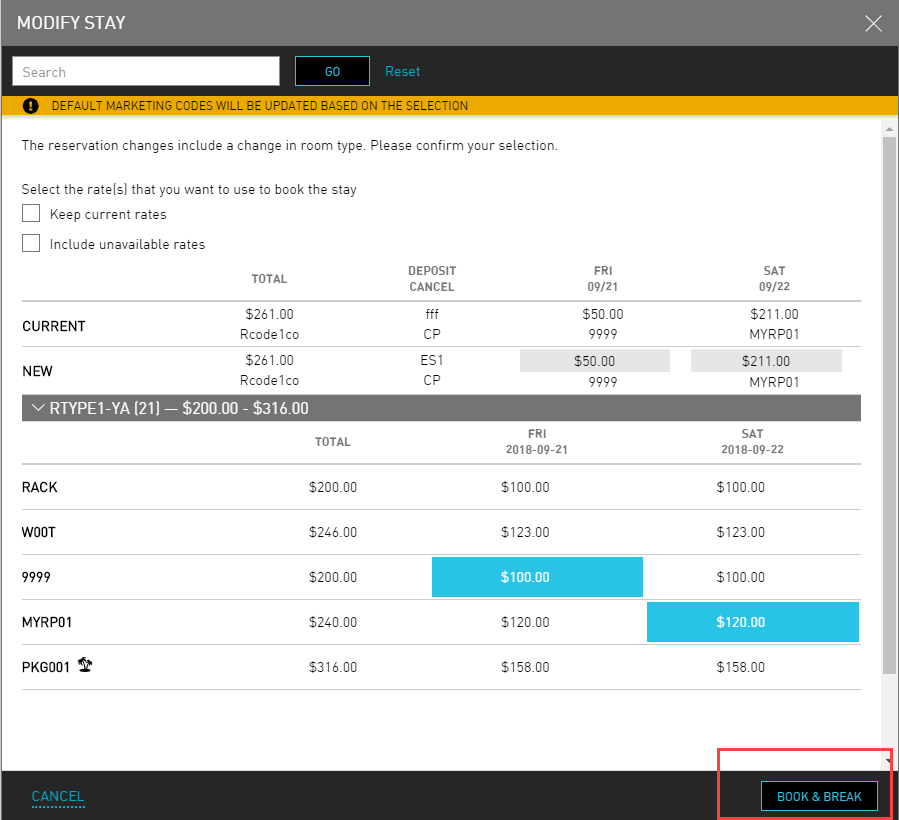
Clicking on Modify Stay will take users to the Change Room Type screen. Either select the same room type or another one from the dropdown. Click See Rates. From the Modify Stay screen, select the rate(s) that users want to use to book the stay. Users can either Keep Current Rates or select from the rate displayed. Click Book & Break to complete the stay modification for the reservation that is breaking away from the share.
-
Clicking on Break Share will immediately remove the reservation from the share without allocating another room for the reservation.
Setting a Primary Reservation
To modify the primary reservation in a share:
Open the shared reservation.
Select the reservation that users wish to reset to as the primary reservation in the share.
Click More.
Click Make it Primary. A reservation confirmation screen is displayed.
Primary reservations are responsible for room preference, interface management, deposits. Valid credit card of the primary reservation is required to authorize incidental charges at check-in. New primary reservation will get the incidental authorization at Night Audit.
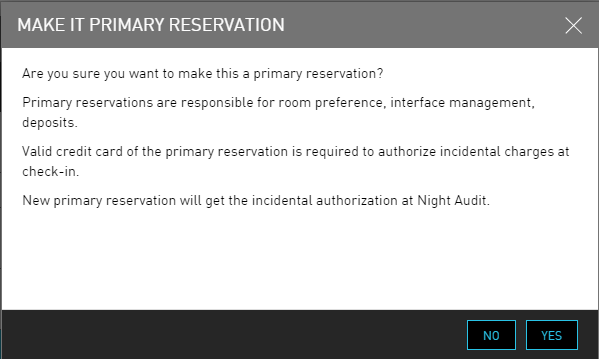
Click Yes to continue to set the selected reservation as the primary reservation.