Configure Function Rooms in Stay
Stay is enhanced to allow properties to configure function rooms of various styles and facilities that can be booked by guests for events such as conferences, weddings, parties, and so on.
For example, users can configure a function room style, Conference, that includes various facilities such as projectors, A/V equipment, whiteboards, markers, and so on with a seating capacity of 50 people. This style can be applied to the Conference function rooms configured at the property that can be booked by a guest who intends to hold a conference for a group of 50 people.
Feature Setting
The following new feature setting must be enabled to use this feature.
-
Name: Function Rooms
-
Comments: License is required
Contact Agilysys to set up this feature for the property.
Permissions
The following permissions must be assigned to use this feature.
-
The ReadProperties or ReadPropertyConfig permissions must be assigned to enable users to view the Function Rooms section in the Settings screen.
-
The WriteProperties or WritePropertyConfig permissions must be assigned to enable users to modify the details displayed in the Function Rooms section in the Settings screen.
The following new permission must be assigned to use this feature.
-
Stay_OverrideFunctionRoomBooking: Allows users to override a function room booking for the following:
-
Maximum occupancy
-
Inventory block
-
Meeting time restriction
-
This permission is assigned to the following roles by default:
-
Stay Hotel Manager
-
Department Manager
-
Accounts Receivable Manager
-
Stay Hotel Supervisor
-
GSA Supervisor
When the Function Rooms feature setting is enabled, a new section, Function Rooms, will be displayed in the Settings screen. This section displays the following hyperlinks:
|
Hyperlink |
Description |
|---|---|
|
Setup |
Allows users to configure the function room styles and facilities. |
|
Configure |
Allows users to configure function rooms associated with the created styles and facilities. |
|
Policy |
Allows users to configure the cancellation policy and the inventory blocks for function rooms. |
Function Room Setup
When users click the Setup hyperlink in the Function Rooms section, they are navigated to the Function Room Setup screen. The following tabs are displayed in this screen:
-
Style
-
Facility
Style Tab
This tab allows users to configure the function room styles. Users can configure various styles such as conference, banquet, classroom and so on.
To configure a new style, users must click the Add button. When clicked, the Add New Style pop-up screen appears that displays the following fields:
|
Field |
Description |
|---|---|
|
Active |
Select the checkbox to activate a style. This checkbox is selected by default. When users deselect this checkbox, the created style cannot be applied when configuring function rooms for the property. |
|
Code |
A unique code for a style. This is a mandatory field. The code configured for a style cannot be modified. |
|
Name |
A unique name for a style. This is a mandatory field. |
|
Description |
A description for the style. This is an optional field that allows users to enter. |

When users click Save, the created style will be displayed in the Style tab. Users can also choose to import function styles to the property. To import function styles, users must first download the template using the Download Template option. When clicked, the FunctionRoomStyle.xlsx file will be downloaded to the system. Users must configure values for the following columns in the downloaded template.
-
Code
-
Name
-
Description
-
Status
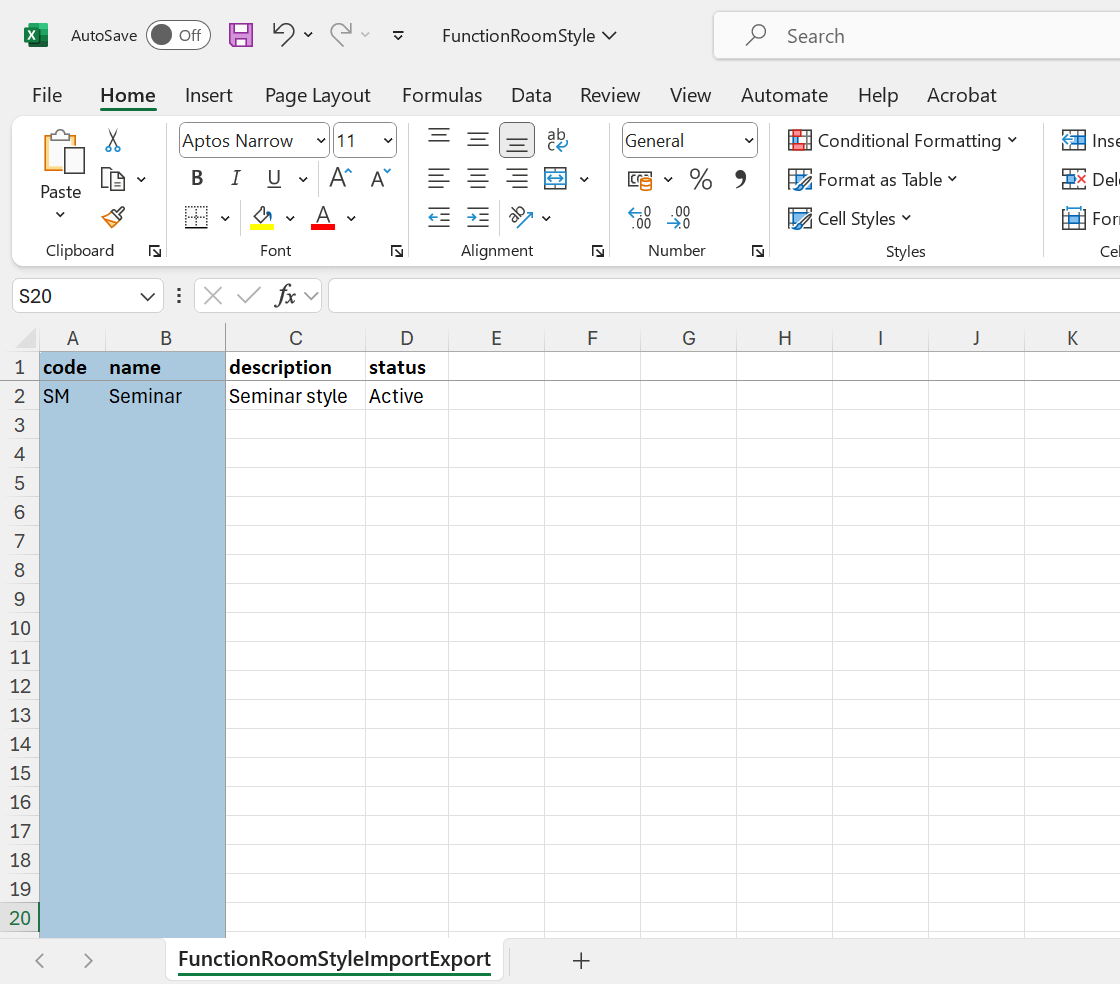
Users can import the function styles configured in the downloaded template using the Import option. When clicked, the Import Style pop-up screen appears that allows users to select the file to be imported. When users click Upload, the selected file will be processed, and the function styles will be imported to the property and displayed in the Style tab. By default, the styles imported to the property will be in the Active status. When the function styles are imported successfully, the message, Imported Successfully, will be displayed and when the styles are not imported successfully, the message, Could Not Import File. Please Try Again Later Using the Correct Data in the File, will be displayed.
The details of the function styles configured are displayed in the following columns in the Style tab:
-
Code
-
Name
-
Description
-
Status
When no configured styles are available for display, the message, No data available, will be displayed. By default, only styles in the Active status are displayed. To view the inactive styles, users must select the Include Inactive checkbox. Users can delete a style by clicking on the delete icon displayed for each style. To modify a style, users must click on the function style’s code displayed as a hyperlink in the Code column. When clicked, the Edit Style pop-up screen appears that allows users to modify the values for the following fields:
-
Active checkbox
-
Name
-
Description
The Code and Name columns can be sorted in the Style tab. Users can search for a record using the style name and code. Users can print the styles displayed in this tab by selecting the preferred styles and clicking on the Print icon. This icon will be enabled for selection only when there is at least one function style configured.

Facility Tab
The Facility tab allows users to configure facilities for function rooms. The following are the examples of facilities that can be configured for a function room:
-
Restrooms: Essential amenities for guests.
-
Kitchen or Catering Areas: Spaces for food preparation and service.
-
Furniture: Tables, chairs, podiums, and staging equipment.
-
Parking: Parking lots or valet services for guest convenience.
-
Climate Control: Heating, ventilation, and air conditioning (HVAC) for comfort.
-
Accessibility Features: Ramps, elevators, and ADA-compliant facilities.
-
Wi-Fi or Internet Access: Network services for guests and event activities.
-
Storage Rooms: For equipment, supplies, or personal belongings
To configure facilities, users must click the Add button. When clicked, the Add New Facility pop-up screen appears that displays the following fields:
|
Field |
Description |
|---|---|
|
Active |
Select the checkbox to activate the facility. This checkbox is selected by default. When users deselect this checkbox, the created facility cannot be applied when configuring function rooms for the property. |
|
Code |
A unique code for a facility. This is a mandatory field. The code configured for a facility cannot be modified. |
|
Name |
A unique name for a facility. This is a mandatory field. |
|
Description |
A description of a facility. This is a mandatory field. |

When users click Save, the configured facility will be saved and displayed in the Facility tab. The details of the facilities configured are displayed in the following columns in the Facility tab:
-
Code
-
Name
-
Description
-
Status
To modify a facility, users must click on the facility’s code displayed as a hyperlink in the Code column. When clicked, the Edit Facility pop-up screen appears that allows users to modify the values of the following fields:
-
Active checkbox
-
Name
-
Description
When no facilities are configured for display, the message, No data available, will be displayed. By default, only facilities in the Active status are displayed in the Facility tab. To view the inactive facilities, users must select the Include Inactive checkbox. The Code and Name columns in the Facility tab can be sorted. Users can search for a record using the facility name and code.
F&B Tab
The F&B tab allows users to configure food and beverage service items that can be added to a function room at the time of booking. For example, users can create a service, Breakfast, that includes various menu items such as bread, butter, jam, coffee, orange juice, and so on.
When users click Add, the Add New F&B Service Code pop-up screen appears that displays the following fields:
|
Field |
Description |
|---|---|
|
Active |
Select this checkbox to create active food and beverage service items. Only active service items can be added to a function room during booking. |
|
Code |
This is a mandatory field that allows users to configure a unique code for a service item. |
|
Name |
This is a mandatory field that allows users to configure a unique name for a service item. |
|
Description |
This is an optional field that allows users to configure a description for the service item. |
|
Charge |
This is a mandatory field that allows users to select from the following options based on which the food and beverage service must be charged:
To select an additional charge, users must click the +Add hyperlink. Each option can be selected only once. Users can configure the amount to be charged in the input field provided. |
|
Post Revenue As |
Users must select the transaction item using which the amount charged for the food and beverage service item will be posted to the function room. Users cannot deactivate the item selected in the Post Revenue As drop-down list in the Guest Accounting screen. |
|
Menu Items |
This is a mandatory field that allows users to configure the items included for the food and beverage service item. Users can configure multiple items using the +Add hyperlink. |

When users click Save, the food and beverage service item will be created and displayed in the F&B tab. This tab displays the details of the service items configured in the following columns:
-
Code
-
Name
-
Price Per Person
-
Price Per Item
-
Price Per Each
-
Flat Fees
-
Menu Items Options
-
Status
All columns except the Menu Items and Status columns can be sorted. Users can search for a service item using the service item name or code.
By default, when no service item is available for display, the message, No data available, will be displayed. Only the active service items are displayed in the F&B tab by default. Users must select the Include Inactive checkbox to view inactive items.
To modify a service item, users must click on the service item code displayed in the Code column as a hyperlink. When clicked, the Edit F&B Service Code pop-up screen appears that allows users to modify all fields except the Code.
Users can print the details of the service items configured by selecting the preferred service items and clicking on the Print icon. The Print icon will be enabled only when at least one service item is configured.

Audio Visual Tab
The Audio Visual tab allows users to configure audio visual services that can be added to a function room at the time of booking. For example, users can configure a service, Conference Rooms Service, that deals with the setting up of audio-visual equipment in conference rooms.
When users click Add, the Add New Audio Visual Service Code pop-up screen appears that displays the following fields:
|
Field |
Description |
|---|---|
|
Active |
Select this checkbox to create active audio-visual services. Only active services can be added to a function room during booking. |
|
Code |
This is a mandatory field that allows users to configure a unique code for a service. |
|
Name |
This is a mandatory field that allows users to configure a unique name for a service. |
|
Description |
This is an optional field that allows users to configure a description for the service. |
|
Charge |
This is a mandatory field that allows users to select from the following options based on which the audio-visual services must be charged:
To select an additional charge, users must click the +Add hyperlink. Each option can be selected only once. Users can configure the amount to be charged in the input field provided. |
|
Post Revenue As |
Users must select the transaction item using which the amount charged for an audio-visual service will be posted to the function room. Users cannot deactivate the item selected in the Post Revenue As drop-down list in the Guest Accounting screen. |

When users click Save, the audio-visual service will be saved and displayed in the Audio Visual tab. Details of the audio-visual services configured are displayed in the following columns:
-
Code
-
Name
-
Price Per Person
-
Price Per Item
-
Price Per Each
-
Flat Fees
-
Status
All columns except the Status column can be sorted. Users can search for a record using the service name or code.
By default, when no service item is available for display, the message, No data available, will be displayed. Only the active service items are displayed in the Audio Visual tab by default. Users must select the Include Inactive checkbox to view inactive items.
To modify a service item, users must click on the service item code displayed in the Code column as a hyperlink. When clicked, the Edit Audio Visual Service Code pop-up screen appears that allows users to modify all fields except the Code.
Users can print the details of the services configured by selecting the preferred services and clicking on the Print icon. The Print icon will be enabled only when at least one service is configured.

Function Room Policy
When users click the Policy hyperlink in the Function Rooms section, they are navigated to the Function Room Policy screen. The following tabs are displayed in this screen:
-
Inventory Blocks
-
Cancellation Policy
Inventory Blocks
Users can configure inventory blocks for function rooms from this tab. When users click Add, the Add Inventory Block pop-up screen appears that displays the following fields.
|
Field |
Description |
|---|---|
|
Active |
Select the checkbox to activate the inventory block. The checkbox is selected by default. When deselected, the created inventory blocks cannot be applied when configuring function rooms for the property. |
|
Code |
A unique code for an inventory block. This is a mandatory field that allows users to configure. This field accepts a maximum of 25 characters. |
|
Name |
This is a mandatory field that allows users to configure a unique name for an inventory block. This field accepts a maximum of 50 characters. |
|
Reason |
This is a mandatory field that allows users to configure a unique reason for an inventory block. This field accepts a maximum of 50 characters. |
|
Description |
This is an optional field that allows users to configure a description for an inventory block. This field accepts a maximum of 150 characters. |
|
Start Date |
This is a mandatory field that allows users to select the start date of an inventory block. By default, the current property date is displayed. Users cannot select a date prior to the current property date. |
|
End Date |
This is a mandatory field that allows users to select the end date of an inventory block. By default, the current property date is displayed. Users cannot select a date prior to the current property date. |
|
Days of Week |
This is a mandatory multi-select drop-down list that allows users to select which days of the week the inventory blocks must be applied. |
|
Start Time |
This is a mandatory field that allows users to select the start time for an inventory block. By default, the start time is displayed as 12:00 AM. Users can configure the preferred start time. |
|
End Time |
This is a mandatory field that allows users to select the end time for an inventory block. By default, the end time is displayed as 11:59 PM. Users can configure the preferred end time. |
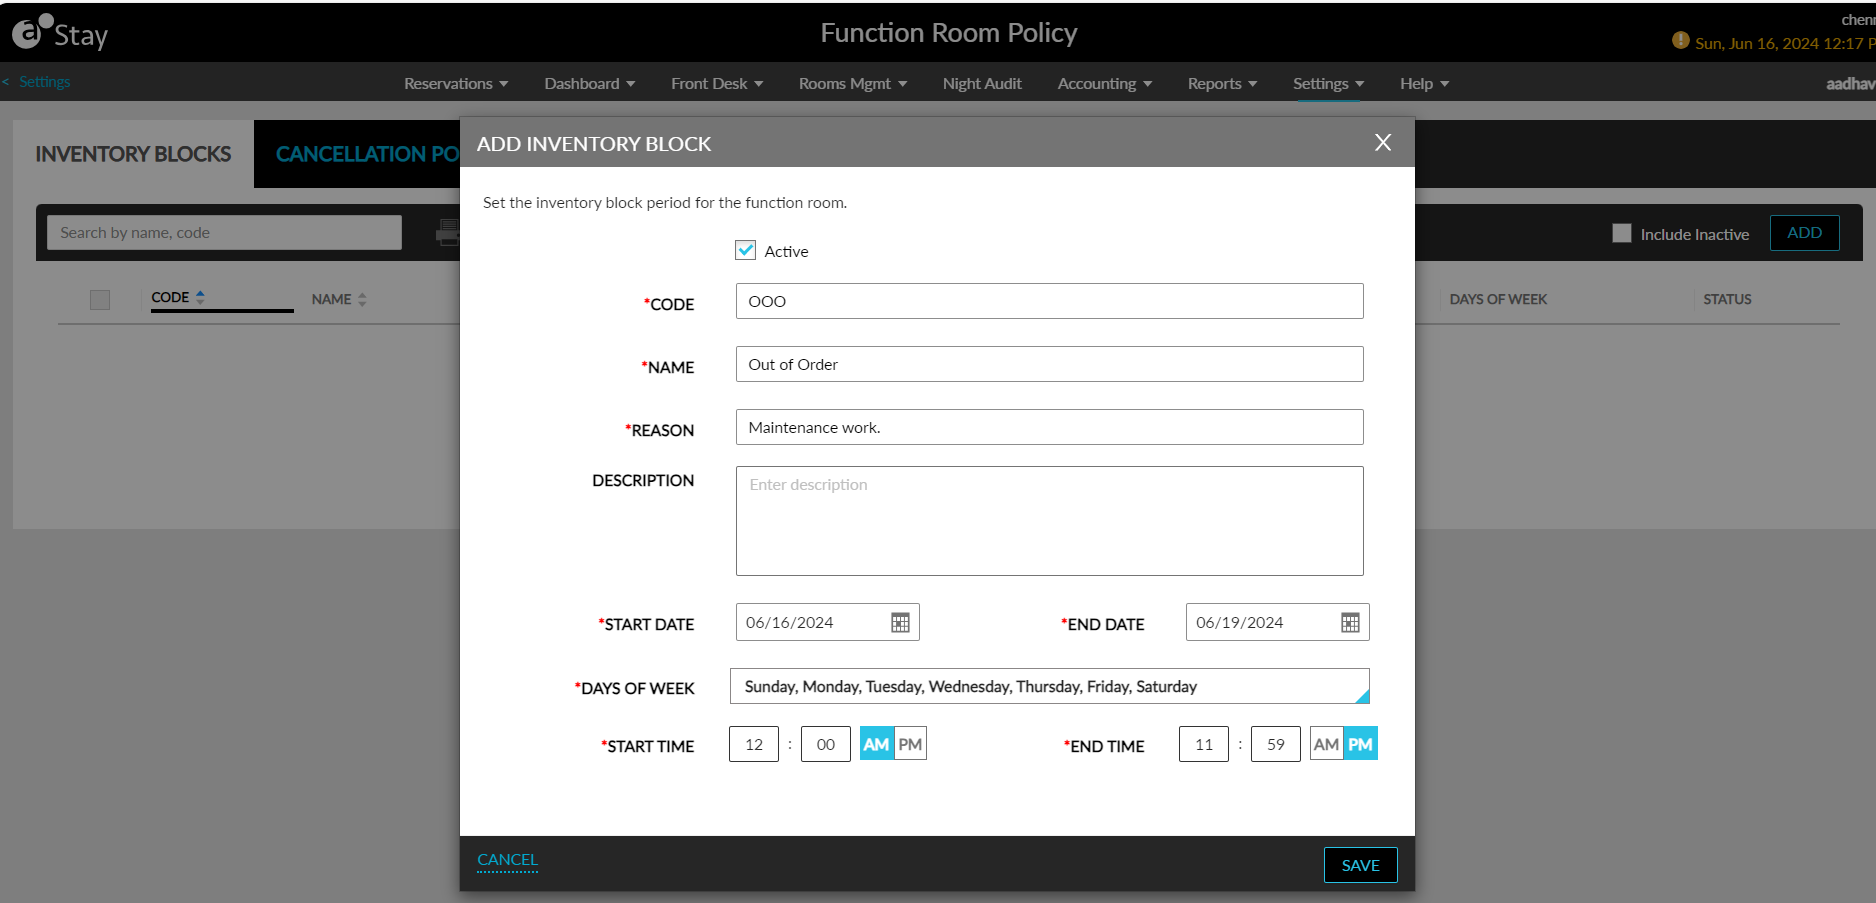
When users click Save, the inventory block will be saved and displayed in the Inventory Blocks tab. The details of the inventory blocks configured are displayed in the following columns:
-
Code
-
Name
-
Reason
-
Start Date
-
End Date
-
Days of Week
-
Start Time
-
End Time
-
Status
When no inventory blocks are available for display, the following message will be displayed: No data available. By default, only inventory blocks in the Active status are displayed. Users must select the Include Inactive checkbox to view the inactive inventory blocks. The Code, Name, and Reason columns can be sorted. Users can search for a record using the inventory block’s name and code.
To modify an inventory block, users must click the inventory block’s code displayed as a hyperlink in the Code column. When clicked, the Edit Inventory Block pop-up screen appears that allows users to modify the values of the following fields:
-
Name
-
Reason
-
Description
-
Start Date
-
End Date
-
Days of Week
-
Start Time
-
End Time
-
Status
Users can print the inventory blocks configured by selecting the preferred blocks and clicking on the print icon.

The print icon will be enabled for selection only when at least one inventory block has been configured.
Cancellation Policy
Users can configure cancellation policies for function rooms from this tab. The cancellation policies configured can be applied when guests cancel a previously booked function room at the property. To create a cancellation policy for a function room, users must click the Add button. When clicked, the Function Room Cancellation Policy pop-up screen appears that displays the following fields:
|
Field |
Description |
|---|---|
|
Active |
Select the checkbox to activate the cancellation policy. This checkbox is selected by default. When deselected, the policies created cannot be applied when configuring function rooms for the property. |
|
Code |
This is a mandatory field that allows users to configure a unique code for a cancellation policy. Users can enter a maximum of 25 characters. |
|
Name |
This is a mandatory field that allows users to configure a unique name for a cancellation policy. Users can enter a maximum of 50 characters. |
|
Charge |
This is a mandatory field that allows users to configure the cancellation fee for a policy. By default, the fee is displayed as $0.00. Users can configure a fee that is a maximum of 16 characters in length. |
|
Number of Days Prior to Arrival |
This is an optional field that allows users to configure the number of days prior to the arrival of a guest when a function room can be canceled. By default, the value is displayed as 0. |
|
Post Revenue As |
This is a single-select drop-down list that allows users to select the transaction item using which the cancellation fee must be posted. |
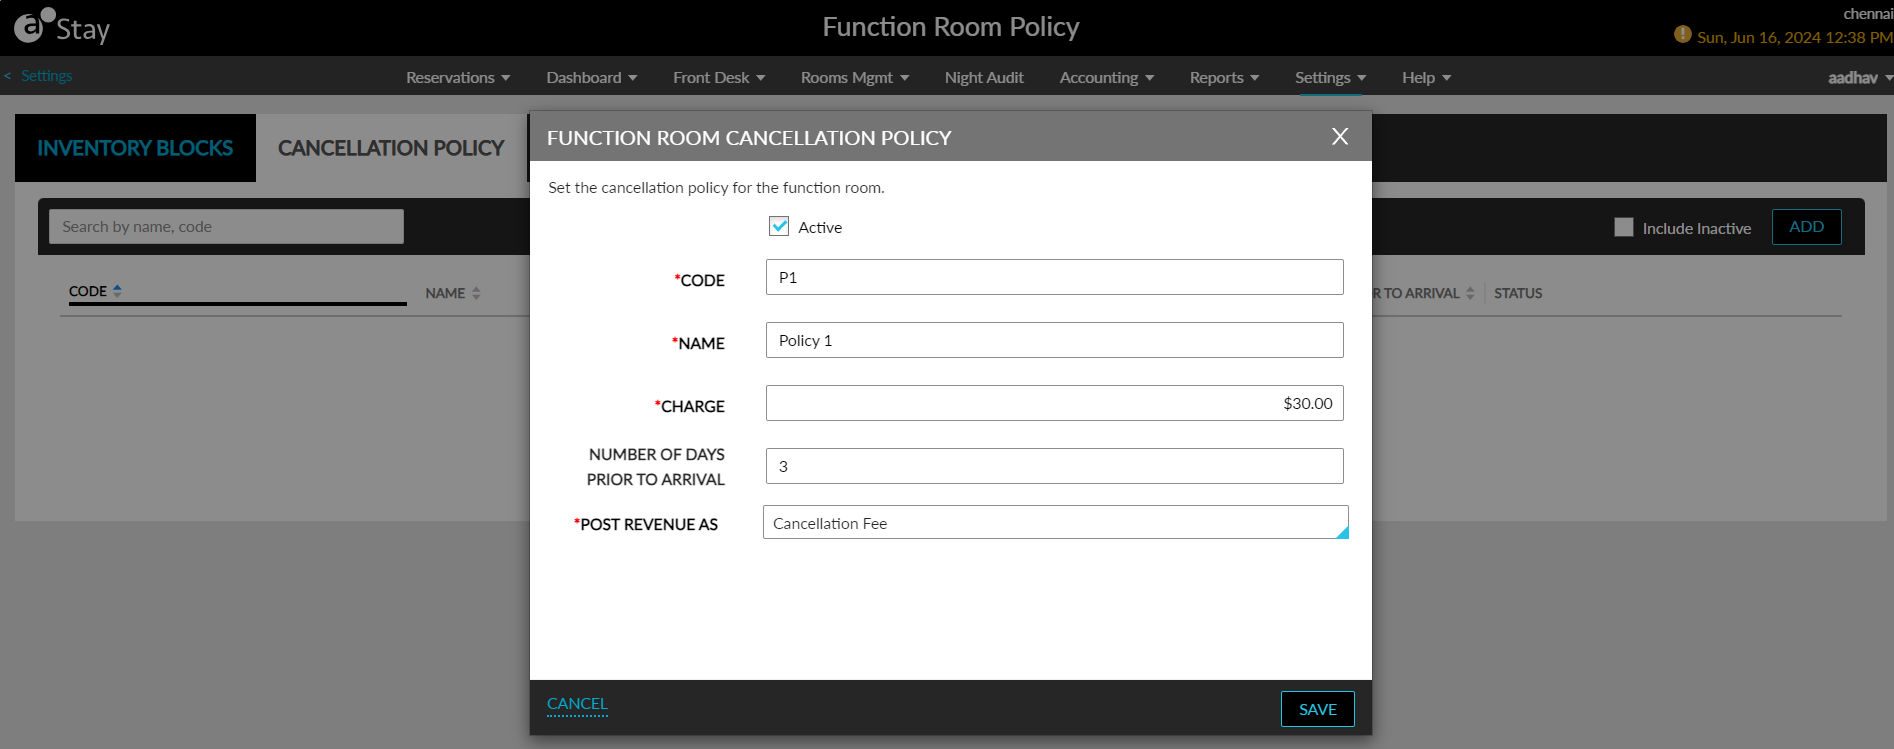
When users click Save, the cancellation policy will be saved and displayed in the Cancellation Policy tab. The details of the cancellation policies configured are displayed in the following columns:
-
Code
-
Name
-
Charge
-
Number of Days Prior to Arrival
-
Status
By default, when no cancellation policies are available for display, the message, No date available, will be displayed. Only the active policies are displayed by default. Users must select the Include Inactive checkbox to view the inactive policies.
All columns except the Status column can be sorted. Users can search for a record using the policy name and code. To modify a cancellation policy, users must click the policy code displayed as a hyperlink in the Code column. When clicked, the Edit Function Room Cancellation Policy pop-up screen appears that allows users to modify the values of the following fields:
-
Name
-
Charge
-
Number of Days Prior to Arrival
-
Post Revenue As
Configure Function Rooms
When users click the Configure hyperlink in the Function Rooms section, they will be navigated to the Configure Function Room screen. Users can create function rooms based on the styles configured and apply the inventory blocks and cancellation policies for the rooms. When users click Add, the Configure Function Room pop-up screen appears that consists of various sections. The first is the Basic Details section which is a mandatory section that displays the following fields:
|
Field |
Description |
|---|---|
|
Name |
This is mandatory field that allows users to configure a unique name for the room. This field accepts a maximum of 50 characters. |
|
Description |
This is an optional field that allows users to enter a description for the function room. This field accepts a maximum of 100 characters. |
|
Maximum Occupancy |
This is a mandatory field that allows users to configure the maximum count of occupants for a function room. |
|
Dimension |
This is an optional field that allows users to define the dimensions of a function room based on the following metrics:
|
|
Length |
This is an optional field that allows users to define the length of a function room. The value entered in this field will be suffixed with the dimension selected in the Dimension field. |
|
Width |
This is an optional field that allows users to define the width of a function room. The value entered in this field will be suffixed with the dimension selected in the Dimension field. |
|
Height |
This is an optional field that allows users to define the height of a function room. The value entered in this field will be suffixed with the dimension selected in the Dimension field. |
|
Square Meter/Feet |
This is an optional field that allows users to define the area of a function room. When the dimension is selected as Meter, the label will be displayed as Square Meter and if the dimension is selected as Feet, the label will be displayed as Square Feet. |
|
Phone Extension |
This is an optional field that allows users to configure the phone extension of a function room. |
|
Rate Per Day |
This is a mandatory field that allows users to configure the charge per day for a function room. This field accepts a maximum of 16 characters. |
|
Rate Per Hour |
This is a mandatory field that allows users to configure the charge per hour for a function room. This field accepts a maximum of 16 characters. |
|
Post Revenue As |
This is a mandatory single-select drop-down list that allows users to select the transaction item for posting the revenue for the function room. The transaction item selected cannot be deactivated in Guest Accounting (Settings à Guest Accounting à Items à Transaction Items). |
|
Buffer Time |
This is an optional field that allows users to define the time interval between two successive function room bookings. |
|
Service Charge |
This is a mandatory field that allows users to define the service charge percentage for a function room. Users can configure a value up to 100%. This field also accepts decimal values rounded off to 2 digits after the decimal point. |
|
Post Revenue As (Service Charge) |
This is a mandatory single-select drop-down list that allows users to select the transaction item for posting the service charge for a function room. |
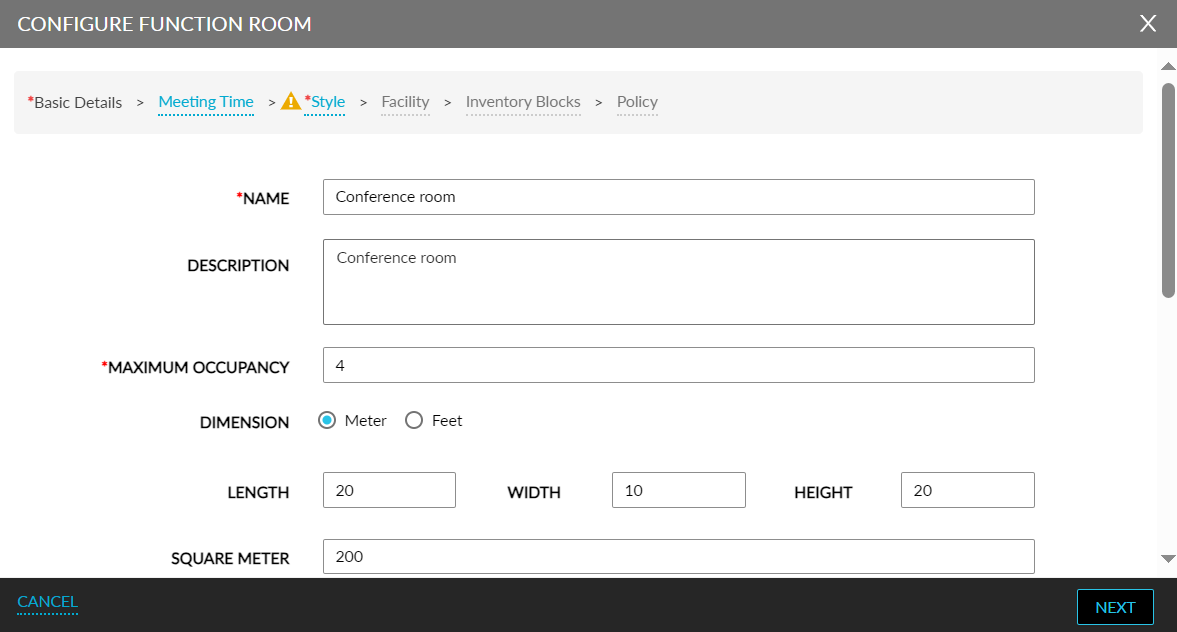
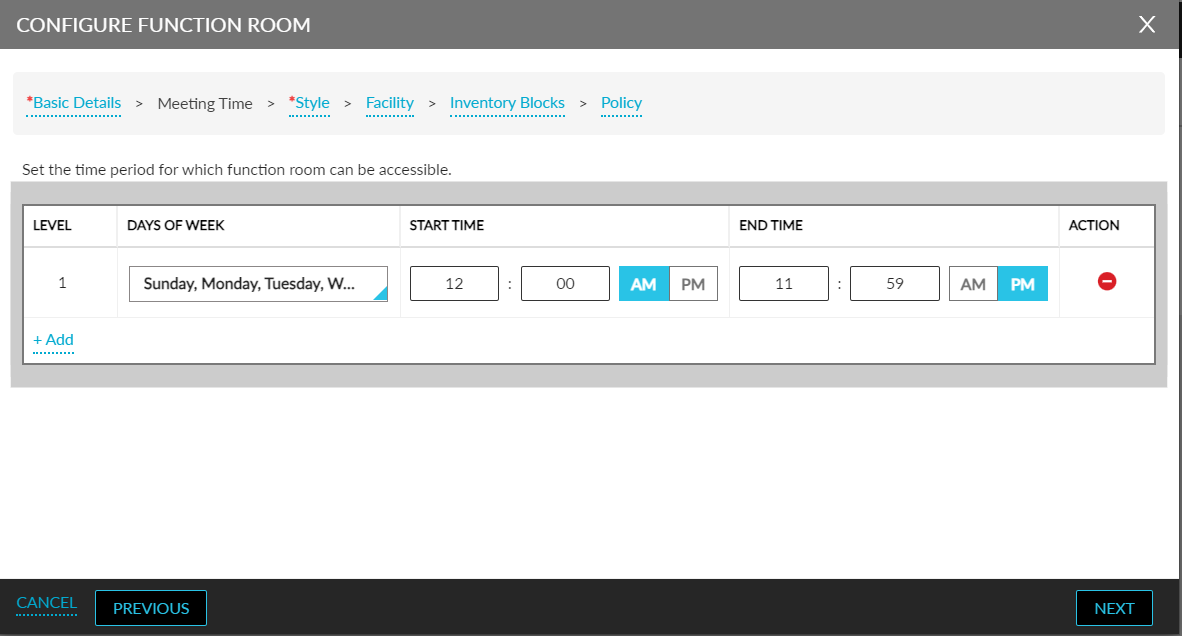
When users click Next, they will be navigated to the Meeting Time section. This is an optional section that allows users to define the days and time when the function rooms will be accessible. This section displays the following fields.
|
Field |
Description |
|---|---|
|
Level |
The level is auto generated by the system. |
|
Days of Week |
This is a multi-select drop-down list that allows users to select the days when the function rooms can be accessed. |
|
Start Time |
This field allows users to select the start time when the function room can be accessed. By default, the start time is displayed as 12:00 AM. |
|
End Time |
This field allows users to select the end time up to which when the function room can be accessed. By default, the start time is displayed as 11:59 PM. |
|
Action |
Users can delete a level by clicking on the delete icon displayed in this column. |
To add a new level, users must click the +Add hyperlink.
When users click Next, they will be navigated to the Style section. This is a mandatory section that displays the following fields:
|
Field |
Description |
|---|---|
|
Style Name |
This is a single-select drop-down list that allows users to select a function style for the room. All the function styles configured in the Style tab of the Function Room Setup screen will be displayed in this drop-down list. |
|
Maximum Occupancy |
This is an input field that allows users to configure the maximum number of occupants for a function room. The count entered is validated against the style selected. When the entered value is greater than the count configured for the style, the following message will be displayed: Function room can accommodate up to <count> occupants. |
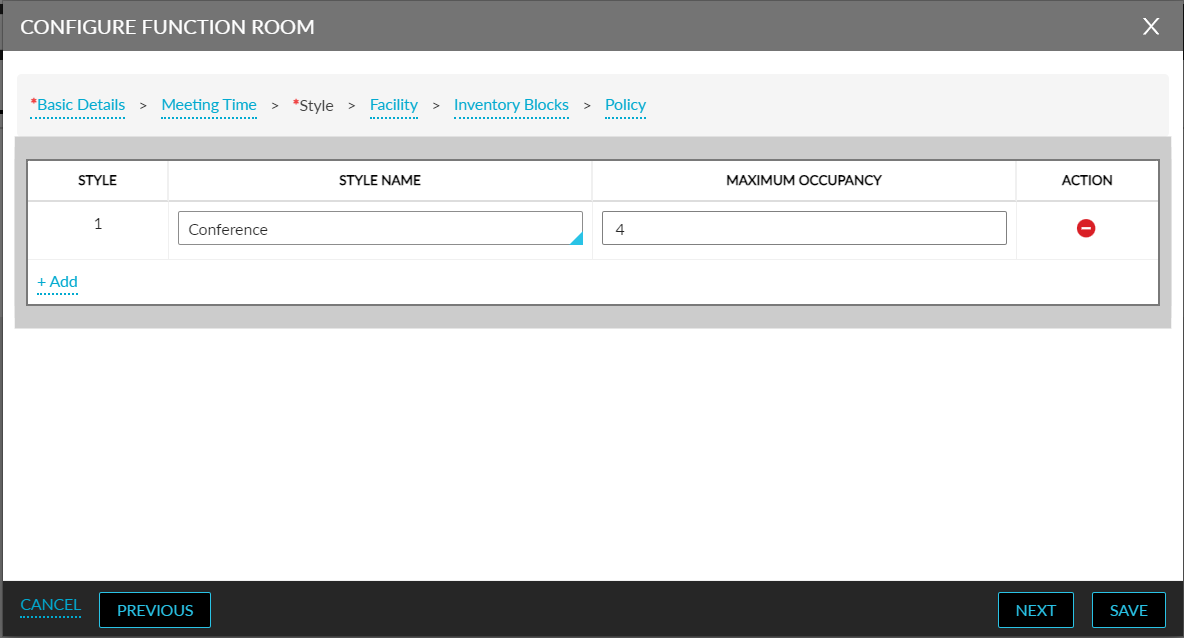
Multiple styles can be associated with a function room. Users must click the +Add hyperlink to associate another function style with the room. Users can delete the style using the delete icon displayed for the style in the Action column.
Once values are configured in the Basic Details and Style sections, the save button will be enabled for selection. Users can optionally configure values in the Facility, Inventory Blocks, and Policy sections.
When users click Next in the Style section, they will be navigated to the Facility section. This section displays the Facility drop-down list. This is a multi-select drop-down list that displays all the facilities configured in the Facility tab of the Function Room Setup screen. Users can select the preferred facilities for a function room. The facilities selected for a function room cannot be deactivated.
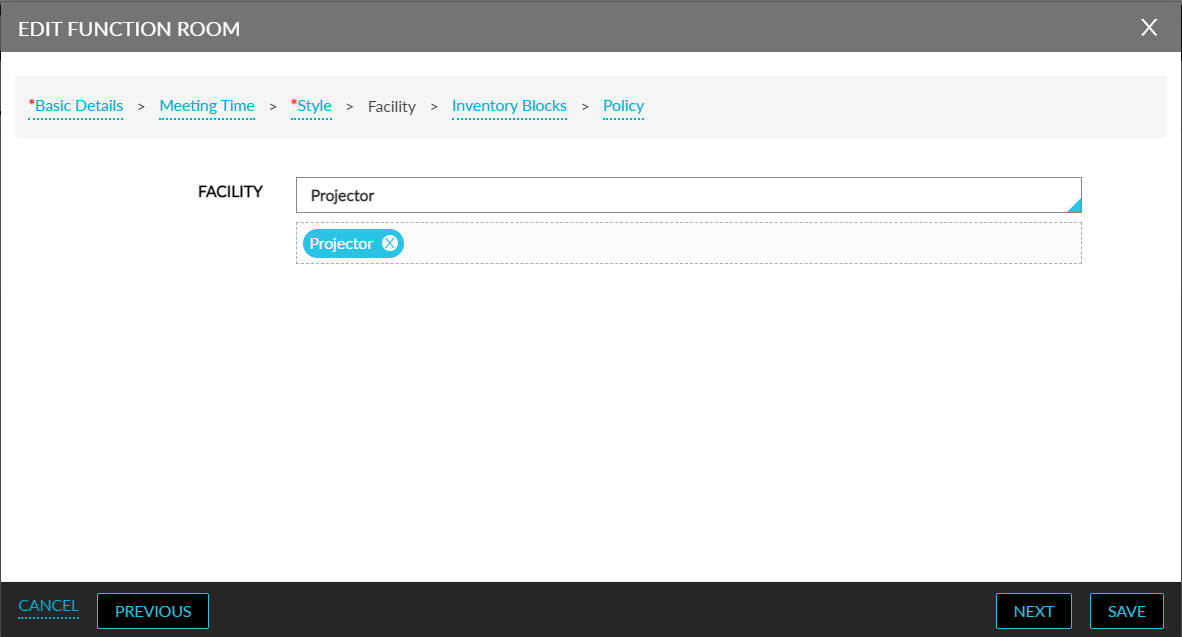
When users click Next, they will be navigated to the Inventory Blocks section. This section allows users to apply the inventory blocks configured in the Inventory Blocks tab of the Function Room Policy screen. When an inventory block is applied to a function room, the room will not be available to the guests for booking. This section displays the following fields:
|
Field |
Description |
|---|---|
|
+Add |
Click this hyperlink to apply an inventory block for a function room. |
|
Inventory Block Code |
This is a single-select drop-down list that displays the inventory blocks configured. Users can select the preferred inventory block for the function room. |
|
Start Date |
The start date configured for the inventory block selected will be displayed. |
|
End Date |
The end date configured for the inventory block selected will be displayed. |
|
Days of Week |
The days of week applicable for the inventory block selected will be displayed. |
|
Start Time |
The start time configured for the inventory block selected will be displayed. |
|
End Time |
The end time configured for the inventory block selected will be displayed. |
|
Action |
Delete an inventory block using the delete icon displayed for a block. |
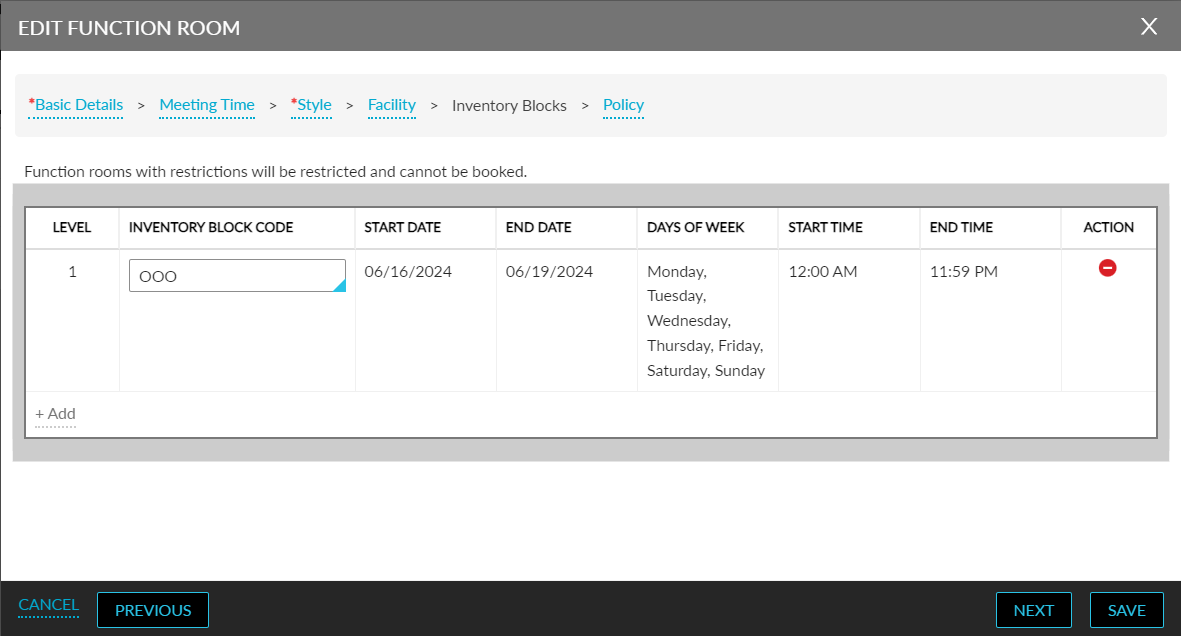
Users cannot deactivate the inventory block applied for a function room. When users click Next, they will be navigated to the Policy section. This section displays the Cancellation Policy drop-down list that displays all the policies configured in the Cancellation Policy tab of the Function Room Policy screen. Users can select the preferred policy to be applied for the function room.
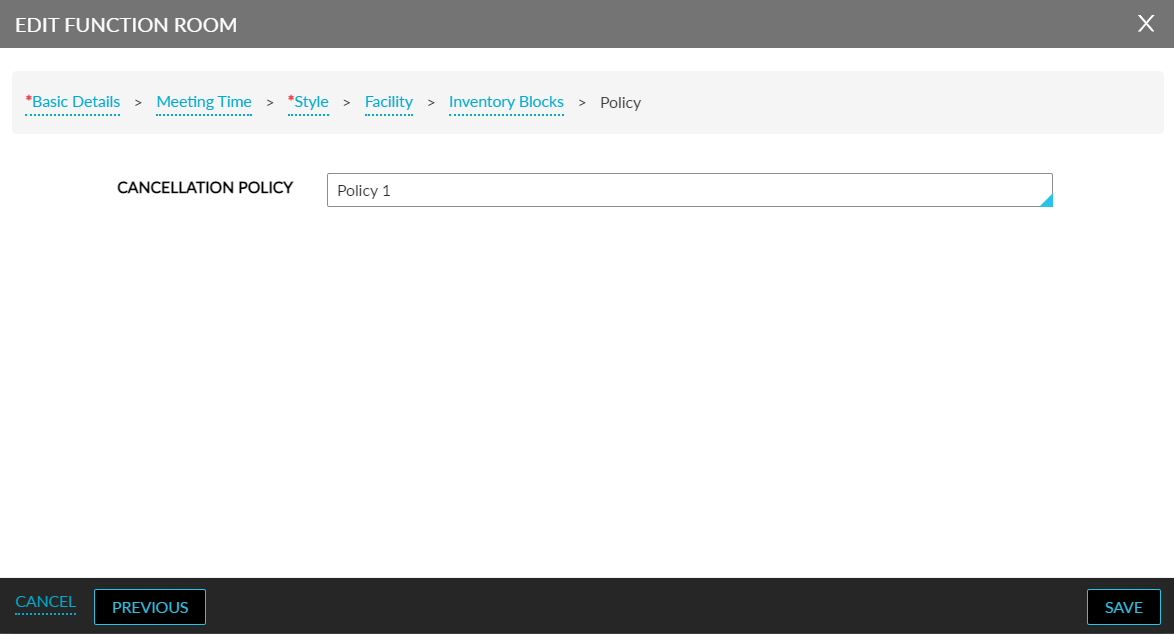
When users click Save, the function rooms configured will be displayed in the Configure Function Room screen. The details of the function rooms will be displayed in the following columns:
-
Name
-
Styles
-
Facilities
-
Maximum Occupancy
-
Rate Per Day
-
Rate Per Hour
An accordion is provided for the function room name displayed in the Name column. When expanded, the styles and maximum occupancy configured for the function room will be displayed in the Styles and Maximum Occupancy columns.

To modify the details of a function room, users must click the function room name displayed as a hyperlink in the Name column. When clicked, the Edit Function Room pop-up screen appears that allows users to modify the details configured for the room.
Mark Function Rooms as Out of Order
Users can mark a function room as out of order by selecting the preferred rooms and clicking on the Out of Order button. When clicked, the following options will be displayed:
-
Mark as Out of Order
-
Remove Out of Order
When users select the Mark as Out of Order option, the Confirmation pop-up screen appears that prompts users to confirm if the selected rooms must be marked as out of order.

When users click Yes, the selected rooms will be marked as out of order and an Out of Order indicator will be displayed for the rooms.

To remove the out of order inventory block created for a function room, users must select the rooms marked as out of order and select the Remove Out of Order option. When selected, the Confirmation pop-up screen appears that prompts users to confirm if the out of order block must be removed from the rooms.

When users click Yes, the out of order block will be removed from the room and the indicator will no longer be displayed.
The Out of Order option will be enabled for selection only when at least one function room is configured. Users can print the details of the function rooms configured using the print icon.

The print icon will be enabled for selection only when at least one function room is configured.
Book Function Rooms
When the Function Room feature setting is enabled, users can book function rooms using the Book a Function Room option in the Reservations menu. When clicked, users are navigated to the Book a Function Room screen that displays the following fields:
|
Field |
Description |
|---|---|
|
Start Date |
This is a mandatory field that displays the current property date by default. Users can select future dates of up to 6 years in the future. Past dates cannot be selected. |
|
End Date |
This is a mandatory field that displays the current property date by default. Users can select future dates of a maximum of up to 365 days from the start date. Past dates cannot be selected. |
|
Start Time |
The start time for which a function room must be booked. This is a mandatory field that displays the current property time + 30 minutes by default. Users cannot select a time prior to the current property time. |
|
End Time |
The end time up to which the function room must be booked. This is a mandatory field that displays the time as 11:59 PM or 23:59 HRS based on the time format used by the property. Users can book a function room for a minimum duration of 30 minutes and a maximum duration of 24 hours. |
|
Number of Persons |
This is a mandatory field that allows users to enter the count of persons occupying a function room. Users can enter a minimum count of 1 and a maximum count of 999999. |
|
Schedule |
The schedule for the function room booking. Users can select from the following options:
|
|
Period |
The number of days/hours for which the function room is being booked. |
Users can book function rooms for a single day or multiple days. The function rooms are available for booking once the buffer time is completed after the previous booking.
The function rooms are charged based on the Per Day/Per Hour option selected. When the Per Day option is selected, based on the number of days selected, the amount is calculated as follows: Per day charge * No of days. When the Per Hour option is selected, based on the number of days selected, the amount is calculated as follows: Per hour charges * No of hours * No of days.
When users select the Check Availability option, the function rooms available for booking are displayed. The following message is displayed when no function rooms are available for booking: Function room unavailable for specified period criteria. Please try entering other different date/time/number of persons.
When the Include unavailable function rooms checkbox is selected, function rooms with inventory blocks, and buffer period are displayed for users to override and book the room. Users with the Stay_OverrideFunctionRoomBooking permission can override and book an unavailable function room. In this case, the function room is validated, and the following messages will be displayed:
-
When the number of persons exceeds the maximum occupancy of the room: Number of persons exceeds maximum occupancy of function room.
-
When the number of persons exceeds the maximum capacity of the setup style: Number of persons exceeds maximum capacity of set up style.
-
When the selected function room has inventory blocks: Function room selected has inventory blocks attached as part of configuration for selected period.
-
When the selected function room is outside the meeting time configured: The function room is not available for bookings.
-
When the selected function room has a buffer period: The function room is unavailable due to buffer time configured.
When users select an unavailable function room and click Book, the Override pop-up screen appears that prompts users to enter their username and password.
-
When the user is assigned the Stay_OverrideFunctionRoomBooking permission, the unavailable function room can be overridden and booked.
-
When the user is not assigned the permission, the following message will be displayed: User does not have the required permission.
When users click Book to proceed with the booking, the Book Function Room pop-up screen appears that displays the following sections:
|
Section |
Description |
|---|---|
|
Summary |
Displays the following details:
|
|
Guest Info |
This section allows users to select an existing guest profile or create a new guest profile for booking a function room. |
|
Booking Details |
Users must enter the following details for booking the room:
|
|
Group Details |
Function room bookings must be mandatorily attached to groups. Users can create a new group or select an existing group. Users can search for a group using the group name. Only groups in Definite and Tentative statuses with the function room’s start and end dates within the group’s arrival and departure dates can be searched and retrieved. |
|
F&B Service |
This section allows users to search and associate food and beverage services to function rooms. One or more services can be selected. When users click the +Add F&B Service, the following fields are displayed:
For single day reservations: Price per option * count For multiple day reservations: Price per option * count * number of days
|
|
A/V Service |
This section allows users to add audio and visual services to function rooms. When users click the +Add A/V Service hyperlink, the following fields will be displayed:
For single day reservations: Price per option * count For multiple day reservations: Price per option * count * number of days |
|
Estimated Charges |
This section displays the rate, tax, and the total estimated due at check-out. Users with the Stay_OverrideFunctionRoomBooking permission can modify the rate if required. |
When users click Book, the function room is booked successfully, and the following details are displayed:
-
Booking ID
-
Start date.
-
End date.
-
Start time.
-
End time.
-
No of day/no of hour
-
No of persons
-
Event name
-
Function room name
-
Style
-
Style occupancy
-
Style description
-
Total charge
-
Service Charge
-
Cancellation policy
-
Facility
-
Rate per hour (when schedule type is per hour)/Rate per day (when schedule type is per day)
-
Food and Beverage services selected for the room
-
Audio Visual services selected for the room
View Booked Function Rooms
Once a function room is booked, users can search and retrieve the booked room in the Search screen using the event name, function room name, and booking ID. Users must select the booked function room to view the booking details. When selected, the booking details are displayed in the following sections:
|
Section |
Description |
|---|---|
|
Function Room |
This section displays the following details:
|
|
F&B Service |
The following details of the food and beverage services booked for a function room are displayed in this section:
|
|
A/V Service |
The following details of the audio-visual services booked for a function room will be displayed in this section:
|
|
Estimated Charges |
Displays the following details:
|
|
History |
This section displays the date, time, and username details of the following operations performed:
|
|
Print/Download |
This section allows users to select from the following options:
|
Cancel Function Room Booking
Users can cancel a booked function room using the Cancel Booking option displayed for a booked function room (Search screen à Select a function room à Cancel Booking). When clicked, the Cancel Confirmation pop-up screen appears that displays the details of the function room booked. When users click Confirm, the booked room is cancelled successfully.
Modify Function Room Booking
Users can modify a function room booking using the Modify function room option displayed for a booked function room (Search screen à Select a function room à Modify function room). When clicked, the Modify Function Room pop-up screen appears that displays the following sections:
|
Section |
Description |
|---|---|
|
Check Availability |
This section allows users to modify the values selected for the following fields:
|
|
Booking Details |
This section allows users to modify the values selected for the following fields:
|
|
F&B Service |
Users can perform the following operations in this section:
|
|
A/V Service |
Users can perform the following operations in this section:
|
|
Estimated Charges |
The updated date, transaction item, rate, tax, and total estimated due is displayed. |
When users click Save, the modifications is updated successfully.
Function Room Bookings for Groups
When the Function Rooms feature setting is enabled, a new tab, Function Room Bookings, will be displayed for groups. Users can book function rooms for a group using the Book a Function Room option displayed in this tab. When clicked, users will be navigated to the Book a Function Room screen that allows users to search and book function rooms.
Once the function room is booked, details of the booked room will be displayed in the following columns in the Function Room Bookings tab:
-
Event Name
-
Function Room Name
-
Style
-
Contact Name
-
Booking ID
-
Booking Status
-
Company Name
-
Guaranteed Status
-
Start Date
-
Start Time
-
End Date
-
End Time
-
Number of persons
-
Total Amount
Users can print the booking confirmation letter of the function rooms by selecting the function room bookings and clicking on the print icon.
Group Folio Postings
The following details are posted to the group folio automatically on the day of check-in of the function room.
|
Field |
Description |
|---|---|
|
Date |
The date for which services were booked.
|
|
Transaction Item |
Function room fees:
|
|
Quantity |
The Quantity column displays the quantity of items posted. |
|
Amount |
The amount of charge for each item is displayed in the Amount column. |
|
Tax |
The Tax column displays the tax associated with each charge. |
|
Payment |
The Payment column displays the amount paid for each charge. |
|
Total |
The Total column displays the sum of the amount and tax for each charge. |
Important Points
-
Users can book function rooms for groups only when the start and end date of the function room booking is within the arrival and departure dates of the group.
-
Function rooms cannot be booked for the group’s shoulder dates.
-
When a group is cancelled, the function room associated with the group will be cancelled automatically.
-
When users copy a group, the function room associated with the group will not be copied.
-
Once a function room is associated with a group, it cannot be modified or delinked.
-
When users modify the arrival and departure dates of a group beyond the start and end dates of the function room booked, the following message will be displayed, and the dates will not be modified: Function room booking exists.
Function Room Booking Report
A new Dynamic report, Function Room Booking, has been added to the Guests/Reservations section of the Reporting screen (Reports à Dynamic Reports à Guests/Reservations) that helps users track details of the function rooms booked for the selected date range.
This report can be generated for a maximum duration of 365 days.
Function Room Calendar
A calendar styled view of the function rooms available at the property grouped by day/week/month is displayed in the Function Room Calendar dashboard (Dashboard à Function Room Calendar).
Users can view the function room bookings for the property based on the following options selected in the View field:
-
Property
-
Function rooms
The Property option is selected by default. When selected, the function room bookings for the current property date are displayed. When a date is selected in the Date field, all function rooms booked at the property for the selected date are displayed.
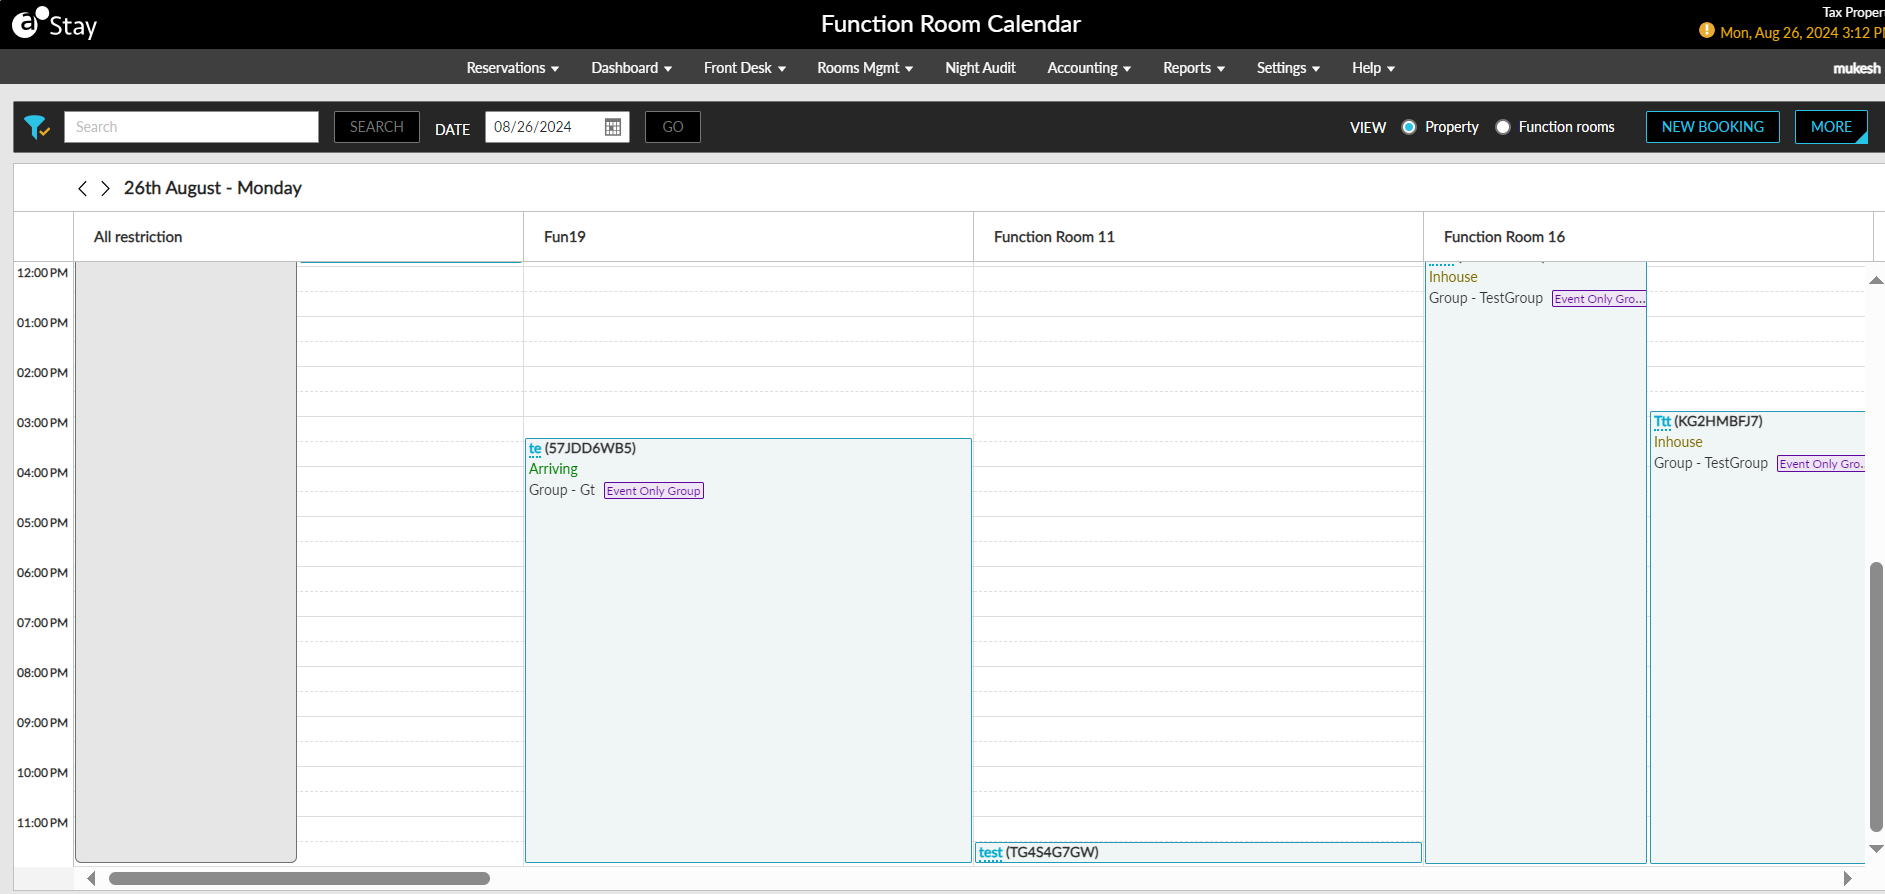
When the Function rooms option is selected, a date range option is provided, allowing users to view function room bookings across a selected period. In this view, users can choose which function rooms to display.
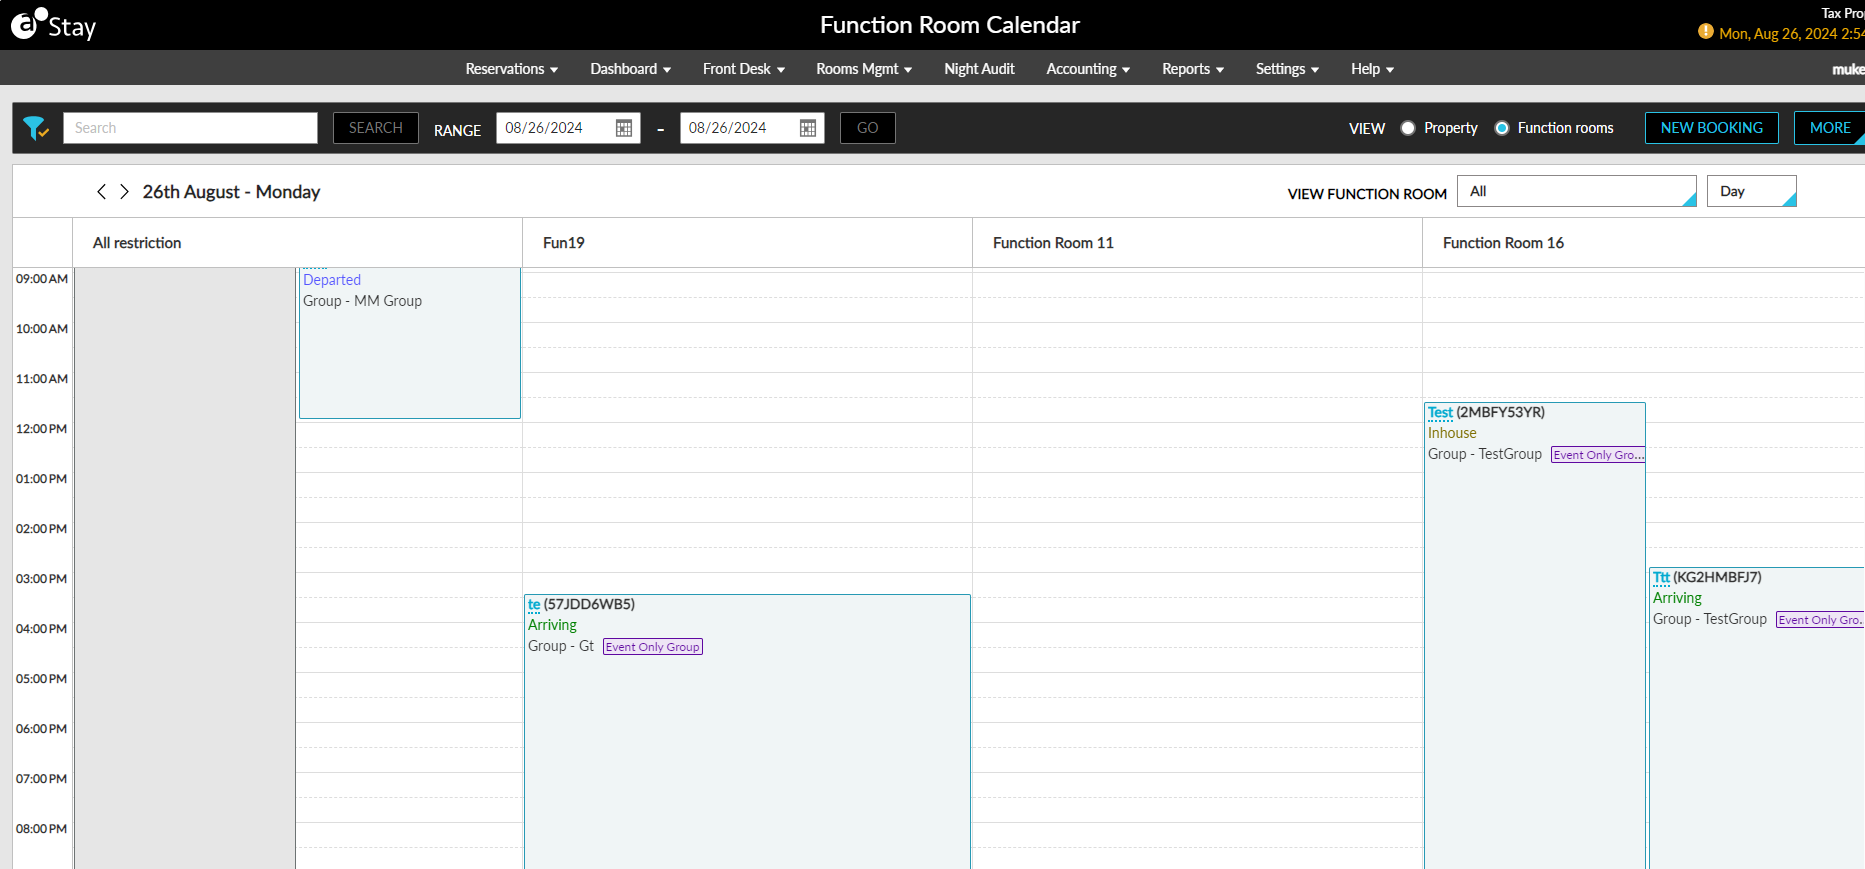
The function rooms are displayed as horizontal blocks. The following details are displayed in each block:
-
Event name (confirmation code)
-
Function room reservation status
When users hover over the function block, the following additional details will be displayed:
-
Event name (confirmation code) - status
-
Function room name - style name (max style occupancy)
-
Timings - start and end time
-
Group- Group name (Event-only indicator if applicable)
-
Company - Company name
-
Status - Guaranteed or Non-Guaranteed
When users click on the event name displayed as a hyperlink, the function room details will be displayed in a new tab. To create a new function room booking, users must select the New Booking option. When selected, users are navigated to the Book a Function Room screen where users can create a new booking.
Users can print, email, and download the confirmation letters for function room bookings by selecting the preferred option from the More menu.
Users can search records in the dashboard using the event name, confirmation ID, and group name. Records can be filtered based on the Guaranteed status values of the function rooms.
System Changes
To support this enhancement, the following changes have been made:
-
A new section, Function Rooms, has been added to the Settings screen. This section displays the following options:
-
Setup
-
Configure
-
Policy
-
-
A new option, Book a Function Room, has been added to the Reservations menu.
-
A new tab, Function Room Bookings, has been added to Groups.
-
A new option, Function Room Calendar, has been added to the Dashboard menu (Dashboard à Function Room Calendar).