Module to Track and Deliver Guest’s Baggage
Stay is enhanced to allow users to create tickets for the tracking and delivery of guest’s baggage in a new screen, Storage. This screen has been added to the Rooms Mgmt menu. This feature facilitates the efficient management of guest’s baggage by the porters or concierge at the property.
Feature Setting
The following new feature setting must be enabled to use this feature.
-
Name: Storage
-
Comments: License is not required
Permissions
The following new permissions must be assigned to use this feature.
|
Permission |
Description |
Roles Assigned |
|---|---|---|
|
Stay_ReadStorage |
Allows users to view the tickets created in the Storage screen (Rooms Mgmt ➜ Storage) and the Storage Details pop-up screen (Reservation ➜ Reservation Summary ➜ Click on the ST badge). When this permission is not assigned, the Storage option in the Rooms Mgmt menu and the ST badge in the Reservation Summary section will not be displayed. |
|
|
Stay_WriteStorage |
Allows users to modify the tickets created in the Storage screen (Rooms Mgmt ➜ Storage) and the Storage Details pop-up screen (Reservation ➜ Reservation Summary ➜ Click on the ST badge). |
|
|
Stay_ConfigStorageSettings |
Allows users to view and modify the storage locations and item types configured (Rooms Mgmt ➜ Storage ➜ Settings). |
|
When the Storage feature setting is enabled, a new option, Storage, is displayed in the Rooms Mgmt menu. When clicked, the Storage screen will be displayed. Users must first configure the storage locations and item types by clicking the Settings hyperlink. When clicked, the following tabs are displayed in the Storage screen:
-
Storage Location
-
Item Type
Configuring Storage Location
By default, the following message is displayed when no storage locations are configured: No storage has been added. Click + Add new area to create a new one. When clicked, the Storage Area section is displayed that allows users to configure details for the following fields:
-
Area
-
Location
-
Rack
-
Shelf
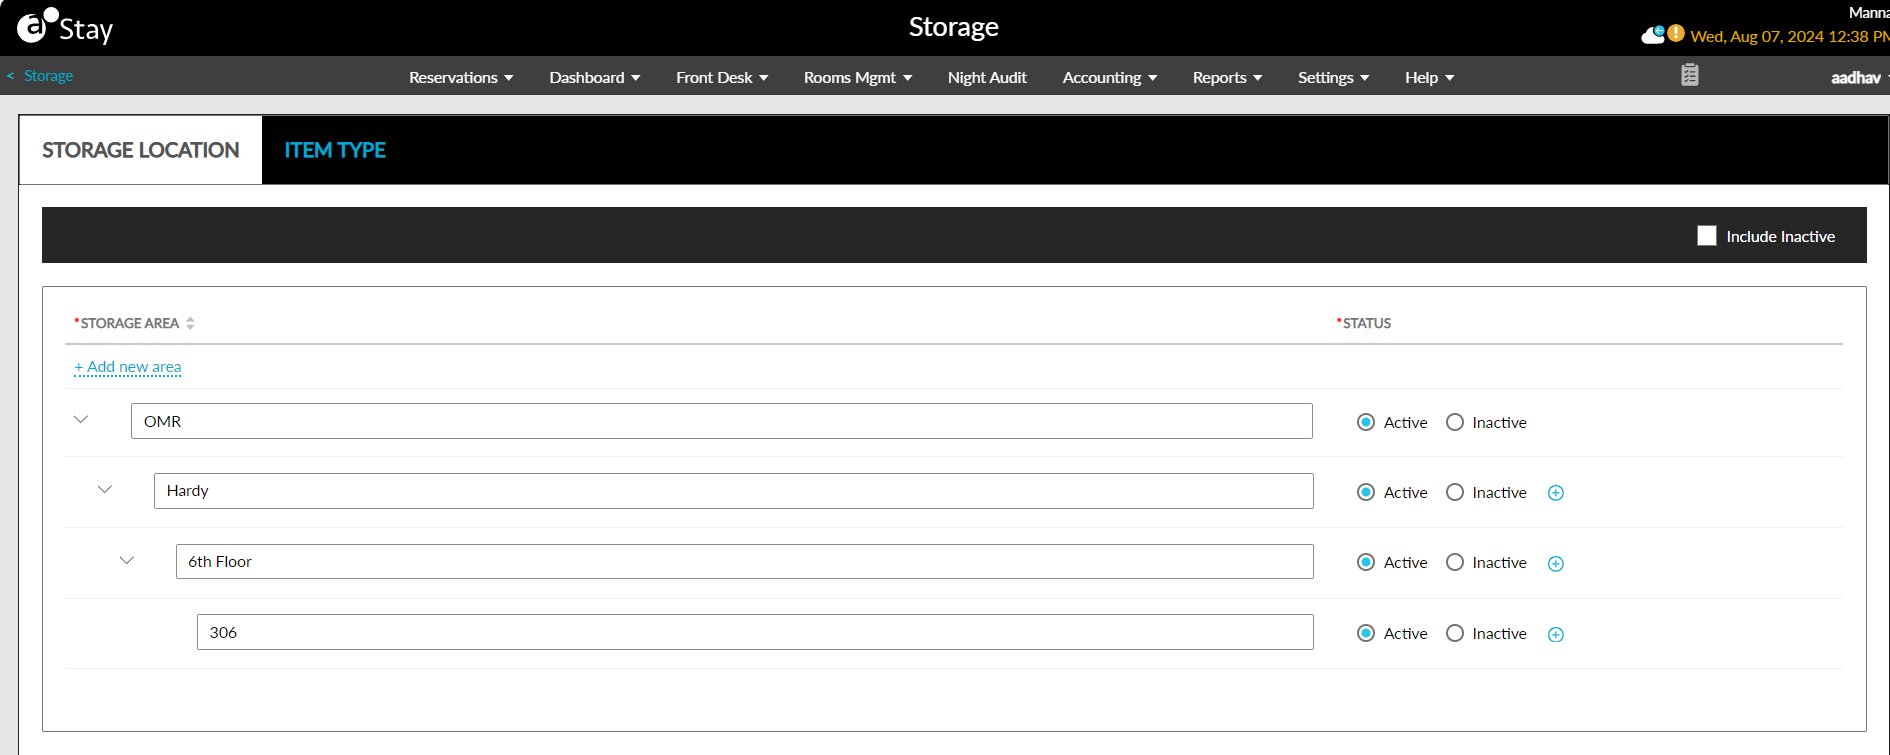
Unique names must be configured for each storage area, location, rack, and shelf. When the storage area name is modified after creating a ticket for a guest’s baggage, the modified name will be updated in the ticket. Users can set the status of each field as Active or Inactive. Users can configure additional locations, racks, and shelves for an area using the (+) icon. To configure additional storage areas, users must click the +Add new area hyperlink. Users cannot make a storage area inactive when it is associated with active tickets. In this case, when users click the Inactive option, the Confirmation pop-up screen is displayed that prompts users to confirm the change.

When users click Yes, the following message is displayed: Area/Location/Rack/Shelf is associated with an active storage ticket. Users can make an area/location/rack/shelf inactive when it is not associated with any active tickets. When an area/location/rack is made inactive, all the sub-components under the field will be made inactive.
Creating Item Types
Users must configure item types in the Item Type tab. When users click Add, the Add Item Type pop-up screen appears that allows users to configure the name and code of the item types.

When users click Save, the item type will be saved and displayed in the Item Type tab. Details of the item types configured are displayed in the following columns:
-
Name
-
Code
-
Status
The name and code columns can be sorted. Users can search for a record using the name and code. To modify an item type, users must click the item type name displayed as a hyperlink. When clicked, the Edit Item Type pop-up screen appears that users to select/deselect the Active checkbox and modify the name and code of the item type. When users deactivate the item types associated with active tickets, the following message will be displayed: Item type associated with an active storage ticket.
Creating Storage Tickets for Reservations
When users click Add in the Storage dashboard, the Storage Details pop-up screen appears that displays the following options:
-
Reservation: Select when the guest has a reservation at the property.
-
No Reservation: Select when the guest does not have a reservation at the property.
When the Reservation option is selected, users can search and retrieve reservations using the reservation confirmation ID or the guest name associated with the reservation. Only reservations in the following statuses are retrieved and displayed.
-
Arriving
-
Reserved
-
In-House
-
Departing
The following details of the reservation are displayed in the Current Reservation section.
-
Guest Name: The guest name associated with the reservation.
-
Confirmation: The confirmation ID of the reservation.
-
Group: The group name associated with the reservation.
-
Company: The company name associated with the reservation.
-
Room Type: The room type of the reservation.
-
Arrival Date: The arrival date of the reservation.
-
Departure Date: The departure date of the reservation.
-
Room Number: The room number assigned to the reservation.
-
VIP Status: The VIP status associated with the reservation.
-
Loyalty Program: The loyalty program associated with the reservation.
Creating Storage Tickets
Users must create storage tickets for the guest’s items by clicking Add in the Storage Details pop-up screen. When clicked, the Add pop-up screen appears that displays the following fields.
|
Field |
Description |
|---|---|
|
Item Type |
This is a mandatory single-select drop-down list that displays the active item types available at the property. |
|
Location |
This is a mandatory single-select drop-down list that displays the active locations available at the property. This field allows users to search and retrieve a configured location. |
|
Number of Items |
This is a mandatory field that allows users to configure the number of items for the selected item type. By default, the value is displayed as 1. This is a numeric field that accepts a minimum value of 1 and a maximum value of 20. Decimal numbers cannot be entered. |
|
Tag Numbers |
This is a mandatory field that allows users to configure tag numbers for the items. Users can create multiple records using the +Add option. |
|
Description |
This is a mandatory field that allows users to enter a description for the item. |
|
Reservation Comments |
This is an optional field that allows users to enter comments for the services. The comments will be added to the reservation with the severity, Low. The comments added as part of the storage tickets cannot be deleted. |
|
Message |
This is an optional field that allows users to enter messages for reservations. The messages added as part of storage tickets will be displayed when guests click on the guest message badge in the Reservation Summary section of reservations. |
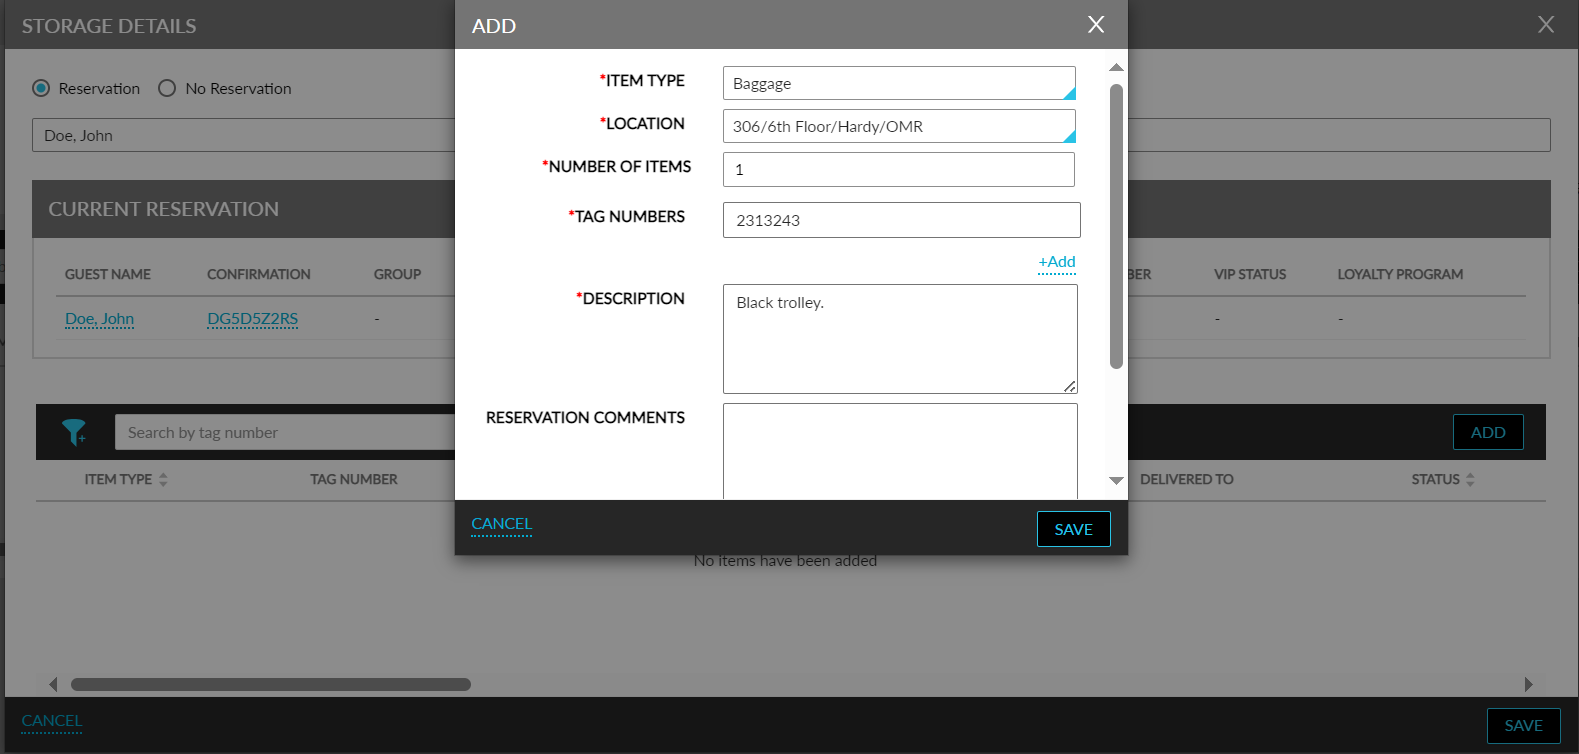
When users click Save, storage tickets will be created for the items and displayed in the Storage Details pop-up screen. The configured details will be displayed in the following columns:
|
Field |
Description |
|---|---|
|
Item Type |
The item type selected. |
|
Tag Number |
The tag numbers entered. |
|
Total Items |
The number of items selected. |
|
Location |
The location selected. |
|
Delivered To |
The location to which the items were delivered. This field will be enabled only when the status is changed to Closed or Closed-Delivered. By default, when a new ticket is created for a service, the status will be set to Stored and the field will be disabled. Users can change the status only when modifying the ticket. |
|
Status |
The following are the values displayed in this column:
|
|
Created On |
The date when the service was created. |
|
Received By |
The name of the person who received the item. This field will be enabled only when the ticket is modified. |
|
Shipping Carrier |
This is a single-select drop-down list that displays the shipping carriers configured at the property. |
|
External Tracking Number |
The tracking number for the shipment. |
|
Cost Quoted |
The cost of shipping configured for the selected carrier. |
|
Description |
The description of the service. |
|
Reservation Comments |
The comments configured in the ticket. |
|
Message |
The message configured in the ticket. |
|
Comment |
Users can enter a comment when modifying the status to the following:
|
|
Closed On |
The date when the service was completed. |
|
Closed By |
The username of the user who closed the service. |
Users can filter records using status and item types and search records using tag numbers. When users click Save, a record will be created in the Storage screen.
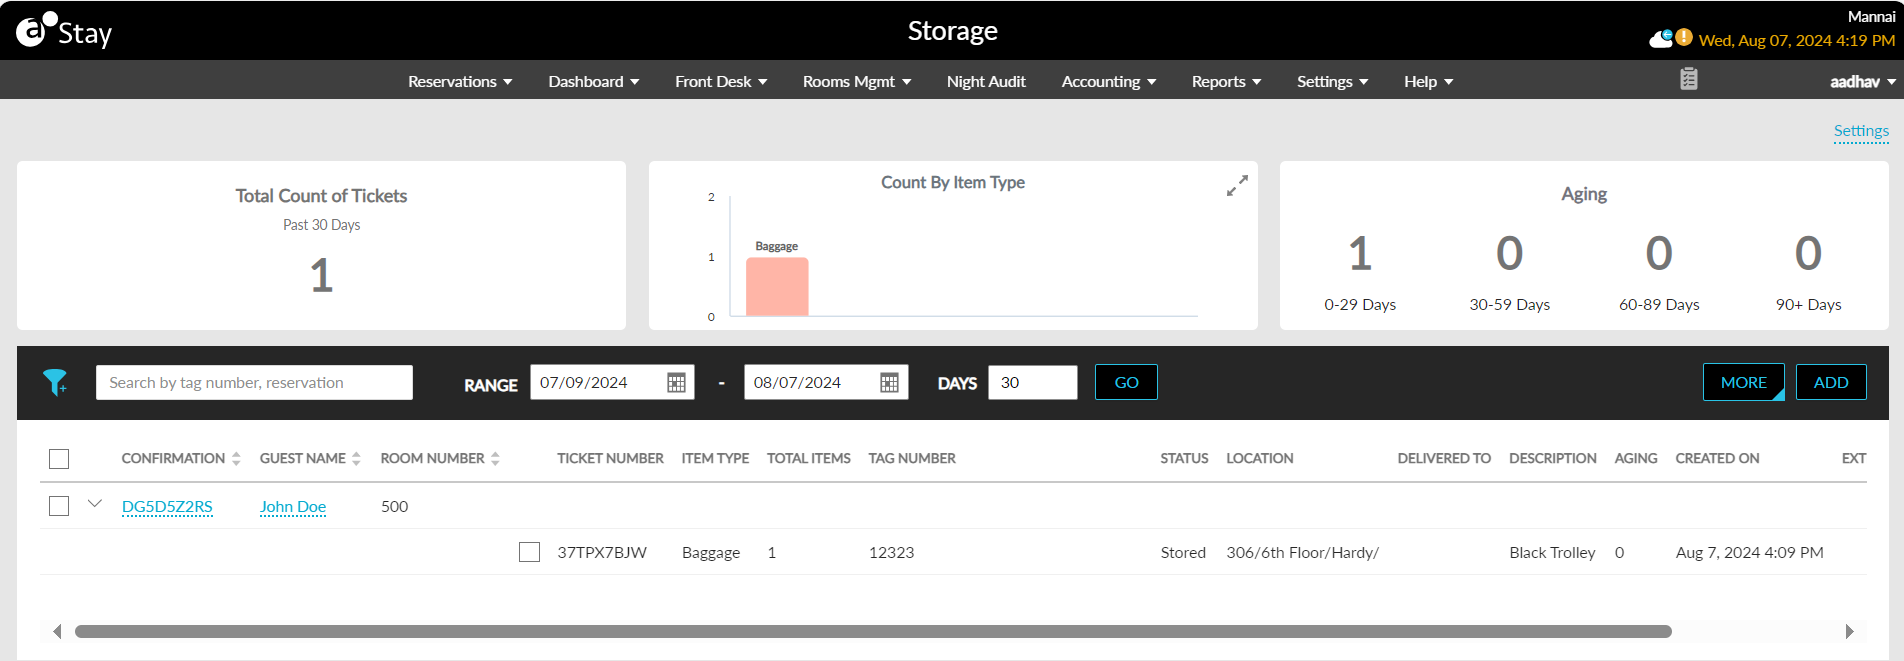
By default, the Confirmation ID, Guest Name, and Room Number details are displayed. Expanding the accordion next to the confirmation ID of reservations displays the values for the remaining columns.
To associate a ticket with a different reservation or modify the details of a ticket such as the values selected in the Status, Delivered To, Received By columns and so on, users must expand the accordion for the ticket, select the checkbox present next to the ticket number in the Ticket Number column, and click on More ➜ View/Edit. When clicked, the Storage Details pop-up screen will be displayed. Users must select the Link with Another Reservation checkbox to associate the ticket with a different reservation. When selected, the search field will be enabled that allows users to search and retrieve reservations. When users select the preferred reservation and click Save, the ticket will be successfully associated with the selected reservation. The ticket details including reservation comments and guest messages will be removed from the previous reservation and associated with the new reservation.
Users can modify the details of a ticket by selecting the preferred values for the columns in the Tags section. Users can also create additional tag numbers for the items. When users click Save, the modifications will be applied to the ticket successfully.
Creating Tickets Without Reservations
For guests who arrive at the property without a reservation, users can create tickets to store the guest’s items and have them delivered to the guest’s room after the reservation is booked. To create tickets without a reservation, users must select the No Reservation option in the Storage Details pop-up screen. When selected, users can search and retrieve guest profiles in the Search field. The selected profile will be displayed in the Current Profile section. Users can also create new guest profiles by selecting the Create a New Profile checkbox. When selected, the Profile Details section appears that allows users to enter values in the following fields and create a new guest profile:
-
Last Name
-
First Name
-
Email
-
Phone
Users must create tag numbers for the items by clicking Add. When users create tag numbers and click Save, the ticket will be created successfully and displayed in the Storage screen. After a reservation is booked for the guest, users can associate the ticket with the reservation by selecting the Link with Another Reservation checkbox when modifying the ticket in the Storage Details pop-up screen. Users can also modify the details of the ticket in this screen.
Bulk Update of Tickets
To update multiple tickets, select the tickets and click on More ➜ View/Edit. When clicked, the Bulk Edit pop-up screen appears where users can modify the values for the following fields:
-
Status
-
Closed On
-
Shipping Carrier
-
External Tracking Number
-
Cost Quoted
-
Received By
-
Delivered To
-
Comments
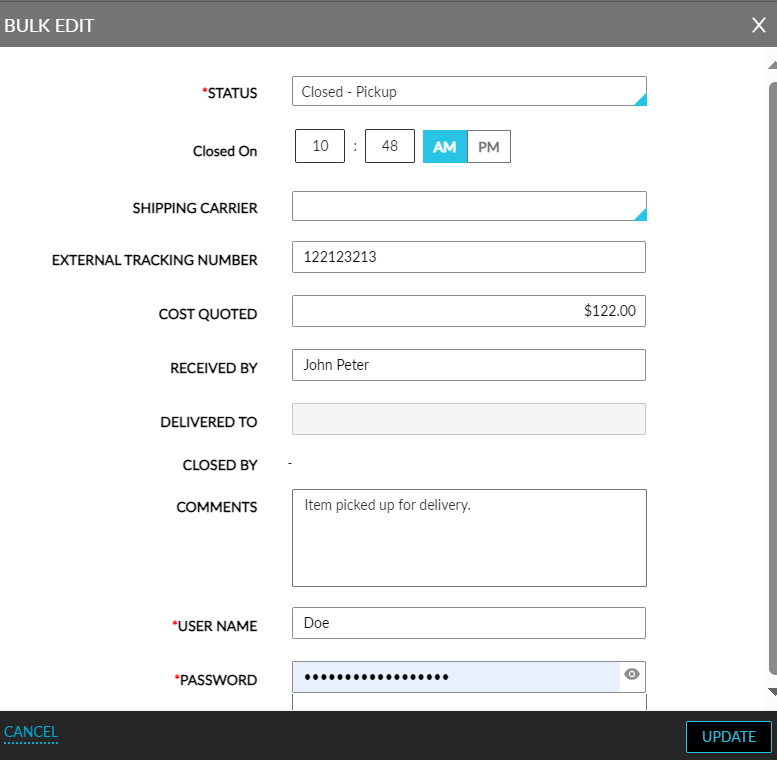
Users must enter their username and password in the Username and Password fields and click Update. When clicked, the entered details will be applied to the selected tickets.
Storage Screen Dashboard
The following widgets are displayed in the dashboard of the Storage screen:
|
Widgets |
Description |
|---|---|
|
Total Count of Tickets |
Displays the total count of tickets created for the past 30 days from the current property date. This count includes tickets in the following statuses: Closed, Closed-delivered, Closed-pickup, Closed-shipped, and Stored. |
|
Count by Item Type |
This is a bar graph that displays the count of tickets in the Stored status categorized by the item type. By default, the graph displays the details of a maximum of 5 tickets created in the recent past. Users must click the expand icon to view details of the remaining tickets. |
|
Aging |
This widget displays the aging of the tickets in the Stored status. Aging is calculated from the time when the ticket is created. Tickets are categorized based on the following aging buckets:
|
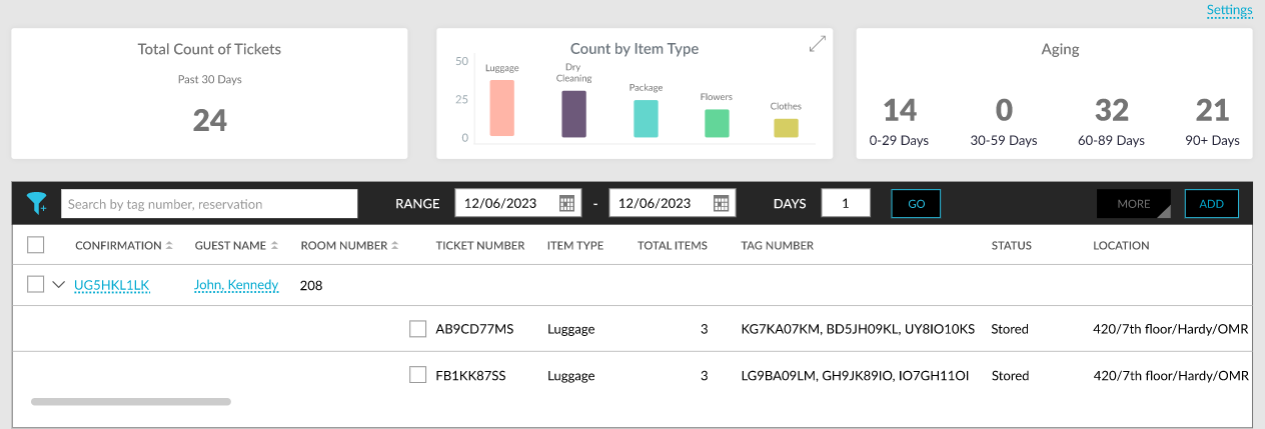
The details of the tickets created are displayed in the mentioned columns below the widgets. Users can search tickets using the tag number or reservation confirmation ID. Users can select the preferred date range for which the tickets must be retrieved in the Range date pickers. Users can select dates in the past up to the current property date. Future dates cannot be selected.
Creating and Viewing Storage Tickets in Reservations
The ST badge is displayed on the Reservation Summary section when the Storage feature is enabled. When a storage ticket is created, the badge is highlighted with the ticket count. Clicking the badge opens the Storage Details pop-up screen, where users can view and edit ticket details.

Users can also create new storage tickets for the reservation by clicking Add. When clicked, the Add pop-up screen appears that allows users to create a new storage ticket. When no ticket has been created for a reservation, but a ticket is available for the guest profile associated with the reservation, the following pop-up message will be displayed in the Storage Details pop-up screen: A ‘No Reservation’ storage ticket is available for the matching profile. Would you like to map it to the reservation? When users click Yes, the ticket will be associated with the reservation.
Copying and Moving Reservations with Storage Tickets
When users move a reservation with active storage tickets in the Stored status to a different property, the Move Reservation button for the reservation is disabled, and the following message is displayed when hovered upon: There are pending storage tickets, please close the tickets to move reservation.
When a reservation with storage tickets is copied, the tickets will not be copied to the new reservation. The following message is displayed in the Copy Reservation screen: Storage tickets cannot be copied.
Records for Storage Tickets
A record is created in the Audit Log screen (Reports ➜ Audit Log) when a storage ticket is created, modified, and associated with a different reservation from the Storage screen (Rooms Mgmt ➜ Storage) and Storage pop-up screen (Reservation ➜ Reservation Summary ➜ ST badge).
Storage Details Report
A new Dynamic report, Storage Details, has been added to the Housekeeping section of the Reporting screen (Reports ➜ Dynamic Reports ➜ Housekeeping ➜ Storage Details) that allows users to track the storage tickets created for reservations.
System Changes
To support this enhancement, the following changes have been made:
-
A new option, Storage, has been added to the Rooms Mgmt menu.
-
A new badge, ST, has been added to the Reservation Summary section of reservations.
-
A Dynamic report, Storage Details, has been added to the Housekeeping section of the Reporting screen (Reports ➜ Dynamic Reports ➜ Housekeeping ➜ Storage Details).